TUNER AND AMP UNIT (TAU) BRACKET REMOVAL/INSTALLATION
id092000014300
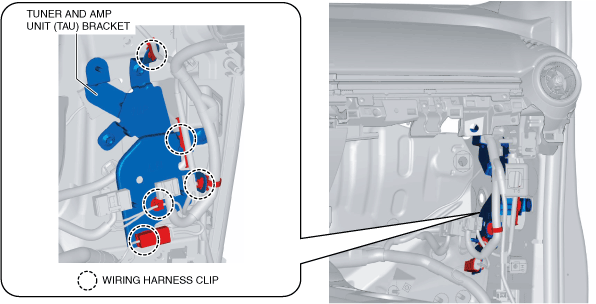
L.H.D.
1. Disconnect the negative battery cable. (See NEGATIVE BATTERY CABLE DISCONNECTION/CONNECTION.)
2. Remove the following parts:
- (1) Front scuff plate (RH) (See FRONT SCUFF PLATE REMOVAL/INSTALLATION.)
- (2) Front side trim (RH) (See FRONT SIDE TRIM REMOVAL/INSTALLATION.)
- (3) Glove compartment (See GLOVE COMPARTMENT REMOVAL/INSTALLATION.)
- (4) Center panel (See CENTER PANEL REMOVAL/INSTALLATION.)
- (5) Dashboard under cover (See DASHBOARD UNDER COVER REMOVAL/INSTALLATION.)
- (6) Passenger-side lower panel (See PASSENGER-SIDE LOWER PANEL REMOVAL/INSTALLATION.)
- (7) Parking assist unit (with parking assist system) (See PARKING ASSIST UNIT REMOVAL/INSTALLATION.)
- (8) Blower unit (See BLOWER UNIT REMOVAL/INSTALLATION.)
- (9) Tuner and amp unit (TAU) component (See TUNER AND AMP UNIT (TAU) REMOVAL/INSTALLATION.)
3. Pull out the wiring harness clip.
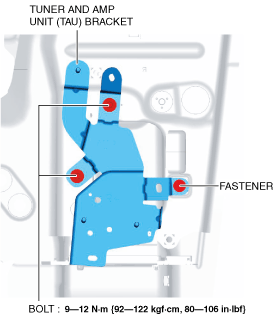
4. Remove the fastener.
5. Remove the bolts.
6. Remove the TAU bracket.
7. Install in the reverse order of removal.
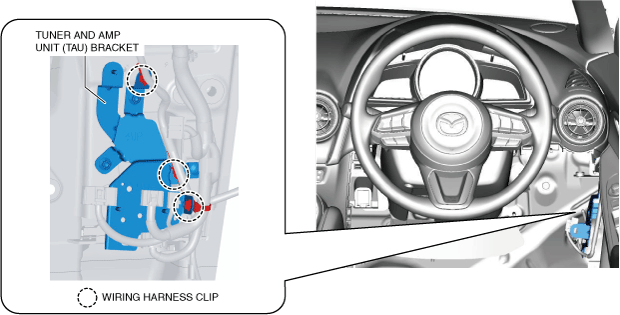
R.H.D.
1. Disconnect the negative battery cable. (See NEGATIVE BATTERY CABLE DISCONNECTION/CONNECTION.)
2. Remove the following parts:
- (1) Front scuff plate (RH) (See FRONT SCUFF PLATE REMOVAL/INSTALLATION.)
- (2) Front side trim (RH) (See FRONT SIDE TRIM REMOVAL/INSTALLATION.)
- (3) Bonnet release lever (See BONNET RELEASE LEVER AND RELEASE CABLE REMOVAL/INSTALLATION.)
- (4) Fuel-filler lid opener lever (See FUEL-FILLER LID OPENER AND LEVER REMOVAL/INSTALLATION.)
- (5) Driver-side lower panel (See DRIVER-SIDE LOWER PANEL REMOVAL/INSTALLATION.)
- (6) Tuner and amp unit (TAU) component (See TUNER AND AMP UNIT (TAU) REMOVAL/INSTALLATION.)
3. Pull out the wiring harness clip.
4. Remove the fastener.
5. Remove the bolts.
6. Remove the TAU bracket.
7. Install in the reverse order of removal.