BEEP SOUND ADJUSTMENT
id092200024100
With Parking Sensor Switch
-
Note
-
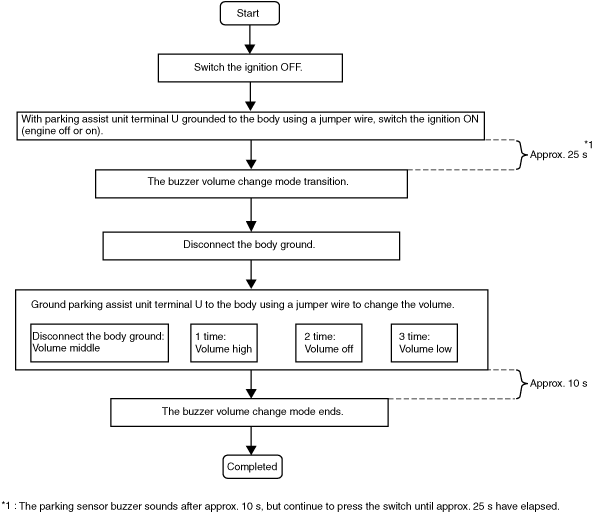
• The parking buzzer volume change mode is activated by operating the parking sensor switch and ignition using the specified procedure.
• While in the parking buzzer volume change mode, the parking buzzer sounds for approx. 1 s when activating the mode and the parking sensor indicator flashes while activating the mode. If the parking buzzer does not sound or the parking sensor indicator does not flash, the procedure for activating the parking buzzer volume change mode may have been performed incorrectly. Switch the ignition off and repeat the procedure from Step 1.
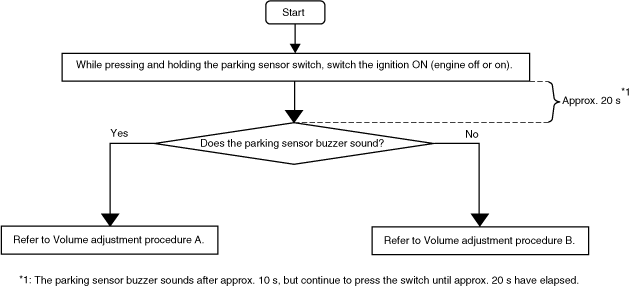
1. Perform the following procedure to determine the correct adjustment procedure.
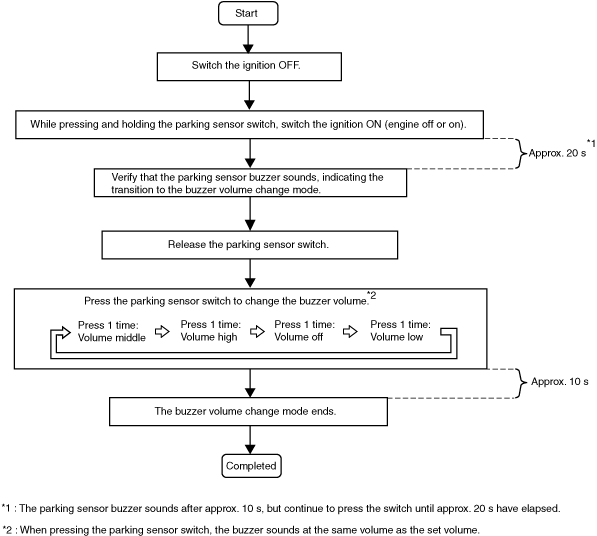
Volume adjustment procedure A
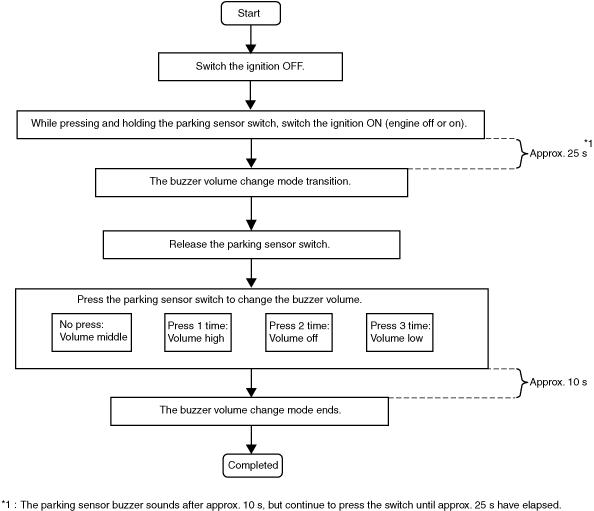
Volume adjustment procedure B
Without Parking Sensor Switch
L.H.D.
1. Disconnect the negative battery cable. (See NEGATIVE BATTERY CABLE DISCONNECTION/CONNECTION.)
2. Remove the following parts:
- (1) Front scuff plate (RH) (See FRONT SCUFF PLATE REMOVAL/INSTALLATION.)
-
- (2) Front side trim (RH) (See FRONT SIDE TRIM REMOVAL/INSTALLATION.)
-
- (3) Glove compartment (See GLOVE COMPARTMENT REMOVAL/INSTALLATION.)
-
- (4) Center panel (See CENTER PANEL REMOVAL/INSTALLATION.)
-
- (5) Dashboard under cover (See DASHBOARD UNDER COVER REMOVAL/INSTALLATION.)
-
- (6) Passenger-side lower panel (See PASSENGER-SIDE LOWER PANEL REMOVAL/INSTALLATION.)
-
3. Connect the negative battery cable. (See NEGATIVE BATTERY CABLE DISCONNECTION/CONNECTION.)
4. Perform the following procedure to determine the correct adjustment procedure.
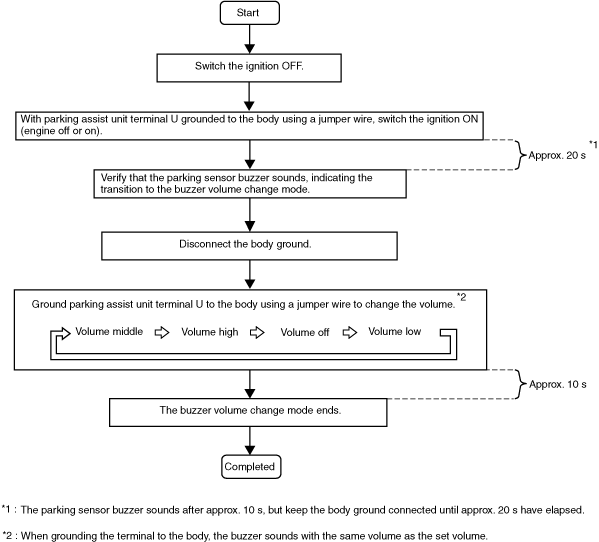
Volume adjustment procedure C
Volume adjustment procedure D
R.H.D.
1. Disconnect the negative battery cable. (See NEGATIVE BATTERY CABLE DISCONNECTION/CONNECTION.)
2. Remove the following parts:
- (1) Front scuff plate (RH) (See FRONT SCUFF PLATE REMOVAL/INSTALLATION.)
-
- (2) Front side trim (RH) (See FRONT SIDE TRIM REMOVAL/INSTALLATION.)
-
- (3) Bonnet release lever (See BONNET RELEASE LEVER AND RELEASE CABLE REMOVAL/INSTALLATION.)
-
- (4) Fuel-filler lid opener lever (See FUEL-FILLER LID OPENER AND LEVER REMOVAL/INSTALLATION.)
-
- (5) Driver-side lower panel (See DRIVER-SIDE LOWER PANEL REMOVAL/INSTALLATION.)
-
3. Connect the negative battery cable. (See NEGATIVE BATTERY CABLE DISCONNECTION/CONNECTION.)
4. Perform the following procedure to determine the correct adjustment procedure.
Volume adjustment procedure C
Volume adjustment procedure D