|
am2zzw00000394
SUPPLIER IDENTIFICATION PROCEDURE [AUDIO]
id0902f6358400
Identification Using Label or Inscribed Lettering
1. Disconnect the negative battery cable.
2. Remove the following parts:
3. Verify the supplier indicated on the label attached on each unit.
am2zzw00000394
|
Verify Using the Diagnostic Assist Function
1. Turn the ignition switch to the ACC or ON position.
2. Turn the center panel unit power to on.
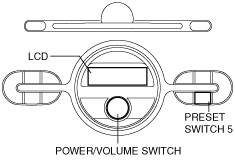
3. While pressing the POWER/VOLUME switch, simultaneously press the Preset switch 5 for approx. 3 s or more.
am2zzw00003761
|
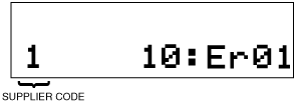
4. Identify the supplier code by referring to the LCD.
am2zzw00000725
|
|
Supplier code |
Supplier name |
|---|---|
|
01
|
SANYO Automedia
|
|
02
|
Panasonic
|
|
03
|
Clarion
|
|
04
|
Pioneer
|
am2zzw00000726
|
5. Cancel the diagnostic assist function by either turning off the center panel unit power or by turning the ignition switch to the LOCK position.