1. : Mazda SST number
2. : Global SST number
1: 49 UN30 3050
2: 303-050
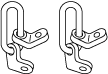
Engine lifting bracket
1: 49 L017 5A0
2: –
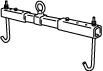
Support hanger
ENGINE DISASSEMBLY/ASSEMBLY [SKYACTIV-X 2.0]
id0110hf800500
Special Service Tool (SST)
|
1. : Mazda SST number
2. : Global SST number
|
|||
|
1: 49 UN30 3050
2: 303-050
Engine lifting bracket
|
|
1: 49 L017 5A0
2: –
Support hanger
|
|
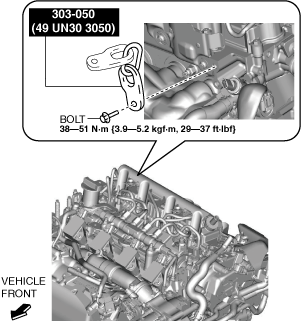
1. Install the SST using part number 99794 1025 or an M10 x 1.25, length 25 mm {0.98 in} bolt as shown in the figure.
2. Engage the hooks of the SST (49 L017 5A0) to the SST (49 UN30 3050).
Engine front side
am3zzw00032263
|
Engine rear side
am3zzw00032264
|
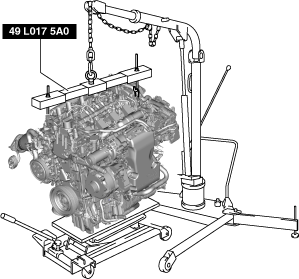
3. To ensure the safety of the work (control engine sway), set a hoist as shown in the figure.
am30jw00000473
|
4. Remove the following parts.
5. Remove the starter. (See STARTER REMOVAL/INSTALLATION [SKYACTIV-X 2.0].)
6. Remove the coolant switching valve (CSV). (See COOLANT SWITCHING VALVE (CSV) REMOVAL/INSTALLATION [SKYACTIV-X 2.0].)
7. Remove the integrated starter generator (ISG). (See INTEGRATED STARTER GENERATOR (ISG) REMOVAL/INSTALLATION [SKYACTIV-X 2.0].)
8. Remove the following parts.
9. Remove the fuel injectors. (See FUEL INJECTOR REMOVAL/INSTALLATION [SKYACTIV-X 2.0].)
10. Remove the camshaft position (CMP) sensor. (See CAMSHAFT POSITION (CMP) SENSOR REMOVAL/INSTALLATION [SKYACTIV-X 2.0].)
11. Remove the high pressure fuel pump.(See HIGH PRESSURE FUEL PUMP REMOVAL/INSTALLATION [SKYACTIV-X 2.0].)
12. Remove the electric variable valve timing motor/driver. (See ELECTRIC VARIABLE VALVE TIMING MOTOR/DRIVER REMOVAL/INSTALLATION [SKYACTIV-X 2.0].)
13. Remove the oil filter. (See OIL FILTER REPLACEMENT [SKYACTIV-X 2.0].)
14. Remove the engine oil temperature sensor/engine oil pressure sensor. (See ENGINE OIL TEMPERATURE SENSOR/ENGINE OIL PRESSURE SENSOR REMOVAL/INSTALLATION [SKYACTIV-X 2.0].)
15. Remove the crankshaft position (CKP) sensor. (See CRANKSHAFT POSITION (CKP) SENSOR REMOVAL/INSTALLATION [SKYACTIV-X 2.0].)
16. Remove the dipstick.
17. Remove the ignition coil. (See IGNITION COIL REMOVAL/INSTALLATION [SKYACTIV-X 2.0].)
18. Remove the emission harness.
19. Remove the electric water pump.(See ELECTRIC WATER PUMP REMOVAL/INSTALLATION [SKYACTIV-X 2.0].)
20. Remove the water pump. (See WATER PUMP REMOVAL/INSTALLATION [SKYACTIV-X 2.0].)
21. Remove the short cord of the engine oil level sensor. (See ENGINE OIL LEVEL SENSOR REMOVAL/INSTALLATION [SKYACTIV-X 2.0].)
22. Assemble in the reverse order of disassembly.