|
am3zzw00007145
OIL PUMP REMOVAL/INSTALLATION [ZY, Z6]
id0111a0800600
1. Remove the battery cover. (See BATTERY REMOVAL/INSTALLATION [ZY, Z6].)
2. Disconnect the negative battery cable.
3. Remove the front wheel and tire (RH). (See GENERAL PROCEDURES (SUSPENSION).)
4. Remove the aerodynamic under cover No.2 and splash shield as a single unit. (See AERODYNAMIC UNDER COVER NO.2 REMOVAL/INSTALLATION.) (See SPLASH SHIELD REMOVAL/INSTALLATION.)
5. Drain the engine coolant. (See ENGINE COOLANT REPLACEMENT [ZY, Z6].)
6. Perform the following procedure.
7. Remove the coolant reserve tank with the hoses still connected. (See COOLANT RESERVE TANK REMOVAL/INSTALLATION [ZY, Z6].)
8. Remove the ignition coils. (See IGNITION COIL REMOVAL/INSTALLATION [ZY, Z6].)
9. Set the wiring harness out of the way.
10. Remove the nut shown in the figure and set the power steering pipe component out of the way.
am3zzw00007145
|
11. Set the cooler pipe and the cooler hose out of the way. (With A/C) (See REFRIGERANT LINE REMOVAL/INSTALLATION.)
12. Remove the drive belt. (See DRIVE BELT REMOVAL/INSTALLATION [ZY, Z6].)
13. Disconnect the crankshaft position (CKP) sensor connector.
14. Remove the generator. (See GENERATOR REMOVAL/INSTALLATION [ZY, Z6].)
15. Remove the water pump. (See WATER PUMP REMOVAL/INSTALLATION [ZY, Z6].)
16. Disconnect the ground cable from the No.3 engine mount.
17. Remove the timing chain. (See TIMING CHAIN REMOVAL/INSTALLATION [ZY, Z6].)
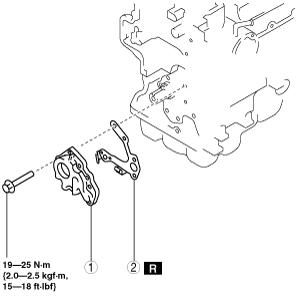
18. Remove in the order indicated in the table.
19. Install in the reverse order of removal.
20. Refill the engine coolant. (See ENGINE COOLANT REPLACEMENT [ZY, Z6].)
21. Start the engine and confirm that there is no oil leakage.
22. Inspect the oil level. (See ENGINE OIL LEVEL INSPECTION [ZY, Z6].)
23. Inspect for engine coolant leakage. (See ENGINE COOLANT LEAKAGE INSPECTION [ZY, Z6].)
24. Inspect for the ignition timing and idle speed. (See ENGINE TUNE-UP [ZY, Z6].)
25. Inspect the oil pressure. (See OIL PRESSURE INSPECTION [ZY, Z6].)
am2zzw00001680
|
|
1
|
Oil pump
|
|
2
|
Oil pump gasket
|
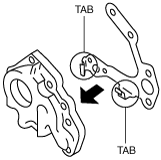
Oil Pump Gasket Installation Note
1. Install the gasket to the oil pump using the oil pump gasket tabs (2 locations).
am2zzw00001681
|