CLUTCH COVER INSPECTION [J65M-R]


id0510008008a2

1.  Disconnect the negative battery cable.

2.  Remove the following parts:

(1)  Battery component (ex: battery, battery tray and PCM component)
(2)  Air cleaner component (See INTAKE-AIR SYSTEM REMOVAL/INSTALLATION [MZ-CD 1.6 (Y6)].)
(3)  Inter cooler pipe bracket (See INTAKE-AIR SYSTEM REMOVAL/INSTALLATION [MZ-CD 1.6 (Y6)].)
(4)  Catalytic converter bracket (See EXHAUST SYSTEM REMOVAL/INSTALLATION [MZ-CD 1.6 (Y6)].)
(5)  Front tires (See GENERAL PROCEDURES (SUSPENSION).)
(6)  Splash shield (See SPLASH SHIELD REMOVAL/INSTALLATION.)
(7)  Aerodynamic under cover No.2 (See AERODYNAMIC UNDER COVER NO.2 REMOVAL/INSTALLATION.)

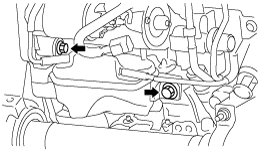
3.  Cut off the vacuum chamber installation bolt and set the vacuum chamber aside so that it does not interfere with the servicing.

am3zzw00005914

4.  Remove the starter.

5.  Drain the transaxle oil into a suitable container. (See TRANSAXLE OIL REPLACEMENT [J65M-R].)

6.  Remove the manual transaxle. (See MANUAL TRANSAXLE REMOVAL/INSTALLATION [J65M-R].)

7.  Remove the clutch cover. (See CLUTCH UNIT REMOVAL/INSTALLATION [J65M-R].)

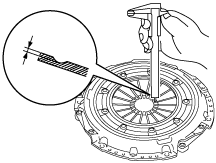
8.  Measure the wear of the diaphragm spring fingers.

am3zzw00006216

•  If it exceeds the maximum specification, replace the clutch cover. (See CLUTCH UNIT REMOVAL/INSTALLATION [J65M-R].)
Clutch cover diaphragm spring fingers maximum depth
0.6 mm {0.02 in} max.

9.  Measure the flatness of the pressure plate with a straight edge and a feeler gauge.

am3zzw00006217

•  If it exceeds the maximum specification, replace the clutch cover. (See CLUTCH UNIT REMOVAL/INSTALLATION [J65M-R].)
Maximum clearance of flatness of the pressure plate
0.3 mm {0.01 in} max.

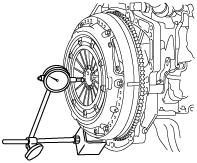
10.  When checking the diaphragm spring fingers, mount a dial gauge on the cylinder block.

am3zzw00006218

11.  Rotate the flywheel and check for misaligned diaphragm spring fingers.

•  If it exceeds the maximum specification, replace the clutch cover. (See CLUTCH UNIT REMOVAL/INSTALLATION [J65M-R].)
Clutch cover diaphragm spring fingers maximum misalignment
1.0 mm {0.039 in} max.

12.  Install in the reverse order of removal.

13.  Add the specified amount of specified transaxle oil. (See TRANSAXLE OIL REPLACEMENT [J65M-R].)

14.  Perform the clutch fluid line air bleeding. (See CLUTCH FLUID AIR BLEEDING/REPLACEMENT.)

Note
•  If the transaxle is overhauled and installed to the vehicle, perform the "INSPECTION AFTER TRANSAXLE INSTALLATION" and verify that there is no abnormality. (See INSPECTION AFTER TRANSAXLE INSTALLATION [J65M-R].)