|
am3zzw00012516
EXHAUST SYSTEM REMOVAL/INSTALLATION [MZ-CD 1.6 (Y6)]
id0115c3800200
1. Remove the battery cover. (See BATTERY REMOVAL/INSTALLATION[MZ-CD 1.6 (Y6)].)
2. Disconnect the negative battery cable. (See BATTERY REMOVAL/INSTALLATION[MZ-CD 1.6 (Y6)].)
3. Remove the engine cover. (See ENGINE COVER REMOVAL/INSTALLATION [MZ-CD 1.6 (Y6) (EURO4 emission level)].)
4. Remove the aerodynamic under cover No.2. (See AERODYNAMIC UNDER COVER NO.2 REMOVAL/INSTALLATION.)
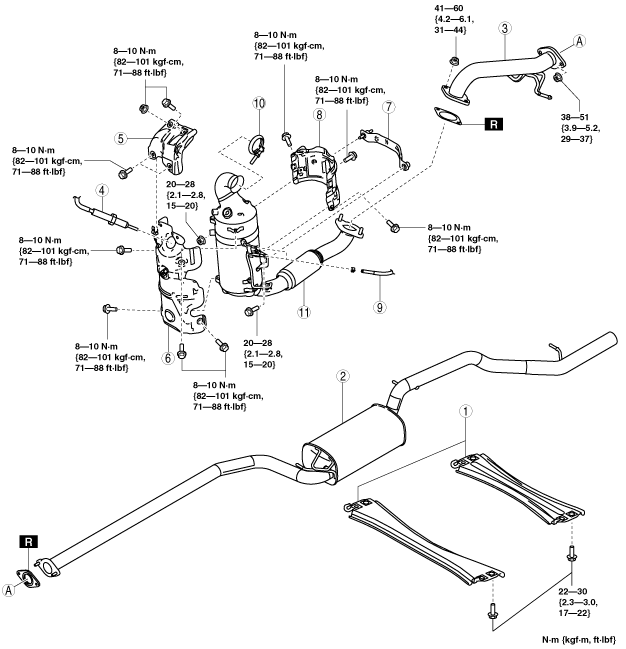
5. Remove in the order indicated in the table.
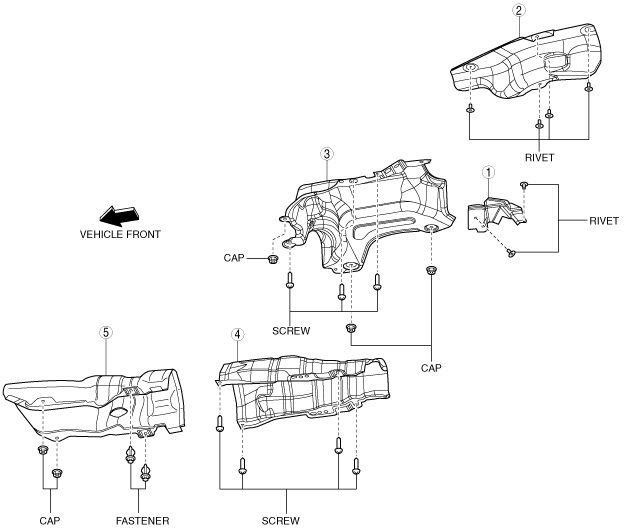
6. Remove the exhaust system insulator. (See Exhaust System Insulator Removal/Installation Note.)
7. Install in the reverse order of removal.
EURO4 emission level
am3zzw00012516
|
|
1
|
Tunnel member
|
|
2
|
Main silencer
(See Main Silencer Removal Note.)
|
|
3
|
Hanger bracket No.1
|
|
4
|
Flexible pipe
(See Flexible Pipe Removal Note.)
|
|
5
|
Exhaust gas temperature sensor
|
|
6
|
Catalytic converter front insulator
|
|
7
|
Hanger bracket No.2
|
|
8
|
Protector bracket
|
|
9
|
Catalytic converter rear insulator
|
|
10
|
Exhaust gas pressure hose
|
|
11
|
Clamp
(See Clamp Installation Note.)
|
|
12
|
Catalytic converter
|
|
13
|
Exhaust manifold insulator
|
|
14
|
Turbocharger
(See Turbocharger Removal Note.)
|
|
15
|
Exhaust manifold
|
|
16
|
Exhaust manifold gasket
|
EURO5 emission level (Step1)
am3zzw00012517
|
|
1
|
Tunnel member
|
|
2
|
Main silencer
(See Main Silencer Removal Note.)
|
|
3
|
Front pipe
|
|
4
|
A/F sensor
|
|
5
|
Catalytic converter upper insulator
|
|
6
|
Catalytic converter front insulator
|
|
7
|
Protector bracket
|
|
8
|
Catalytic converter rear insulator
|
|
9
|
Exhaust gas pressure hose
|
|
10
|
Clamp
|
|
11
|
Catalytic converter
|
EURO5 emission level (Step2)
am3zzw00012518
|
|
1
|
Exhaust manifold insulator No.1
|
|
2
|
Oil inlet pipe
|
|
3
|
Oil outlet pipe
|
|
4
|
Turbocharger
|
|
5
|
Exhaust manifold insulator No.2
|
|
6
|
Exhaust manifold
|
Exhaust System Insulator Removal/Installation Note
1. Remove in the order indicated in the table.
2. Install in the reverse order of removal.
am3zzw00012519
|
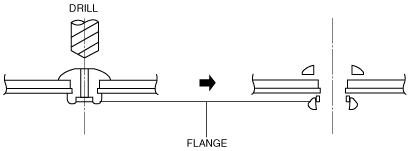
Insulator (rear No.1, No.2) removal note
1. Push out the mandrel using a hammer and punch (2—2.8 mm {0.08—0.11 in} diameter).
am3zzw00015675
|
2. Remove the flange using a drill (5 mm {0.20 in} drill bit).
am3zzw00015676
|
Main Silencer Removal Note
1. Remove the following parts:
2. Remove the main silencer.
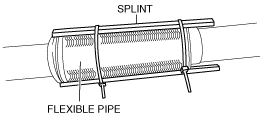
Flexible Pipe Removal Note
1. Support the flexible pipe with a support wrap or splint as shown in the figure.
am3zzw00007817
|
2. Remove the flexible pipe.
Catalytic Converter Front Insulator Removal Note
1. Remove the air pipe and charge air cooler inlet hose. (See INTAKE-AIR SYSTEM REMOVAL/INSTALLATION [MZ-CD 1.6 (Y6)].)
2. Remove the catalytic converter front insulator.
Catalytic Converter Rear Insulator Removal Note
1. Remove the catalytic converter and catalytic converter rear insulator as a single unit.
2. Remove the catalytic converter rear insulator
Turbocharger Replacement Note
Inspection for turbocharger replacement
1. Remove the oil inlet pipe and the oil inlet pipe installation bolts.
2. Verify that there is no blockage caused by particles in the oil inlet pipe and on the oil inlet pipe installation bolts.
3. Verify that there are no particles in the lubrication system.
4. Inspect the oil pressure. (See OIL PRESSURE INSPECTION [MZ-CD 1.6 (Y6)].)
5. After determining the reason for the turbocharger damage install a new turbocharger.
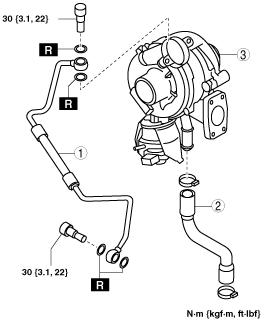
Turbocharger Removal Note
1. Remove the air outlet hose. (See INTAKE-AIR SYSTEM REMOVAL/INSTALLATION [MZ-CD 1.6 (Y6)].)
2. Remove the turbocharger outlet pipe and charge air cooler inlet hose as a single unit. (See INTAKE-AIR SYSTEM REMOVAL/INSTALLATION [MZ-CD 1.6 (Y6)].)
3. Disconnect the variable boost control valve actuator connector.
4. Disconnect the vacuum hose.
5. Remove the turbocharger and oil inlet pipe and oil outlet pipe as a single unit.
6. Remove in the order indicated in the table.
am3zzw00007818
|
|
1
|
Oil inlet pipe
|
|
2
|
Oil outlet pipe
|
|
3
|
Turbocharger
|
Clamp Installation Note
1. Install the clamp as shown in the figure.
am3zzw00007819
|