CLUTCH RELEASE CYLINDER REMOVAL/INSTALLATION [J65M-R]
id0510008013m3
-
Note
-
• Wrap the primary shaft splines with adhesive tape to protect the primary shaft oil seal.
• Apply sealer to the mating surfaces of the clutch housing.
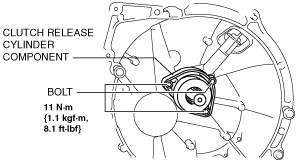
• Install a new clutch release cylinder component.
-
Caution
-
• Do not lubricate the clutch release cylinder.
1. Disconnect the negative battery cable.
2. Remove the following parts:
- (1) Battery component (ex: battery, battery tray and PCM component)
- (2) Air cleaner component (See INTAKE-AIR SYSTEM REMOVAL/INSTALLATION [MZ-CD 1.6 (Y6)].)
- (3) Inter cooler pipe bracket (See INTAKE-AIR SYSTEM REMOVAL/INSTALLATION [MZ-CD 1.6 (Y6)].)
- (4) Catalytic converter bracket (See EXHAUST SYSTEM REMOVAL/INSTALLATION [MZ-CD 1.6 (Y6)].)
- (5) Front tires (See GENERAL PROCEDURES (SUSPENSION).)
- (6) Splash shield (See SPLASH SHIELD REMOVAL/INSTALLATION.)
- (7) Aerodynamic under cover No.2 (See AERODYNAMIC UNDER COVER NO.2 REMOVAL/INSTALLATION.)
3. Cut off the vacuum chamber installation bolt and set the vacuum chamber aside so that it does not interfere with the servicing.
4. Remove the starter.
5. Drain the transaxle oil into a suitable container. (See TRANSAXLE OIL REPLACEMENT [J65M-R].)
6. Remove the transaxle. (See MANUAL TRANSAXLE REMOVAL/INSTALLATION [J65M-R].)
-
Note
-
• Only remove the clutch release cylinder component if it is damaged or leakage.
7. Remove the bolt.
8. Remove the clutch release cylinder component.
9. Install in the reverse order of removal.
10. Add the specified amount of specified transaxle oil. (See TRANSAXLE OIL REPLACEMENT [J65M-R].)
11. Perform the clutch fluid line air bleeding. (See CLUTCH FLUID AIR BLEEDING/REPLACEMENT.)
-
Note
-
• If the transaxle is overhauled and installed to the vehicle, perform the "INSPECTION AFTER TRANSAXLE INSTALLATION" and verify that there is no abnormality. (See
CLUTCH UNIT REMOVAL/INSTALLATION [J65M-R].)