INTRUDER SENSOR REMOVAL/INSTALLATION
id091400809400
1. Disconnect the negative battery cable.
2. Remove the following parts:
- (1) Sunroof seaming welt (vehicles with sunroof)
-
- (2) Console (4SD) (See CONSOLE REMOVAL/INSTALLATION.)
-
- (3) A-pillar trim (See A-PILLAR TRIM REMOVAL/INSTALLATION.)
-
- (4) Upper anchor of the front seat belt (See FRONT SEAT BELT REMOVAL/INSTALLATION.)
-
- (5) Front scuff plate (See FRONT SCUFF PLATE REMOVAL/INSTALLATION.)
-
- (6) Rear scuff plate (See REAR SCUFF PLATE REMOVAL/INSTALLATION.)
-
- (7) B-pillar lower trim (See B-PILLAR LOWER TRIM REMOVAL/INSTALLATION.)
-
- (8) B-pillar upper trim (See B-PILLAR UPPER TRIM REMOVAL/INSTALLATION.)
-
- (9) Rear seat (See REAR SEAT REMOVAL/INSTALLATION.)
-
- (10) Tire house trim (See TIRE HOUSE TRIM REMOVAL/INSTALLATION.)
-
- (11) Trunk side upper trim (5HB) (See TRUNK SIDE UPPER TRIM REMOVAL/INSTALLATION.)
-
- (12) C-pillar trim (See C-PILLAR TRIM REMOVAL/INSTALLATION.)
-
- (13) Map light (See MAP LIGHT REMOVAL/INSTALLATION.)
-
- (14) Interior light (See INTERIOR LIGHT REMOVAL/INSTALLATION.)
-
- (15) Sunvisor (See SUNVISOR REMOVAL/INSTALLATION.)
-
- (16) Assist handle (See ASSIST HANDLE REMOVAL/INSTALLATION.)
-
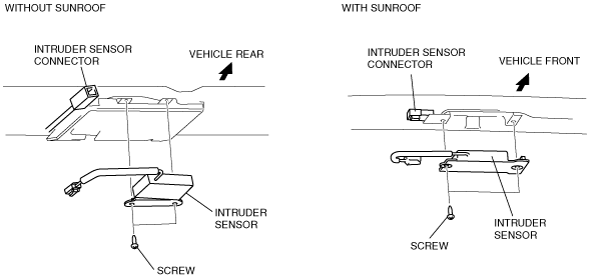
3. Disconnect the intruder sensor.
4. Remove the screws.
5. Remove the intruder sensor.
6. Install in the reverse order of removal.