|
am6xuw00006166
AIR INTAKE ACTUATOR REMOVAL/INSTALLATION [MANUAL AIR CONDITIONER]
id0740a2801400
L.H.D.
1. Disconnect the negative battery cable. (See NEGATIVE BATTERY CABLE DISCONNECTION/CONNECTION [MZR 1.6].)(See NEGATIVE BATTERY CABLE DISCONNECTION/CONNECTION [SKYACTIV-G 1.5, SKYACTIV-G 2.0, SKYACTIV-G 2.5].)(See NEGATIVE BATTERY CABLE DISCONNECTION/CONNECTION [SKYACTIV-D 1.5].)(See NEGATIVE BATTERY CABLE DISCONNECTION/CONNECTION [SKYACTIV-D 2.2].)
2. Remove the glove compartment. (See GLOVE COMPARTMENT REMOVAL/INSTALLATION.)
3. Remove the following parts (with center display)(with Bluetooth® system):
4. Disconnect the air intake actuator connector.
am6xuw00006166
|
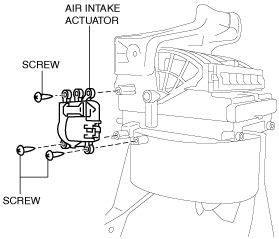
5. Remove the screws, then remove the air intake actuator.
6. Install in the reverse order of removal.
R.H.D.
1. Disconnect the negative battery cable. (See NEGATIVE BATTERY CABLE DISCONNECTION/CONNECTION [MZR 1.6])(See NEGATIVE BATTERY CABLE DISCONNECTION/CONNECTION [SKYACTIV-G 1.5, SKYACTIV-G 2.0, SKYACTIV-G 2.5].)(See NEGATIVE BATTERY CABLE DISCONNECTION/CONNECTION [SKYACTIV-D 1.5].)(See NEGATIVE BATTERY CABLE DISCONNECTION/CONNECTION [SKYACTIV-D 2.2].)
2. Remove the following parts:
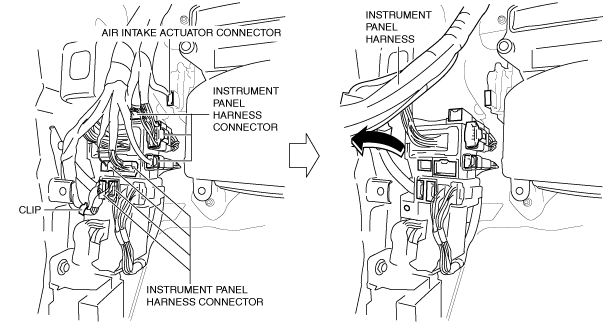
3. Disconnect the instrument panel harness connector.
am3zzw00015149
|
4. Remove the clip.
5. Disconnect the air intake actuator connector.
6. Set the instrument panel harness out of the way as shown in the figure.
7. Remove the screw, then remove the air intake actuator.
am3zzw00015150
|
8. Install in the reverse order of removal.