|
am3zzw00020703
LOWER PANEL REMOVAL/INSTALLATION
id091700801100
Driver-side
1. Set the wheel blocks for both the front and rear wheels (without electric parking brake).
2. Disconnect the negative battery cable. (See NEGATIVE BATTERY CABLE DISCONNECTION/CONNECTION [MZR 1.6].) (See NEGATIVE BATTERY CABLE DISCONNECTION/CONNECTION [SKYACTIV-G 1.5, SKYACTIV-G 2.0, SKYACTIV-G 2.5].) (See NEGATIVE BATTERY CABLE DISCONNECTION/CONNECTION [SKYACTIV-D 1.5].) (See NEGATIVE BATTERY CABLE DISCONNECTION/CONNECTION [SKYACTIV-D 2.2].)
3. Shift the selector lever from the P position to the D position (ATX).
4. Remove the following parts:
5. Partially peel back the seaming welt.
6. Remove the bolt.
am3zzw00020703
|
7. Move the driver-side lower panel in the order of arrows (1), (2), (3), (4), and (5) shown in the figure, and remove the clips, tabs, hook, pin, and guide.
8. Disconnect the cluster switch connector.
9. Disconnect the trunk lid opener switch connector (with trunk lid opener switch).
10. Install in the reverse order of removal.
Passenger-side
Removal
1. Disconnect the negative battery cable. (See NEGATIVE BATTERY CABLE DISCONNECTION/CONNECTION [MZR 1.6].) (See NEGATIVE BATTERY CABLE DISCONNECTION/CONNECTION [SKYACTIV-G 1.5, SKYACTIV-G 2.0, SKYACTIV-G 2.5].) (See NEGATIVE BATTERY CABLE DISCONNECTION/CONNECTION [SKYACTIV-D 1.5].) (See NEGATIVE BATTERY CABLE DISCONNECTION/CONNECTION [SKYACTIV-D 2.2].)
2. Remove the following parts:
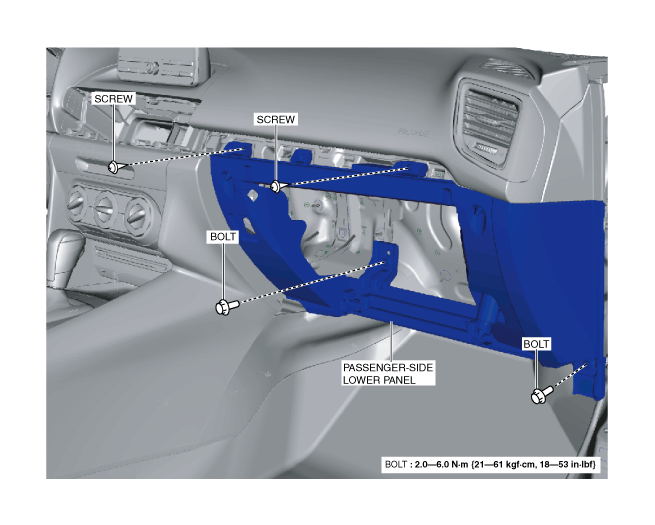
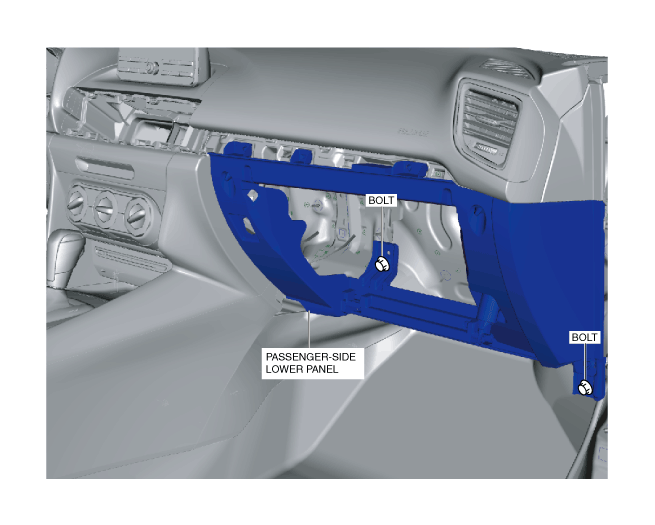
3. Remove the bolts.
am3zzw00020704
|
4. Remove the screws.
5. Partially peel back the seaming welt.
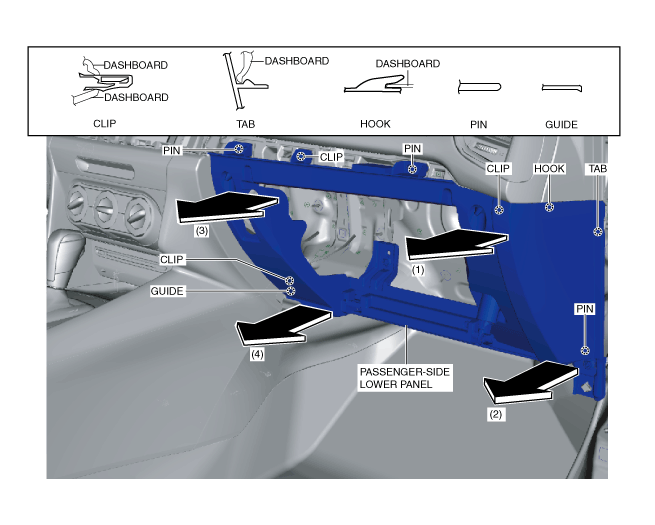
6. Move the passenger-side lower panel in the order of the arrows (1), (2), (3), and (4) shown in the figure, and remove it while detaching the clips, tab, hook, pins, and guide.
am3zzw00018576
|
7. Disconnect the passenger air bag deactivation (PAD) switch connector (with passenger air bag deactivation (PAD) switch).
Installation
1. Connect the passenger air bag deactivation (PAD) switch connector (with passenger air bag deactivation (PAD) switch).
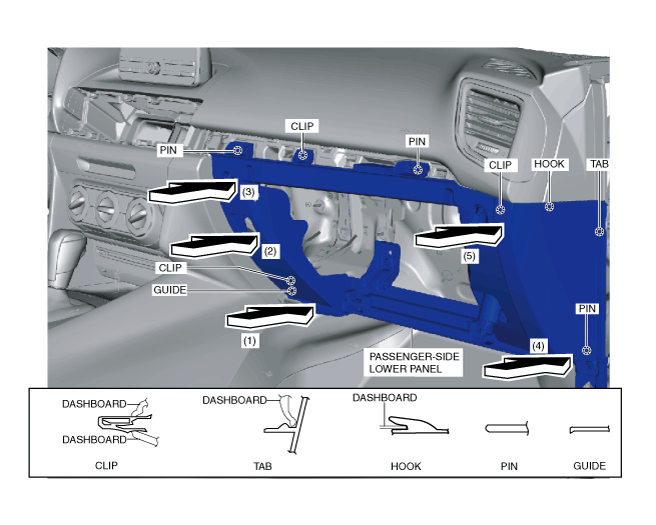
2. Install the clips, tab, hook, pins, and guide while pressing the passenger-side lower panel in the order of the arrows (1), (2), (3), (4), and (5) shown in the figure.
am3zzw00020705
|
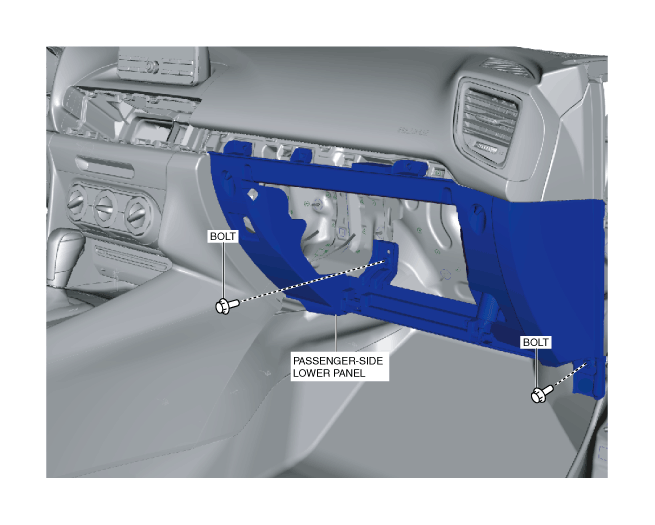
3. Install the screw (1).
am3zzw00020706
|
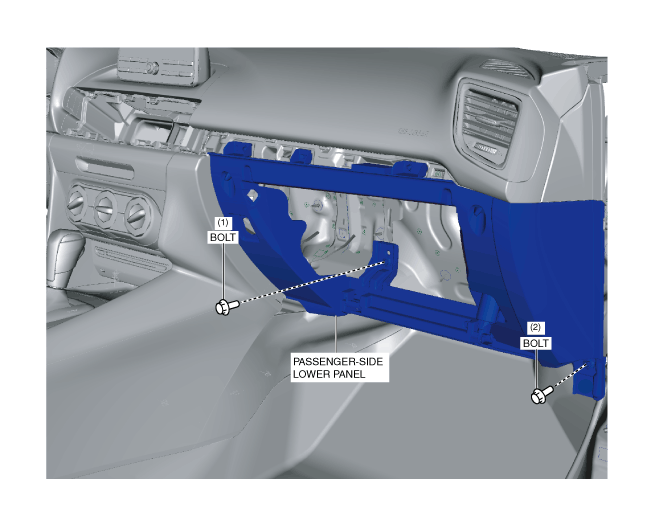
4. Install the screw (2).
5. Install the bolt (1).
6. Install the bolt (2).
7. Install the following parts:
8. Connect the negative battery cable. (See NEGATIVE BATTERY CABLE DISCONNECTION/CONNECTION [MZR 1.6].) (See NEGATIVE BATTERY CABLE DISCONNECTION/CONNECTION [SKYACTIV-G 1.5, SKYACTIV-G 2.0, SKYACTIV-G 2.5].) (See NEGATIVE BATTERY CABLE DISCONNECTION/CONNECTION [SKYACTIV-D 1.5].) (See NEGATIVE BATTERY CABLE DISCONNECTION/CONNECTION [SKYACTIV-D 2.2].)
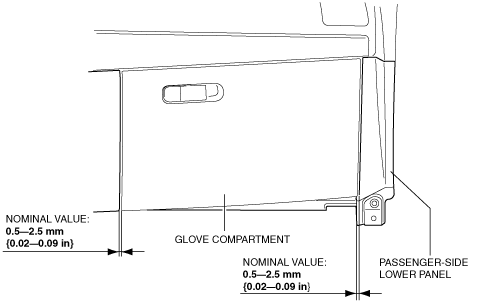
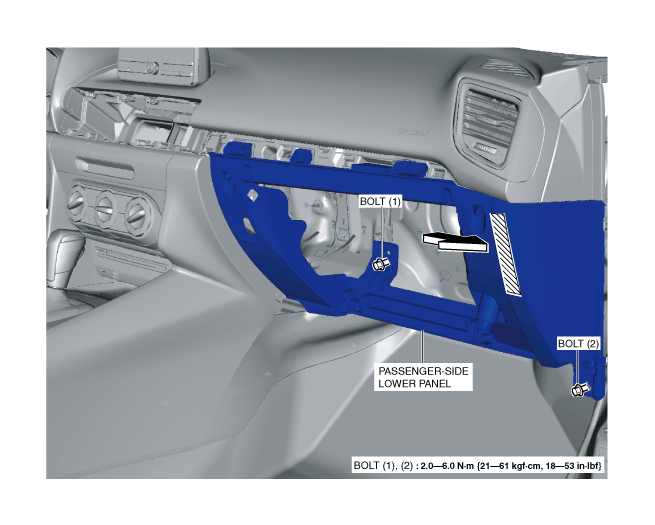
9. After installing the passenger-side lower panel and glove compartment, measure the clearance, and verify that the measurement value is within the specification shown in the figure.
am6zzw00010473
|
Passenger-side lower panel adjustment
1. Remove the glove compartment. (See GLOVE COMPARTMENT REMOVAL/INSTALLATION.)
2. Loosen the bolts.
am3zzw00018579
|
3. Remove the bolts.
am3zzw00018580
|
4. Install the bolts in the order of (1), (2) shown in the figure.
am3zzw00018581
|
5. Install the bolts in the order of (1), (2) while pressing the shaded area shown in the figure for the passenger-side lower panel.
am3zzw00020707
|
6. Install the glove compartment, measure the clearance between the glove compartment and passenger-side lower panel again, and verify that it is within the specification.