LIFTGATE HINGE REMOVAL/INSTALLATION
id091100521300
1. Disconnect the negative battery cable. (See NEGATIVE BATTERY CABLE DISCONNECTION/CONNECTION [MZR 1.6].) (See NEGATIVE BATTERY CABLE DISCONNECTION/CONNECTION [SKYACTIV-G 1.5, SKYACTIV-G 2.0, SKYACTIV-G 2.5].) (See NEGATIVE BATTERY CABLE DISCONNECTION/CONNECTION [SKYACTIV-D 2.2].) (See NEGATIVE BATTERY CABLE DISCONNECTION/CONNECTION [SKYACTIV-D 1.5].)
2. Remove the following parts:
- (1) Trunk covering (See TRUNK COVERING REMOVAL/INSTALLATION.)
- (2) Trunk board (See TRUNK BOARD REMOVAL/INSTALLATION.)
- (3) Trunk end trim (See TRUNK END TRIM REMOVAL/INSTALLATION.)
- (4) Rear scuff plate (See REAR SCUFF PLATE REMOVAL/INSTALLATION.)
- (5) Rear seat cushion (See REAR SEAT CUSHION REMOVAL/INSTALLATION.)
- (6) Tire house trim (See TIRE HOUSE TRIM REMOVAL/INSTALLATION.)
- (7) Trunk side upper trim (See TRUNK SIDE UPPER TRIM REMOVAL/INSTALLATION.)
- (8) Trunk side trim (LH) (See TRUNK SIDE TRIM REMOVAL/INSTALLATION.)
- (9) Rear package tray (See REAR PACKAGE TRAY REMOVAL/INSTALLATION.)
- (10) Assist handle (Rear side) (See ASSIST HANDLE REMOVAL/INSTALLATION.)
- (11) C-pillar trim (See C-PILLAR TRIM REMOVAL/INSTALLATION.)
- (12) Liftgate (See LIFTGATE REMOVAL/INSTALLATION.)
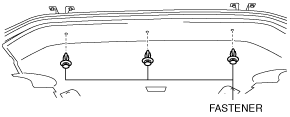
3. Remove the fasteners shown in the figure.
-
Caution
-
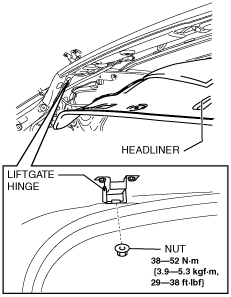
• Peeling back the headliner without supporting it may cause the headliner to bend excessively and create a fold seam. Peel back the headliner while supporting it.
4. While partially peeling back the rear part of the headliner, remove the nuts shown in the figure.
5. Remove the liftgate hinges.
6. Install in the reverse order of removal.
7. Adjust the liftgate. (See LIFTGATE ADJUSTMENT.)