 |
FRONT COMBINATION LIGHT REMOVAL/INSTALLATION
id091800800700
1. Disconnect the negative battery cable. (See NEGATIVE BATTERY CABLE DISCONNECTION/CONNECTION [SKYACTIV-G 1.5, SKYACTIV-G 2.0, SKYACTIV-G 2.5].) (See NEGATIVE BATTERY CABLE DISCONNECTION/CONNECTION [SKYACTIV-D 1.5].) (See NEGATIVE BATTERY CABLE DISCONNECTION/CONNECTION [SKYACTIV-D 2.2].) (See NEGATIVE BATTERY CABLE DISCONNECTION/CONNECTION [MZR 1.6].)
2. Remove the set plate. (See SET PLATE REMOVAL/INSTALLATION.)
3. Remove the front bumper. (See FRONT BUMPER REMOVAL.) (See FRONT BUMPER INSTALLATION.)
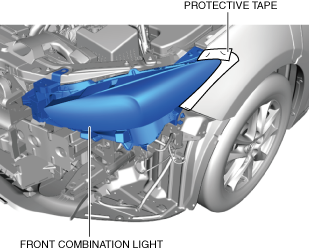
4. To prevent scratches or damage, affix protective tape to the position shown in the figure.
aaxjjw00020319
|
5. Disconnect the connector.
aaxjjw00020320
|
6. Remove the bolts. (See Bolt Installation Note.)
7. Remove the fasteners.
8. While partially bending part A of the intake air guide in the direction of arrow (1) shown in the figure, remove the front combination light in the direction of arrow (2) shown in the figure.
am3zzw00018402
|
9. Install in the reverse order of removal.
10. Adjust the headlight aiming. (See HEADLIGHT AIMING.)
Bolt Installation Note
1. Install the bolts in the order of (1), (2) and (3).
aaxjjw00020323
|