 |
am3zzw00017750
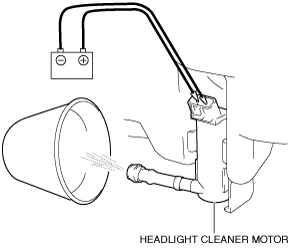
HEADLIGHT CLEANER MOTOR INSPECTION
id091900803200
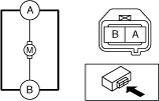
VIN: Except 3MZ
1. Disconnect the negative battery cable. (See NEGATIVE BATTERY CABLE DISCONNECTION/CONNECTION [MZR 1.6].) (See NEGATIVE BATTERY CABLE DISCONNECTION/CONNECTION [SKYACTIV-G 1.5, SKYACTIV-G 2.0, SKYACTIV-G 2.5].) (See NEGATIVE BATTERY CABLE DISCONNECTION/CONNECTION [SKYACTIV-D 2.2].)(See NEGATIVE BATTERY CABLE DISCONNECTION/CONNECTION [SKYACTIV-D 1.5].)
2. Remove the set plate. (See SET PLATE REMOVAL/INSTALLATION.)
3. Remove the front bumper. (See FRONT BUMPER REMOVAL.) (See FRONT BUMPER INSTALLATION.)
4. Disconnect connector. (See HEADLIGHT CLEANER MOTOR REMOVAL/INSTALLATION.)
5. Apply battery positive voltage to headlight cleaner motor terminal B, and connect terminal A to ground.
am3zzw00017750
|
6. Verify that washer fluid sprays from the headlight cleaner motor.
am3zzw00013839
|
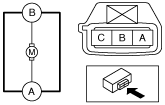
VIN: 3MZ
1. Disconnect the negative battery cable. (See NEGATIVE BATTERY CABLE DISCONNECTION/CONNECTION [SKYACTIV-G 1.5, SKYACTIV-G 2.0, SKYACTIV-G 2.5].) (See NEGATIVE BATTERY CABLE DISCONNECTION/CONNECTION [SKYACTIV-D 1.5].)
2. Remove the set plate. (See SET PLATE REMOVAL/INSTALLATION.)
3. Remove the front bumper. (See FRONT BUMPER REMOVAL.) (See FRONT BUMPER INSTALLATION.)
4. Disconnect connector. (See HEADLIGHT CLEANER MOTOR REMOVAL/INSTALLATION.)
5. Apply battery positive voltage to headlight cleaner motor terminal A, and connect terminal B to ground.
am3zzw00020161
|
6. Verify that washer fluid sprays from the headlight cleaner motor.
am3zzw00013839
|