|
am3zzw00019672
HORN INSPECTION
id092200012700
HORN LO
1. Disconnect the negative battery cable. (See NEGATIVE BATTERY CABLE DISCONNECTION/CONNECTION [SKYACTIV-G 1.5, SKYACTIV-G 2.0, SKYACTIV-G 2.5].) (See NEGATIVE BATTERY CABLE DISCONNECTION/CONNECTION [SKYACTIV-D 1.5].) (See NEGATIVE BATTERY CABLE DISCONNECTION/CONNECTION [SKYACTIV-D 2.2].) (See NEGATIVE BATTERY CABLE DISCONNECTION/CONNECTION [MZR 1.6].)
2. Remove the set plate. (See SET PLATE REMOVAL/INSTALLATION.)
3. Remove the front bumper. (See FRONT BUMPER REMOVAL.) (See FRONT BUMPER INSTALLATION.)
4. Remove the horn. (See HORN REMOVAL/INSTALLATION.)
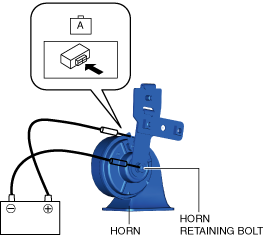
5. Apply battery positive voltage to horn terminal, and connect the horn retaining bolt to ground as shown in the figure, and then verify that the horn sounds.
am3zzw00019672
|
HORN HI
1. Disconnect the negative battery cable. (See NEGATIVE BATTERY CABLE DISCONNECTION/CONNECTION [SKYACTIV-G 1.5, SKYACTIV-G 2.0, SKYACTIV-G 2.5].) (See NEGATIVE BATTERY CABLE DISCONNECTION/CONNECTION [SKYACTIV-D 1.5].) (See NEGATIVE BATTERY CABLE DISCONNECTION/CONNECTION [SKYACTIV-D 2.2].) (See NEGATIVE BATTERY CABLE DISCONNECTION/CONNECTION [MZR 1.6].)
2. Remove the set plate. (See SET PLATE REMOVAL/INSTALLATION.)
3. Remove the front bumper. (See FRONT BUMPER REMOVAL.) (See FRONT BUMPER INSTALLATION.)
4. Remove the horn. (See HORN REMOVAL/INSTALLATION.)
5. Apply battery positive voltage to horn terminal, and connect the horn retaining bolt to ground as shown in the figure, and then verify that the horn sounds.
am3zzw00019673
|