 |
am3zzw00018359
RADAR UNIT REMOVAL/INSTALLATION
id152000004400
1. Disconnect the negative battery cable. (See NEGATIVE BATTERY CABLE DISCONNECTION/CONNECTION [SKYACTIV-D 1.5].)(See NEGATIVE BATTERY CABLE DISCONNECTION/CONNECTION [SKYACTIV-D 2.2].) (See NEGATIVE BATTERY CABLE DISCONNECTION/CONNECTION [SKYACTIV-G 1.5, SKYACTIV-G 2.0, SKYACTIV-G 2.5].)
2. Remove the set plate. (See SET PLATE REMOVAL/INSTALLATION.)
3. Remove the front bumper. (See FRONT BUMPER REMOVAL.)(See FRONT BUMPER INSTALLATION.)
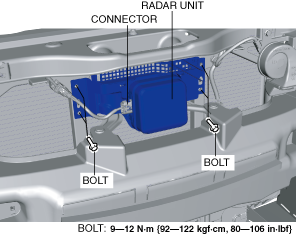
4. Disconnect the radar unit connector.
am3zzw00018359
|
5. Remove the bolts.
6. Remove the radar unit.
7. Install in the reverse order of removal.
8. Perform the radar unit aiming adjustment. (See RADAR UNIT AIMING.)