|
am5uuw00003822
VARIABLE VALVE TIMING ACTUATOR INSPECTION [MZR 2.0, MZR 2.5]
id011006801200
1. Remove the battery cover. (See BATTERY REMOVAL/INSTALLATION [MZR 2.0, MZR 2.5].)
2. Disconnect the negative battery cable. (See BATTERY REMOVAL/INSTALLATION [MZR 2.0, MZR 2.5].)
3. Remove the plug hole plate. (See PLUG HOLE PLATE REMOVAL/INSTALLATION [MZR 2.0, MZR 2.5].)
4. Disconnect the wiring harness.
5. Remove the ignition coils. (See IGNITION COIL REMOVAL/INSTALLATION [MZR 2.0, MZR 2.5].)
6. Remove the spark plugs. (See SPARK PLUG REMOVAL/INSTALLATION [MZR 2.0, MZR 2.5].)
7. Remove the ventilation hose.
8. Remove the dipstick.
9. Remove the cylinder head cover. (See TIMING CHAIN REMOVAL/INSTALLATION [MZR 2.0, MZR 2.5].)
10. Inspect the variable valve timing actuator for damage around the stopper pin cap (A), or a missing stopper pin cap (B), spring and stopper.
am5uuw00003822
|
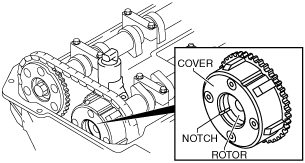
11. Turn the crankshaft clockwise so that the notches on the variable valve timing actuator can be checked.
am6xuw00002472
|
12. Turn the camshaft counterclockwise to align the notches on the variable valve timing actuator.
am5uuw00003823
|
13. With the notches aligned, turn the camshaft clockwise 30 degrees.
am5uuw00003824
|
14. Verify the notches again.
am5uuw00003821
|
15. Install in the reverse order of removal.