 |
FRONT OIL SEAL REPLACEMENT [SKYACTIV-G 2.0]
id0110h2800800
1. Remove the battery cover. (See BATTERY REMOVAL/INSTALLATION [SKYACTIV-G 2.0].)
2. Disconnect the negative battery cable. (See BATTERY REMOVAL/INSTALLATION [SKYACTIV-G 2.0].)
3. Remove the aerodynamic under cover No.2 and splash shield as a single unit. (See AERODYNAMIC UNDER COVER NO.2 REMOVAL/INSTALLATION.) (See SPLASH SHIELD REMOVAL/INSTALLATION.)
4. Remove the drive belt. (See DRIVE BELT REMOVAL/INSTALLATION [SKYACTIV-G 2.0].)
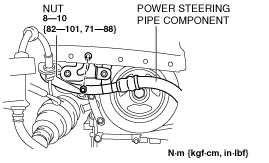
5. Remove the nut shown in the figure and set the power steering pipe component out of the way.
am3zzw00013524
|
6. Remove in the order indicated in the table.
7. Install in the reverse order of removal.
am3zzw00013525
|
|
1
|
Crankshaft pulley lock bolt
|
|
2
|
Crankshaft pulley
|
|
3
|
Front oil seal
(See Front Oil Seal Removal Note.)
|
Crankshaft Pulley Lock Bolt Removal Note
1. Hold the crankshaft pulley using the SSTs.
am3zzw00013526
|
2. Remove the crankshaft pulley lock bolt.
Front Oil Seal Removal Note
1. Cut the oil seal lip using a utility knife.
2. Remove the oil seal using a flathead screwdriver with the tip protected by a clean cloth to prevent damage to the oil seal sliding part of the crankshaft.
am3zzw00013527
|
Front Oil Seal Installation Note
1. Apply clean engine oil to the inner surface of a new front oil seal.
2. Insert the front oil seal into the engine front cover by hand.
3. Tap the oil seal in evenly using the SST and a hammer.
am3uuw00008830
|
am3zzw00013528
|
Crankshaft Pulley Lock Bolt Installation Note
1. Hold the crankshaft pulley using the SSTs.
am3zzw00013529
|
2. Tighten the crankshaft pulley lock bolt in the order shown in the following two steps.