 |
am3uuw00008935
WATER PUMP REMOVAL/INSTALLATION [SKYACTIV-G 2.0]
id0112h4800700
1. Remove the battery cover. (See BATTERY REMOVAL/INSTALLATION [SKYACTIV-G 2.0].)
2. Disconnect the negative battery cable. (See BATTERY REMOVAL/INSTALLATION [SKYACTIV-G 2.0].)
3. Remove the aerodynamic under cover No.2 and splash shield as a single unit. (See AERODYNAMIC UNDER COVER NO.2 REMOVAL/INSTALLATION.)(See SPLASH SHIELD REMOVAL/INSTALLATION.)
4. Drain the engine coolant. (See ENGINE COOLANT REPLACEMENT [SKYACTIV-G 2.0].)
5. Remove the water pump drive belt with the generator drive belt still installed and set it out of the way. (See DRIVE BELT REMOVAL/INSTALLATION [SKYACTIV-G 2.0].)
6. Remove in the order indicated in the table.
7. Install in the reverse order of removal.
8. Refill the engine coolant. (See ENGINE COOLANT REPLACEMENT [SKYACTIV-G 2.0].)
9. Inspect for engine coolant leakage. (See ENGINE COOLANT LEAKAGE INSPECTION [SKYACTIV-G 2.0].)
am3uuw00008935
|
|
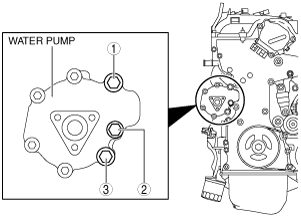
1
|
Water pump pulley
|
|
2
|
Water pump component
|
|
3
|
Gasket
|
|
4
|
O-ring
(See O-ring Installation Note.)
|
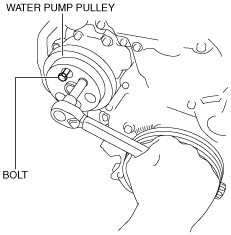
Water Pump Pulley Removal Note
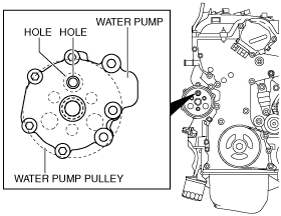
1. Align the water pump pulley hole with the water pump hole as shown in the figure.
am3uuw00008936
|
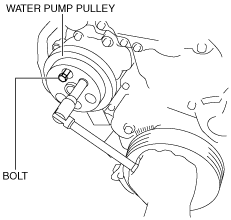
2. Insert an appropriate bolt (length 70 mm {2.8 in}) into the water pump hole shown in the figure and lock the water pump pulley against rotation.
am3uuw00008937
|
3. Remove the bolt used for locking the water pump pulley against rotation.
Water Pump Component Removal Note
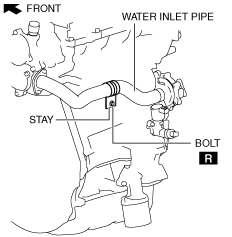
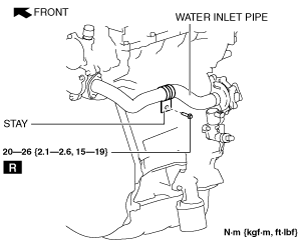
1. Remove the water inlet pipe stay bolt.
am3uuw00008938
|
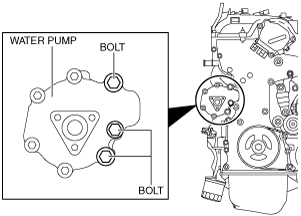
2. Place a container under the engine to collect the engine coolant remaining in the engine.
3. Slightly loosen the three water pump component bolts shown in the figure and collect the draining engine coolant into a container.
am3uuw00008939
|
4. After the engine coolant stops draining, remove the water pump component.
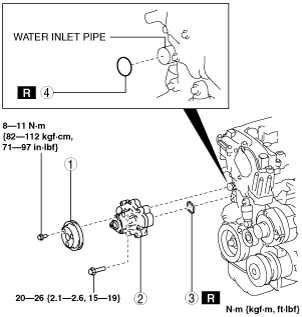
O-ring Installation Note
1. Apply engine coolant to a new O-ring.
2. Install the O-ring to the water inlet pipe.
Water Pump Component Installation Note
1. Tighten the bolts in the order shown in the figure.
am3uuw00008940
|
2. Clean away the sealant adhering to the bolt hole on the cylinder block side of the water inlet pipe stay.
3. Install a new water inlet pipe stay bolt.
am3uuw00008941
|
Water Pump Pulley Installation Note
1. Install the water pump pulley to the water pump and temporarily tighten the bolt
2. Align the water pump pulley hole with the water pump hole as shown in the figure.
am3uuw00008936
|
3. Insert an appropriate bolt (length 70 mm {2.8 in}) into the water pump hole shown in the figure and lock the water pump pulley against rotation.
am3uuw00008942
|
4. Completely tighten the water pump pulley bolt to the specified torque.
5. Remove the bolt used for locking the water pump pulley against rotation.