|
am3uuw00003095
SUPPLIER IDENTIFICATION PROCEDURE [AUDIO]
id0902f6803800
Identification Using the Label or Inscribed Lettering
1. Disconnect the negative battery cable. (See BATTERY REMOVAL/INSTALLATION [MZR 1.5, MZR 1.6].)(See BATTERY REMOVAL/INSTALLATION [MZR 2.0, MZR 2.5].)(See BATTERY REMOVAL/INSTALLATION [MZR 2.0 DISI i-stop].)(See BATTERY REMOVAL/INSTALLATION [MZR 2.3 DISI Turbo].)(See BATTERY REMOVAL/INSTALLATION [MZR-CD 2.2].)(See BATTERY REMOVAL/INSTALLATION [SKYACTIV-G 2.0].)(See BATTERY REMOVAL/INSTALLATION [MZ-CD 1.6].)
2. Remove the center panel. (See CENTER PANEL REMOVAL/INSTALLATION.)
3. Remove the audio unit. (See AUDIO UNIT REMOVAL/INSTALLATION.)
4. Verify the supplier by referring to the label attached to each unit.
am3uuw00003095
|
Verify Using the Diagnostic Assist Function
1. Switch the ignition to ACC or ON.
2. Turn the audio unit power to ON.
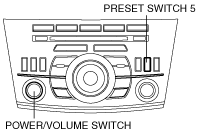
3. While pressing the POWER/VOLUME switch, simultaneously press the PRESET switch 5 for 3 s or more.
With RDS (radio data system)
am3zzw00007420
|
Without RDS (radio data system)
am3zzw00007421
|
4. Identify the supplier code by referring to the information display.
am3uuw00003103
|
|
Supplier code |
Supplier name |
|---|---|
|
01
|
SANYO Automedia
|
|
02
|
Panasonic
|
|
03
|
Clarion
|
|
04
|
Pioneer
|
|
05
|
VISTEON
|
am3uuw00003104
|
5. To stop the diagnostic assist function, ignition is switched to off.