• JM0 BL******:100001—388225, JM6 BL******:100001—388225, JM7 BL******:100001—388225, JMZ BL******:100001—568820
am3uuw00007139
|
INBOARD LIGHT REMOVAL/INSTALLATION
id091800806100
4SD
1. Disconnect the negative battery cable. (See BATTERY REMOVAL/INSTALLATION [MZR 2.0, MZR 2.5].) (See BATTERY REMOVAL/INSTALLATION [MZR 2.0 DISI i-stop].) (See BATTERY REMOVAL/INSTALLATION [MZ-CD 1.6].) (See BATTERY REMOVAL/INSTALLATION [MZR-CD 2.2].) (See BATTERY REMOVAL/INSTALLATION [MZR 1.5, MZR 1.6].) (See BATTERY REMOVAL/INSTALLATION [SKYACTIV-G 2.0].)
2. Remove the trunk lid trim. (See TRUNK LID TRIM REMOVAL/INSTALLATION.)
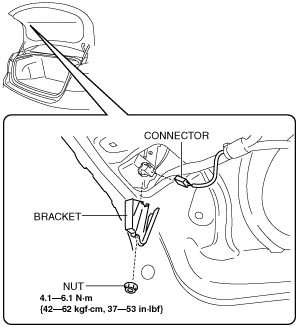
3. Disconnect the connector.
am3uuw00007139
|
am3zzw00013494
|
4. Remove the nut.
5. Remove the bracket.
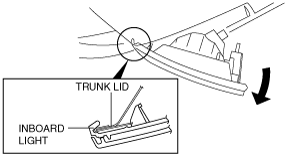
6. Remove the inboard light as shown in the figure.
am3uuw00005582
|
7. Install in the reverse order of removal. (See Inboard Light Installation Note.)
5HB
1. Disconnect the negative battery cable. (See BATTERY REMOVAL/INSTALLATION [MZR 2.0, MZR 2.5].) (See BATTERY REMOVAL/INSTALLATION [MZR 2.3 DISI Turbo].) (See BATTERY REMOVAL/INSTALLATION [MZR 2.0 DISI i-stop].) (See BATTERY REMOVAL/INSTALLATION [MZ-CD 1.6].) (See BATTERY REMOVAL/INSTALLATION [MZR-CD 2.2].) (See BATTERY REMOVAL/INSTALLATION [MZR 1.5, MZR 1.6].) (See BATTERY REMOVAL/INSTALLATION [SKYACTIV-G 2.0].)
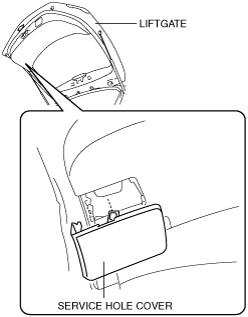
2. Remove the service hole cover.
am3uuw00007140
|
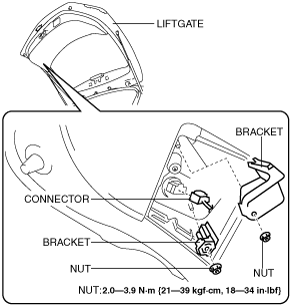
3. Disconnect the connector.
am3zzw00012251
|
am3zzw00013495
|
4. Remove the nut.
5. Remove the bracket.
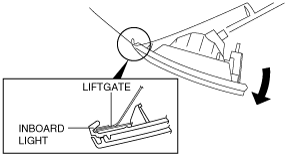
6. Remove the inboard light as shown in the figure.
am3uuw00005583
|
7. Remove the request switch. (With Advanced keyless entry and push button start system) (See REQUEST SWITCH REMOVAL/INSTALLATION.)
8. Install in the reverse order of removal. (See Inboard Light Installation Note.)
Inboard Light Installation Note
4SD
1. Push the bracket onto the trunk lid as shown in the figure and install.
am3uuw00007849
|
5HB
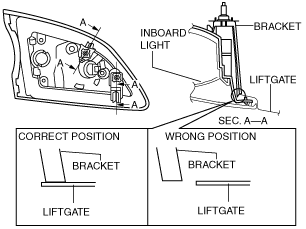
1. Push the bracket into the liftgate as shown in the figure and install.
am3uuw00007850
|