 |
am3uuw00007559
FUEL GAUGE SENDER UNIT INSPECTION
id092200012100
MZR 2.3 DISI Turbo, SKYACTIV-G 2.0
1. Disconnect the negative battery cable.
(See BATTERY REMOVAL/INSTALLATION [MZR 2.3 DISI Turbo].)
2. Remove the rear seat cushion. (See REAR SEAT CUSHION REMOVAL/INSTALLATION.)
3. Remove the fuel pump unit. (See FUEL PUMP UNIT DISASSEMBLY/ASSEMBLY [MZR 2.3 DISI Turbo].)(See FUEL PUMP UNIT DISASSEMBLY/ASSEMBLY [SKYACTIV-G 2.0].)
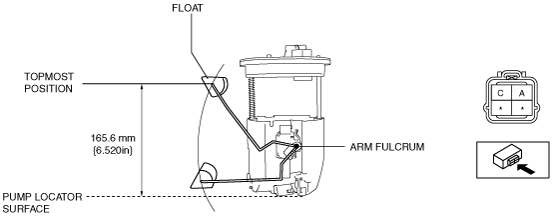
4. Verify that the resistance between terminals A and C of the fuel gauge sender unit based on the height of the float as shown in the figure.
am3uuw00007559
|
|
Float height (mm {in}) |
Resistance (ohms) |
|---|---|
|
165.6 {6.520}
|
9.5—12.5
|
|
159.3 {6.272}
|
20.0
|
|
130.1 {5.122}
|
109.4
|
|
91.3 {3.59}
|
194.8—222.2
|
|
52.2 {2.06}
|
307.6
|
|
25.7 {1.01}
|
400.0
|
|
20.0 {0.787}
|
414.5—405.5
|
MZR 1.5, MZR 1.6, MZR 2.0, MZR 2.5, MZR 2.0 DISI i-stop
1. Disconnect the negative battery cable.
(See BATTERY REMOVAL/INSTALLATION [MZR 1.5, MZR 1.6].)
2. Remove the rear seat cushion. (See REAR SEAT CUSHION REMOVAL/INSTALLATION.)
3. Remove the fuel pump unit. (See FUEL PUMP UNIT DISASSEMBLY/ASSEMBLY [MZR 1.5, MZR 1.6].)(See FUEL PUMP UNIT DISASSEMBLY/ASSEMBLY [MZR 2.0, MZR 2.5].)(See FUEL PUMP UNIT DISASSEMBLY/ASSEMBLY [MZR 2.0 DISI i-stop].)
4. Move the float to the topmost and bottommost positions, and verify that the resistance between terminals B and D of the fuel gauge sender unit and the position of the float are as shown in the figure.
am3zzw00006988
|
|
Float height (mm {in}) |
Resistance (ohms) |
|---|---|
|
168.5 {6.634}
|
18—22
|
|
130.1 {5.122}
|
107.2—111.6
|
|
91.3 {3.59}
|
206—211
|
|
52.2 {2.06}
|
304.6—310.6
|
|
40.6 {1.60}
|
333.5—339.5
|
|
12.1 {0.476}
|
396.8—403.2
|
MZ-CD 1.6, MZR-CD 2.2
1. Disconnect the negative battery cable.
(See BATTERY REMOVAL/INSTALLATION [MZ-CD 1.6].)
2. Remove the rear seat cushion. (See REAR SEAT CUSHION REMOVAL/INSTALLATION.)
3. Remove the fuel gauge sender unit. (See FUEL GAUGE SENDER UNIT REMOVAL/INSTALLATION.)
4. Move the float to the topmost and bottommost positions, and verify that the resistance between terminals B and D of the fuel gauge sender unit and the position of the float are as shown in the figure.
am3zzw00006988
|
