|
am6zzw00004942
AUTOMATIC TRANSAXLE SHIFT MECHANISM REMOVAL/INSTALLATION
id051800274500
Selector Lever Removal/Installation
1. Disconnect the negative battery cable.
2. Remove the rear console. (SeeREAR CONSOLE REMOVAL/INSTALLATION.)
3. Disconnect the selector lever component connector.
am6zzw00004942
|
4. Disconnect the selector cable from the selector lever.
am6zzw00004943
|
5. Remove the selector lever component.
am6zzw00004944
|
6. Install in the reverse order of removal.
Selector Cable Removal/Installation
1. Disconnect the negative battery cable.
2. Remove the aerodynamic under cover NO.2. (See AERODYNAMIC UNDER COVER NO.2 REMOVAL/INSTALLATION.)
3. Remove the rear console. (SeeREAR CONSOLE REMOVAL/INSTALLATION.)
4. Remove the dashboard. (SeeDASHBOARD REMOVAL/INSTALLATION.)
5. Remove the A/C unit. (SeeA/C UNIT REMOVAL/INSTALLATION.)
6. Remove the SAS control module. (SeeSAS CONTROL MODULE REMOVAL/INSTALLATION.)
7. Remove in the order indicated in the table.
8. Install in the reverse order of removal.
9. Adjust the selector cable after having installed. (SeeSELECTOR CABLE ADJUSTMENT.)
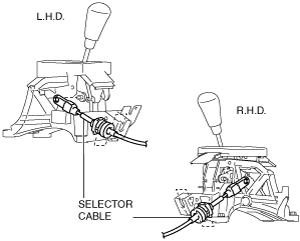
am6zzw00004945
|
|
1
|
Selector cable (transaxle side)
|
|
2
|
Bolt
|
|
3
|
Selector cable (selector lever side)
|