HEADLIGHT BULB REMOVAL/INSTALLATION
id091800800500
Halogen Type
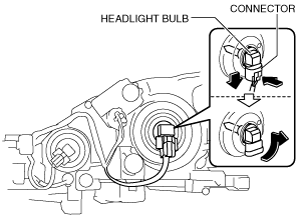
Low-beam
1. Disconnect the negative battery cable.
2. Remove the fasteners and slightly bend back the mudguard.
3. Disconnect the connector.
4. Rotate the headlight bulb in the direction of the arrow shown in the figure.
5. Remove the headlight bulb.
-
Caution
-
• A halogen bulb generates extremely high heat when it is illuminated. If the surface of the bulb is soiled, excessive heat will build up and the life of the bulb will be shortened. When replacing the bulb, hold the metal flange, not the glass.
6. Install in the reverse order of removal.
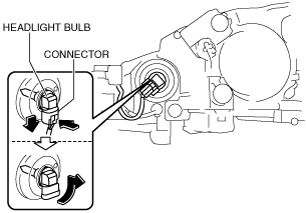
High-beam
1. Disconnect the negative battery cable.
2. Disconnect the connector.
3. Remove the headlight bulb.
-
Caution
-
• A halogen bulb generates extremely high heat when it is illuminated. If the surface of the bulb is soiled, excessive heat will build up and the life of the bulb will be shortened. When replacing the bulb, hold the metal flange, not the glass.
4. Install in the reverse order of removal.
Discharge Type
-
Warning
-
• Incorrect servicing of the discharge headlights could result in electrical shock. Before servicing the discharge headlights, always refer to the discharge headlight service warnings. (See
DISCHARGE HEADLIGHT SERVICE WARNINGS.)
Without AFS (Adaptive front lighting system)
-
Low-beam
-
1. Disconnect the negative battery cable.
2. Remove the fasteners and slightly bend back the mudguard.
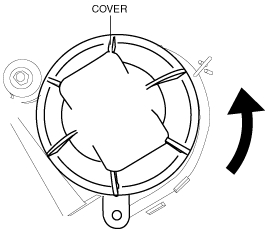
3. Rotate the cover in the direction of the arrow shown in the figure to remove it.
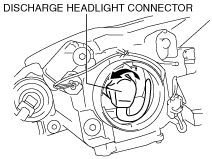
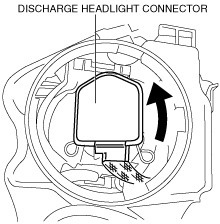
4. Rotate the discharge headlight connector in the direction of the arrow shown in the figure to remove it.
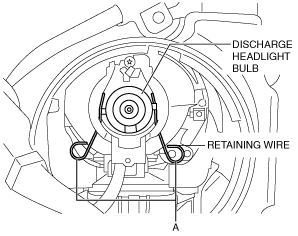
5. Press sections A to release the lock retaining wire.
6. Remove the discharge headlight bulb.
-
Caution
-
• The discharge headlight bulb generates extremely high heat when it is illuminated. If the surface of the discharge headlight bulb is soiled, excessive heat will build up and the life of the discharge headlight bulb will be shortened. When replacing the discharge headlight, hold the metal flange, not the glass.
7. Install in the reverse order of removal.
-
High-beam
-
1. Disconnect the negative battery cable.
2. Disconnect the connector.
3. Remove the headlight bulb.
-
Caution
-
• A halogen bulb generates extremely high heat when it is illuminated. If the surface of the bulb is soiled, excessive heat will build up and the life of the bulb will be shortened. When replacing the bulb, hold the metal flange, not the glass.
4. Install in the reverse order of removal.
With AFS (Adaptive front lighting system)
1. Disconnect the negative battery cable.
2. Remove the front bumper. (See FRONT BUMPER REMOVAL/INSTALLATION.)
3. Remove the front combination light. (See FRONT COMBINATION LIGHT REMOVAL/INSTALLATION.)
4. Rotate the cover in the direction of the arrow shown in the figure to remove it.
5. Rotate the discharge headlight connector in the direction of the arrow shown in the figure to remove it.
6. Press sections A to release the lock retaining wire.
7. Remove the discharge headlight bulb.
-
Caution
-
• The discharge headlight bulb generates extremely high heat when it is illuminated. If the surface of the discharge headlight bulb is soiled, excessive heat will build up and the life of the discharge headlight bulb will be shortened. When replacing the discharge headlight, hold the metal flange, not the glass.
8. Install in the reverse order of removal. (See Discharge headlight connector installation note.)
9. Adjust the headlight aiming. (See HEADLIGHT AIMING.)
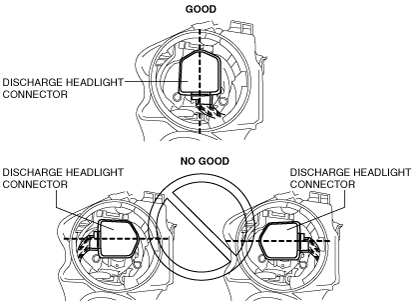
Discharge headlight connector installation note
-
Caution
-
• If the installation direction of the discharge headlight connector is incorrect when the connector is installed, the connector may contact the front combination light housing during the AFS (Adaptive front lighting system) operation and the AFS may not operate normally. After installing the connector to the position shown in the figure, verify that the connector does not contact the front combination light housing.