 |
am6zzw00007538
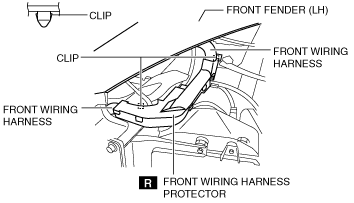
FRONT WIRING HARNESS PROTECTOR REMOVAL/INSTALLATION
id092100000300
Removal
1. Disconnect the negative battery cable.
2. Remove the front bumper. (See FRONT BUMPER REMOVAL/INSTALLATION.)
3. Remove the front combination light (LH). (See FRONT COMBINATION LIGHT REMOVAL/INSTALLATION.)
4. Remove the air cleaner. (See INTAKE-AIR SYSTEM REMOVAL/INSTALLATION [MZR 1.8, MZR 2.0, MZR 2.5].) (See INTAKE-AIR SYSTEM REMOVAL/INSTALLATION [MZR 2.0 DISI].) (See INTAKE-AIR SYSTEM REMOVAL/INSTALLATION [MZR-CD 2.2])
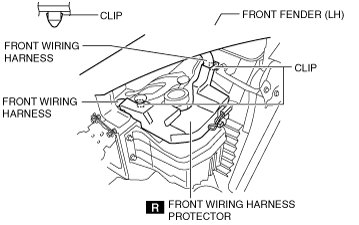
5. Using the removal tool, remove the clips.
L8, LF, L5
am6zzw00007538
|
MZR-CD (RF Turbo), MZR-CD 2.2
am6zzw00007531
|
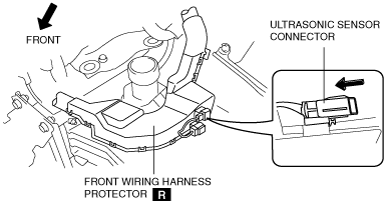
6. Disconnect the ultrasonic sensor connector. (L8, LF, L5) (Vehicles with parking sensor)
am6zzw00007521
|
am6zzw00007510
|
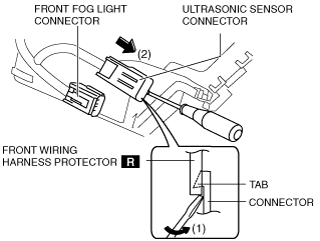
7. Disconnect the front fog light connector. (L8, LF, L5) (Vehicles with front fog lights)
am6zzw00007522
|
am6zzw00007511
|
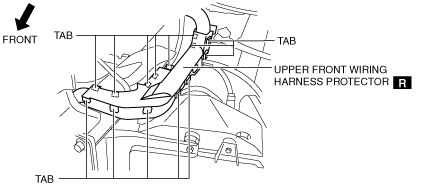
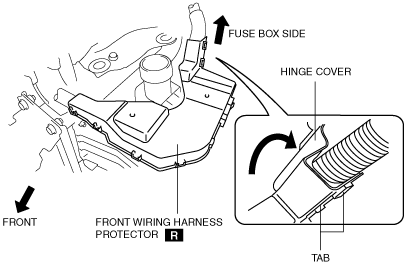
8. While releasing the tabs, turn the hinge cover in the direction of the arrow shown in the figure. (L8, LF, L5)
am6zzw00007512
|
9. While releasing the tabs, remove the upper front wiring harness protector.
L8, LF, L5
am6zzw00007523
|
MZR-CD (RF Turbo), MZR-CD 2.2
am6zzw00007539
|
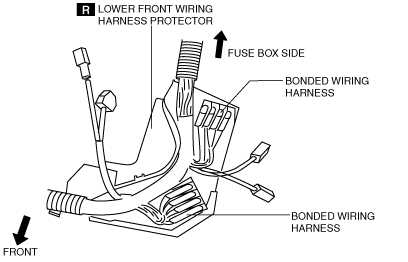
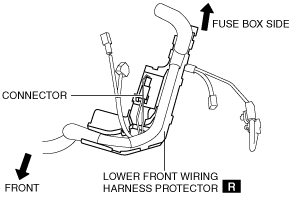
10. Remove the bonded wiring harnesses from the lower front wiring harness protector. (L8, LF, L5)
am6zzw00007513
|
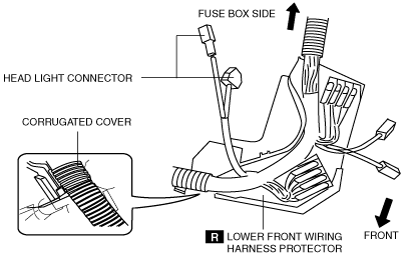
11. Remove the connector from the lower front wiring harness protector. (MZR-CD (RF Turbo), MZR-CD 2.2)
am6zzw00007540
|
12. Remove the lower front wiring harness protector from the front wiring harness.
13. Visually inspect the front wiring harness.
Installation
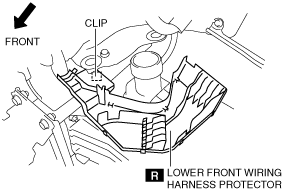
1. Install the lower front wiring harness protector by pressing the clip(s) position shown in the figure.
L8, LF, L5
am6zzw00007524
|
MZR-CD (RF Turbo), MZR-CD 2.2
am6zzw00007534
|
2. Install the wiring harnesses and the bonded wiring harnesses along the shape of the lower front wiring harness protector. (L8, LF, L5)
am6zzw00007514
|
3. Install the wiring harnesses and the connector along the shape of the lower front wiring harness protector. (MZR-CD (RF Turbo), MZR-CD 2.2)
am6zzw00007540
|
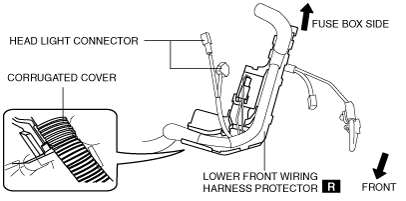
4. Align the corrugated cover to the grooves of the lower front wiring harness protector.
L8, LF, L5
am6zzw00007515
|
MZR-CD (RF Turbo), MZR-CD 2.2
am6zzw00007535
|
5. Pass the wiring harness through the cutout of the lower front wiring harness protector.
L8, LF, L5
am6zzw00007525
|
MZR-CD (RF Turbo), MZR-CD 2.2
am6zzw00007536
|
6. Install the upper front wiring harness protector.
am6zzw00007516
|
L8, LF, L5
am6zzw00007523
|
MZR-CD (RF Turbo), MZR-CD 2.2
am6zzw00007539
|
7. Install the lower front wiring harness protector by pressing the clip position shown in the figure. (L8, LF, L5)
am6zzw00007517
|
8. Install the front fog light connector in the direction of the arrow shown in the figure. (L8, LF, L5) (Vehicles with front fog lights)
am6zzw00007518
|
9. Install the ultrasonic sensor connector in the direction of the arrow shown in the figure. (L8, LF, L5) (Vehicles with parking sensor)
am6zzw00007519
|
10. Install the air cleaner. (See INTAKE-AIR SYSTEM REMOVAL/INSTALLATION [MZR 1.8, MZR 2.0, MZR 2.5].) (See INTAKE-AIR SYSTEM REMOVAL/INSTALLATION [MZR 2.0 DISI].) (See INTAKE-AIR SYSTEM REMOVAL/INSTALLATION [MZR-CD 2.2])
11. Install the front combination light (LH). (See FRONT COMBINATION LIGHT REMOVAL/INSTALLATION.)
12. Install the front bumper. (See FRONT BUMPER REMOVAL/INSTALLATION.)
13. Connect the negative battery cable.
14. Perform an operation check of the removed parts.