am6zzw00018432
|
REAR SEAT BACK TRIM REMOVAL/INSTALLATION
id091300989400
Removal
4SD (rear seat back RH)
1. Disconnect the negative battery terminal. (With rear seat warmer system) (See NEGATIVE BATTERY TERMINAL DISCONNECTION/CONNECTION.)
2. Remove the head restraint. (See Headrest Removal Note.)
3. Remove the rear seat back. (See REAR SEAT BACK REMOVAL/INSTALLATION.)
4. Remove the rear seat back frame. (See REAR SEAT BACK FRAME REMOVAL/INSTALLATION.)
5. For vehicles with rear seat back decoration plate, perform the following procedure.
am6zzw00018432
|
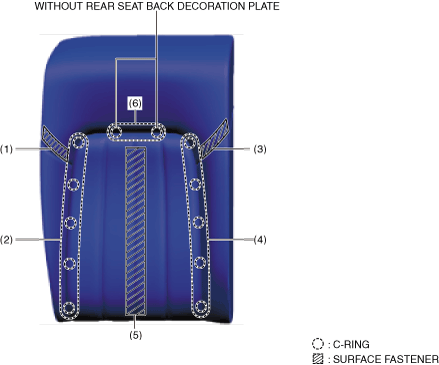
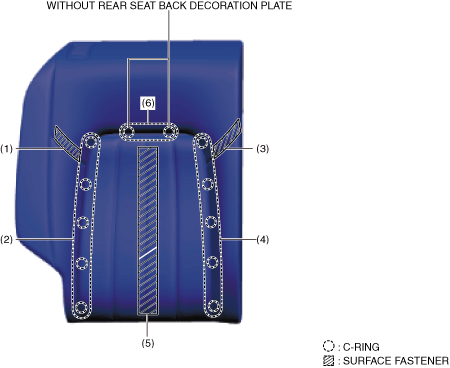
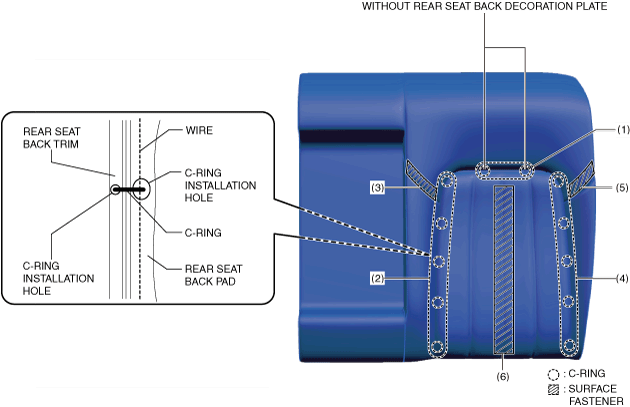
6. Remove C-rings as well as surface fasteners in the order of (1), (2), (3), (4), (5), and (6) shown in the figure, and remove the rear seat back trim from the rear seat back pad.
am6zzw00018433
|
7. When replacing the rear seat back decoration plate, perform the following procedure.
am6zzw00018465
|
4SD (rear seat back LH)
1. Disconnect the negative battery terminal. (With USB power outlet/with rear seat warmer system) (See NEGATIVE BATTERY TERMINAL DISCONNECTION/CONNECTION.)
2. Remove the head restraint. (See Headrest Removal Note.)
3. Remove the rear seat back. (See REAR SEAT BACK REMOVAL/INSTALLATION.)
4. Remove the rear seat center armrest. (See REAR SEAT CENTER ARMREST REMOVAL/INSTALLATION.)
5. Remove the rear seat back frame. (See REAR SEAT BACK FRAME REMOVAL/INSTALLATION.)
6. For vehicles with rear seat back decoration plate, perform the following procedure.
am6zzw00018432
|
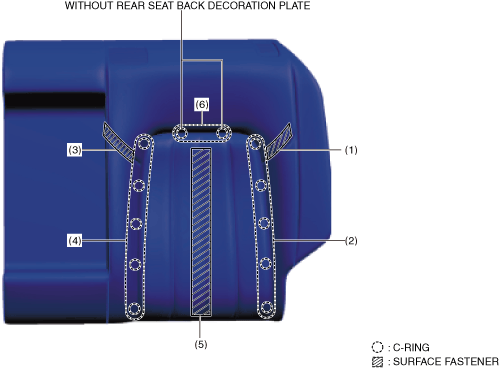
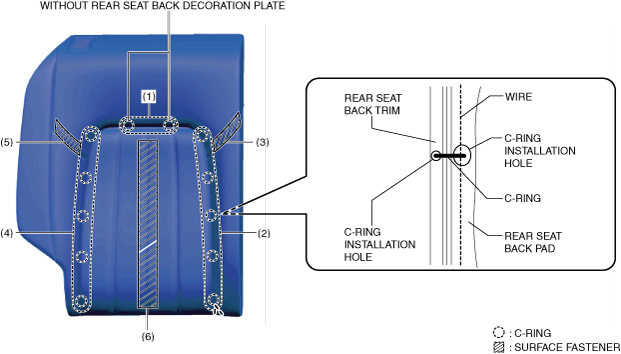
7. Remove C-rings as well as surface fasteners in the order of (1), (2), (3), (4), (5), and (6) shown in the figure, and remove the rear seat back trim from the rear seat back pad.
am6zzw00018435
|
8. When replacing the rear seat back decoration plate, perform the following procedure.
am6zzw00018465
|
WGN (rear seat back RH)
1. Disconnect the negative battery terminal. (With rear seat warmer system) (See NEGATIVE BATTERY TERMINAL DISCONNECTION/CONNECTION.)
2. Remove the head restraint. (See Headrest Removal Note.)
3. Remove the rear seat back. (See REAR SEAT BACK REMOVAL/INSTALLATION.)
4. Remove the rear seat back frame. (See REAR SEAT BACK FRAME REMOVAL/INSTALLATION.)
5. For vehicles with rear seat back decoration plate, perform the following procedure.
am6zzw00018432
|
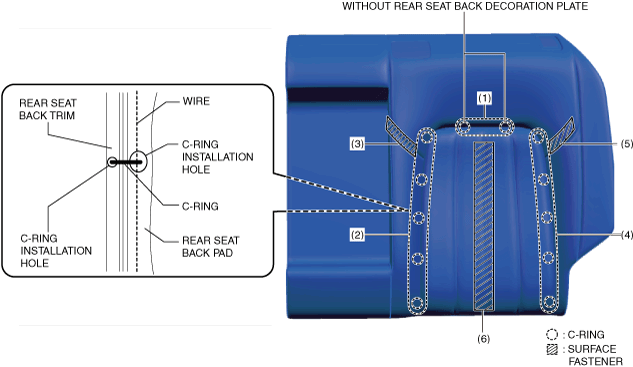
6. Remove C-rings as well as surface fasteners in the order of (1), (2), (3), (4), (5), and (6) shown in the figure, and remove the rear seat back trim from the rear seat back pad.
am6zzw00018436
|
7. When replacing the rear seat back decoration plate, perform the following procedure.
am6zzw00018465
|
WGN (rear seat back LH)
1. Disconnect the negative battery terminal. (With USB power outlet/with rear seat warmer system) (See NEGATIVE BATTERY TERMINAL DISCONNECTION/CONNECTION.)
2. Remove the head restraint. (See Headrest Removal Note.)
3. Remove the rear seat back. (See REAR SEAT BACK REMOVAL/INSTALLATION.)
4. Remove the rear seat center armrest. (See REAR SEAT CENTER ARMREST REMOVAL/INSTALLATION.)
5. Remove the rear seat back frame. (See REAR SEAT BACK FRAME REMOVAL/INSTALLATION.)
6. For vehicles with rear seat back decoration plate, perform the following procedure.
am6zzw00018432
|
7. Remove C-rings as well as surface fasteners in the order of (1), (2), (3), (4), (5), and (6) shown in the figure, and remove the rear seat back trim from the rear seat back pad.
am6zzw00018437
|
8. When replacing the rear seat back decoration plate, perform the following procedure.
am6zzw00018465
|
Installation
4SD (rear seat back RH)
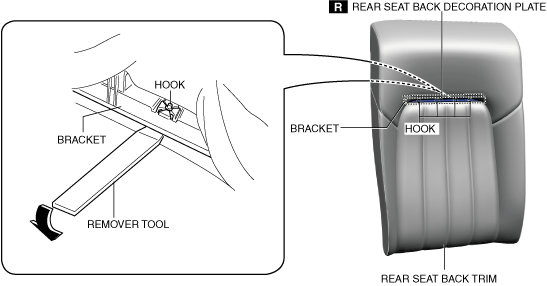
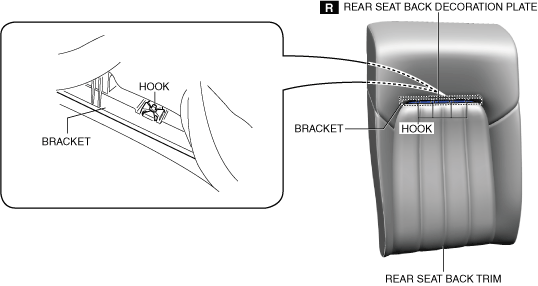
1. If the rear seat back decoration plate was replaced, insert the rear seat back decoration plate into the hook positions shown in the figure and install it to the bracket.
am6zzw00018466
|
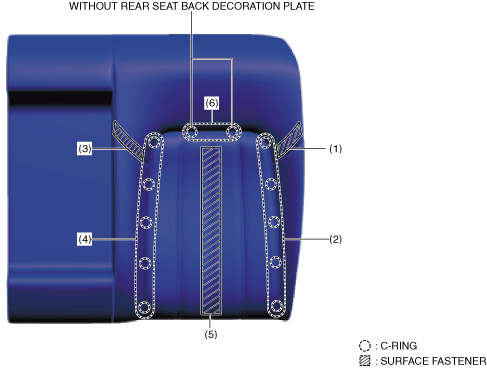
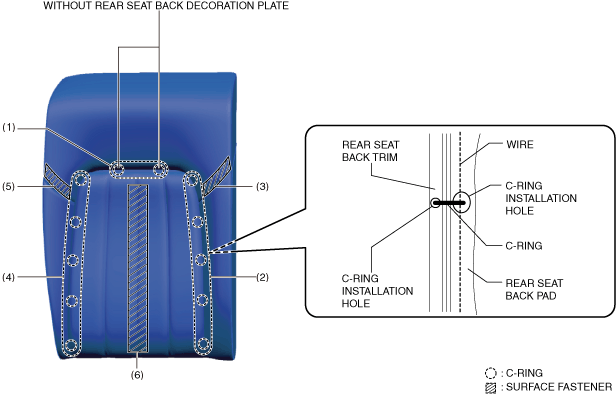
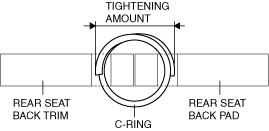
2. Align the rear seat back trim with the installation hole of the rear seat back pad, and install the C-rings as well as surface fasteners in the order of (1), (2), (3), (4), (5), and (6) shown in the figure.
am6zzw00018439
|
ac5wzw00007057
|
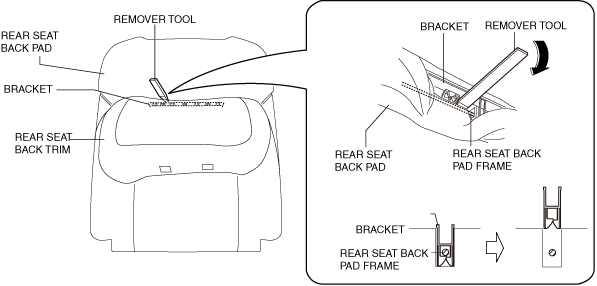
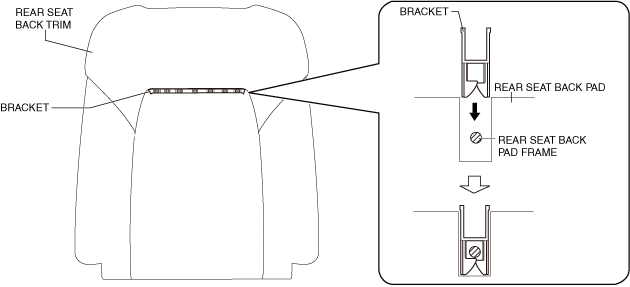
3. Press the bracket in the direction of the arrow shown in the figure and install the bracket to the frame.
am6zzw00018440
|
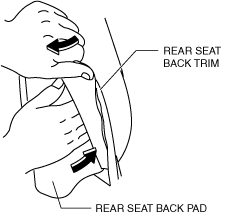
4. Press the rear seat back pad inward while pulling the rear seat back trim outward.
ac5wzw00007058
|
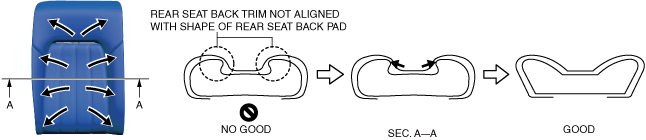
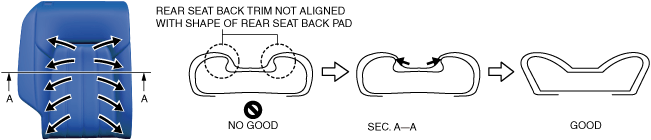
5. Align the rear seat back trim with the shape of the rear seat back pad while pressing the rear seat back pad outward.
am6zzw00018467
|
6. Install the rear seat back frame. (See REAR SEAT BACK FRAME REMOVAL/INSTALLATION.)
7. Install the rear seat back. (See REAR SEAT BACK REMOVAL/INSTALLATION.)
8. Install the head restraint.
9. Connect the negative battery terminal. (With rear seat warmer system) (See NEGATIVE BATTERY TERMINAL DISCONNECTION/CONNECTION.)
4SD (rear seat back LH)
1. If the rear seat back decoration plate was replaced, insert the rear seat back decoration plate into the hook positions shown in the figure and install it to the bracket.
am6zzw00018466
|
2. Align the rear seat back trim with the installation hole of the rear seat back pad, and install the C-rings as well as surface fasteners in the order of (1), (2), (3), (4), (5), and (6) shown in the figure.
am6zzw00018442
|
ac5wzw00007057
|
3. Press the bracket in the direction of the arrow shown in the figure and install the bracket to the frame.
am6zzw00018440
|
4. Press the rear seat back pad inward while pulling the rear seat back trim outward.
ac5wzw00007058
|
5. Align the rear seat back trim with the shape of the rear seat back pad while pressing the rear seat back pad outward.
am6zzw00018467
|
6. Install the rear seat back frame. (See REAR SEAT BACK FRAME REMOVAL/INSTALLATION.)
7. Install the rear seat center armrest. (See REAR SEAT CENTER ARMREST REMOVAL/INSTALLATION.)
8. Install the rear seat back. (See REAR SEAT BACK REMOVAL/INSTALLATION.)
9. Install the head restraint.
10. Connect the negative battery terminal. (With USB power outlet/with rear seat warmer system) (See NEGATIVE BATTERY TERMINAL DISCONNECTION/CONNECTION.)
WGN (rear seat back RH)
1. If the rear seat back decoration plate was replaced, insert the rear seat back decoration plate into the hook positions shown in the figure and install it to the bracket.
am6zzw00018466
|
2. Align the rear seat back trim with the installation hole of the rear seat back pad, and install the C-rings as well as surface fasteners in the order of (1), (2), (3), (4), (5), and (6) shown in the figure.
am6zzw00018443
|
ac5wzw00007057
|
3. Press the bracket in the direction of the arrow shown in the figure and install the bracket to the frame.
am6zzw00018440
|
4. Press the rear seat back pad inward while pulling the rear seat back trim outward.
ac5wzw00007058
|
5. Align the rear seat back trim with the shape of the rear seat back pad while pressing the rear seat back pad outward.
am6zzw00018468
|
6. Install the rear seat back frame. (See REAR SEAT BACK FRAME REMOVAL/INSTALLATION.)
7. Install the rear seat back. (See REAR SEAT BACK REMOVAL/INSTALLATION.)
8. Install the head restraint.
9. Connect the negative battery terminal. (With rear seat warmer system) (See NEGATIVE BATTERY TERMINAL DISCONNECTION/CONNECTION.)
WGN (rear seat back LH)
1. If the rear seat back decoration plate was replaced, insert the rear seat back decoration plate into the hook positions shown in the figure and install it to the bracket.
am6zzw00018466
|
2. Align the rear seat back trim with the installation hole of the rear seat back pad, and install the C-rings as well as surface fasteners in the order of (1), (2), (3), (4), (5), and (6) shown in the figure.
am6zzw00018445
|
ac5wzw00007057
|
3. Press the bracket in the direction of the arrow shown in the figure and install the bracket to the frame.
am6zzw00018440
|
4. Press the rear seat back pad inward while pulling the rear seat back trim outward.
ac5wzw00007058
|
5. Align the rear seat back trim with the shape of the rear seat back pad while pressing the rear seat back pad outward.
am6zzw00018468
|
6. Install the rear seat back frame. (See REAR SEAT BACK FRAME REMOVAL/INSTALLATION.)
7. Install the rear seat center armrest. (See REAR SEAT CENTER ARMREST REMOVAL/INSTALLATION.)
8. Install the rear seat back. (See REAR SEAT BACK REMOVAL/INSTALLATION.)
9. Install the head restraint.
10. Connect the negative battery terminal. (With USB power outlet/with rear seat warmer system) (See NEGATIVE BATTERY TERMINAL DISCONNECTION/CONNECTION.)
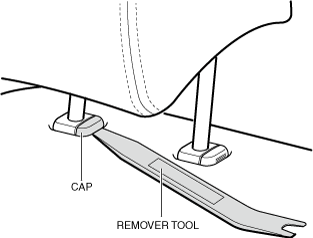
Headrest Removal Note
Pole guide with cap
1. Remove the cap using the remover tool.
am6zzw00018181
|
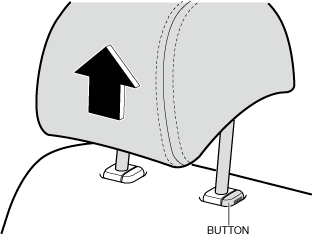
2. Pull up the headrest while pressing the button.
am6zzw00018182
|
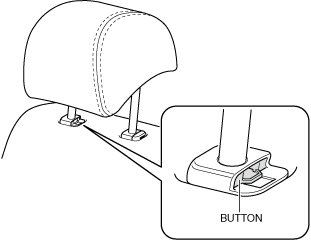
3. Pull up the headrest while pressing the button and remove the headrest.
am6zzw00018183
|