 |
am6zzw00016305
ADAPTIVE FRONT LIGHTING SYSTEM (AFS) CONTROL MODULE REMOVAL/INSTALLATION
id152000001500
L.H.D.
1. Disconnect the negative battery terminal. (See NEGATIVE BATTERY TERMINAL DISCONNECTION/CONNECTION.)
2. Remove the front scuff plate (LH). (See FRONT SCUFF PLATE REMOVAL/INSTALLATION.)
3. Remove the front side trim (LH). (See FRONT SIDE TRIM REMOVAL/INSTALLATION.)
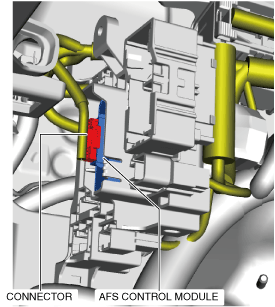
4. Disconnect the connector and set the wiring harnesses aside to the positions where the AFS control module can be removed.
am6zzw00016305
|
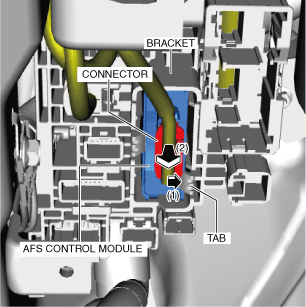
5. Disconnect the connector.
am6xuw00009323
|
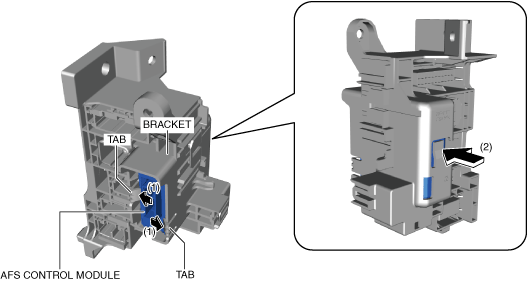
6. While pressing tabs of the bracket in the direction of arrow (1) shown in the figure, press out the AFS control module in the direction of arrow (2) from the back of the bracket to detach the AFS control module from tabs of the bracket.
am6xuw00009353
|
7. Remove the AFS control module.
8. Install in the reverse order of removal.
9. Switch the ignition ON (engine off or on) and perform the AFS control module automatic configuration.
10. Clear the DTCs using the M-MDS. (See CLEARING DTC [ADAPTIVE FRONT LIGHTING SYSTEM (AFS) CONTROL MODULE].)
11. If the AFS control module is replaced with a new one, perform the headlight auto leveling system initialization. (See HEADLIGHT AUTO LEVELING SYSTEM INITIALIZATION.)
R.H.D.
1. Disconnect the negative battery terminal. (See NEGATIVE BATTERY TERMINAL DISCONNECTION/CONNECTION.)
2. Remove the following parts:
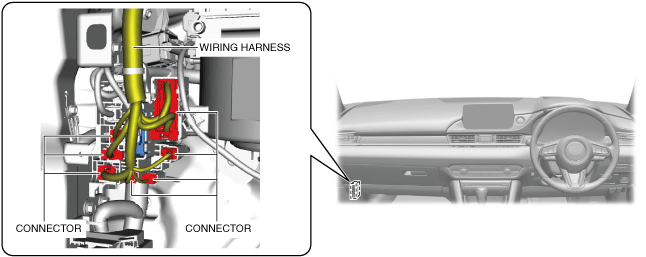
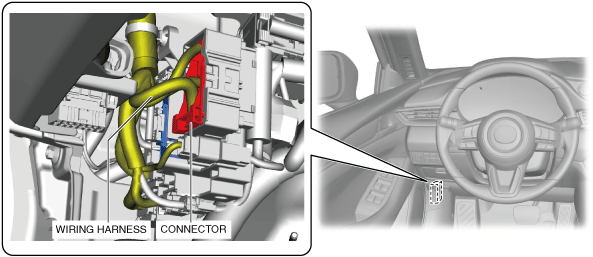
3. Disconnect the connectors and set the wiring harnesses aside to the positions where the adaptive LED headlights control module can be removed.
am6zzw00016306
|
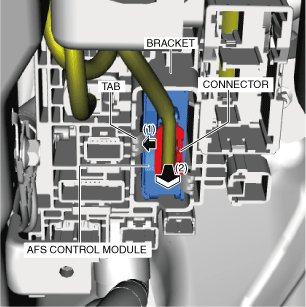
4. While pressing tab of the bracket in the direction of arrows (1) shown in the figure, pull the AFS control module connector in the direction of arrow (2) to pull out the AFS control module from the bracket.
am6zzw00016307
|
5. While pressing tab of the bracket in the direction of arrows (1) shown in the figure, pull the AFS control module connector in the direction of arrow (2) to pull out the AFS control module from the bracket.
am6zzw00016308
|
6. Disconnect the connector and remove the AFS control module.
7. Install in the reverse order of removal.
8. Switch the ignition ON (engine off or on) and perform the AFS control module automatic configuration.
9. Clear the DTCs using the M-MDS. (See CLEARING DTC [ADAPTIVE FRONT LIGHTING SYSTEM (AFS) CONTROL MODULE].)
10. If the AFS control module is replaced with a new one, perform the headlight auto leveling system initialization. (See HEADLIGHT AUTO LEVELING SYSTEM INITIALIZATION.)