Description
Audio unit internal malfunction
Detection condition
• Audio unit (circuit around power amplifier) malfunction detected
• Audio unit protection function operates due to short to ground in speaker wiring harness and speaker lead wire
Fail-safe function
Output to speakers stops
Possible cause
• Audio unit connector or terminal malfunction
• Speaker connector or terminal malfunction
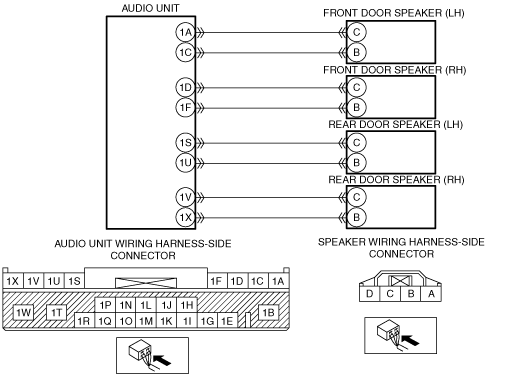
• Open circuit in wiring harness between the following terminals:
-
― Audio unit terminal 1A and front door speaker (LH) terminal C― Audio unit terminal 1C and front door speaker (LH) terminal B― Audio unit terminal 1D and front door speaker (RH) terminal C― Audio unit terminal 1F and front door speaker (RH) terminal B― Audio unit terminal 1S and rear door speaker (LH) terminal C― Audio unit terminal 1U and rear door speaker (LH) terminal B― Audio unit terminal 1V and rear door speaker (RH) terminal C― Audio unit terminal 1X and rear door speaker (RH) terminal B
• Short to ground in wiring harness between the following terminals:
-
― Audio unit terminal 1A and front door speaker (LH) terminal C― Audio unit terminal 1C and front door speaker (LH) terminal B― Audio unit terminal 1D and front door speaker (RH) terminal C― Audio unit terminal 1F and front door speaker (RH) terminal B― Audio unit terminal 1S and rear door speaker (LH) terminal C― Audio unit terminal 1U and rear door speaker (LH) terminal B― Audio unit terminal 1V and rear door speaker (RH) terminal C― Audio unit terminal 1X and rear door speaker (RH) terminal B
• Speaker malfunction
• Audio unit malfunction