1. Park the vehicle on a level surface.
2. Perform the 'Fuel Line Safety Procedure' referring to the BEFORE SERVICE PRECAUTION. (See BEFORE SERVICE PRECAUTION [L3].)
3. Disconnect the negative battery cable.
4. Remove the fuel pump unit. (See FUEL PUMP UNIT REMOVAL/INSTALLATION [L3].)
5. Drain the fuel from the service hole.
6. Remove the LH rear tire.
7. Remove the main silencer.
8. Remove in the order indicated in the figure.
9. Install in the reverse order of removal.
10. Inspect all parts by performing the AFTER SERVICE PRECAUTION. (See AFTER SERVICE PRECAUTION [L3].)
R.H.D. model
.
|
1
|
Joint hose
(See Joint Hose Installation Note.)
|
|
2
|
Breather hose
|
|
3
|
Fuel tank
|
|
4
|
Fuel-filler pipe protector
|
|
5
|
Fuel-filler pipe
|
|
6
|
Nonreturn valve
|
L.H.D. model

.
|
1
|
Joint hose
(See Joint Hose Installation Note.)
|
|
2
|
Breather hose
|
|
3
|
Fuel tank
|
|
4
|
Fuel-filler pipe protector
|
|
5
|
Fuel-filler pipe
|
|
6
|
Nonreturn valve
|
1. Remove the propeller shaft. (See PROPELLER SHAFT REMOVAL/INSTALLATION.)
2. Position the rear differential out of way.
3. Remove the fuel tank.
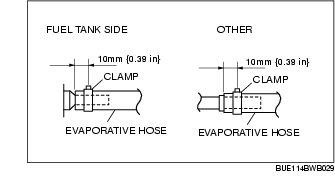
1. Install the evaporative hose and clamp as shown in the figure.
1. Install the breather hose and clamps as shown in the figure.
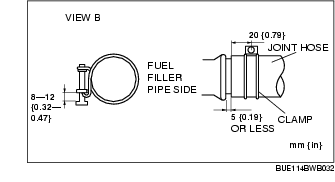
1. Install the joint hose and clamps as shown in the figure.