Removal
TL70 MANUAL TRANSMISSION / TRANSAXLE: MANUAL TRANSMISSION ASSEMBLY: REMOVAL; 2013 MY FR-S [03/2012 -]
1. DISCONNECT CABLE FROM NEGATIVE BATTERY TERMINAL Removal
2. REMOVE CONSOLE BOX ASSEMBLY
Removal
3. REMOVE SHIFT LEVER BOOT
(a) Remove the 2 clips and the shift and select lever cover.

(b) Disconnect the wire harness clamp.

(c) Remove the 4 bolts, the shift and select lever retainer and the shift lever boot.
4. REMOVE SHIFT LEVER CAP
(a) Remove the 4 bolts and the shift lever cap.

5. REMOVE NO. 1 ENGINE UNDER COVER Removal
6. REMOVE NO. 2 ENGINE UNDER COVER Removal
7. DRAIN MANUAL TRANSMISSION OIL Service and Repair
8. REMOVE PROPELLER SHAFT WITH CENTER BEARING ASSEMBLY
Removal
9. REMOVE FRONT STABILIZER BAR
Removal
10. REMOVE STARTER ASSEMBLY
Removal
11. SEPARATE WIRE HARNESS
HINT
Fix the disconnected harness components with tape to keep them out of the way.
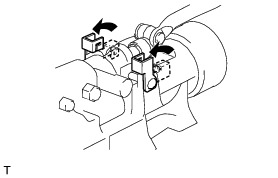
(a) Release the lock of connector (A) and disconnect the connector.

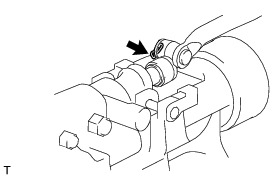
(b) Disconnect the connector (B).
(c) Disconnect the 2 connectors.

(d) Remove the bolt and disconnect the ground cable.
(e) Disengage the wire harness clamp.
(f) Remove the bolt and the wire harness clamp bracket.
12. SEPARATE CLUTCH RELEASE CYLINDER ASSEMBLY
(a) Remove the 2 bolts and separate the clutch release cylinder assembly.

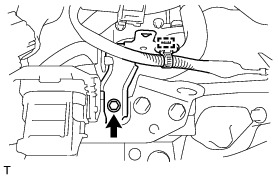
13. SEPARATE MANUAL TRANSMISSION ASSEMBLY
(a) Remove the bolt from the manual transmission assembly.

14. REMOVE EXHAUST MANIFOLD
Removal
15. SUSPEND ENGINE ASSEMBLY
(a) Support the engine assembly with an engine lifter so that it is stable, as shown in the illustration.
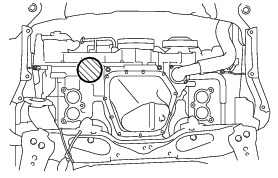

NOTICE:
* Set the engine assembly with transmission so that it is horizontal.
* Never attach the attachment and plate lift attachment to the oil pan section of the engine assembly.
16. REMOVE FLOOR SHIFT LEVER ASSEMBLY
(a) Turn over the shift and select lever boot.

(b) Using a screwdriver, remove the clip and the floor shift lever assembly.
(c) Remove the plate washer from the floor shift lever assembly.
(d) Remove the 2 bushings and O-ring from the floor shift lever assembly.
17. REMOVE SHIFT LEVER BOOT
(a) Remove the shift lever boot from the floor shift lever assembly.
18. SEPARATE FLOOR SHIFT CONTROL SHIFT LEVER RETAINER SUB-ASSEMBLY
(a) Remove the 2 bolts and separate the floor shift control shift lever retainer sub-assembly.

19. REMOVE EXHAUST PIPE BRACKET
(a) Remove the 2 bolts and the exhaust pipe bracket.

20. SUPPORT MANUAL TRANSMISSION ASSEMBLY
(a) Support the manual transmission assembly with a transmission jack.

NOTICE:
* Check that the manual transmission assembly is centered on the transmission jack plate.
* When removing the manual transmission assembly, support the engine assembly so that it does not tilt.
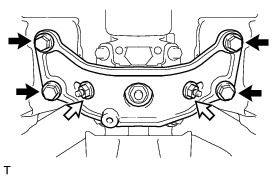
21. REMOVE REAR NO. 2 ENGINE MOUNTING INSULATOR
(a) Remove the 4 bolts, 2 washers, 2 nuts and rear No. 2 engine mounting insulator.

22. REMOVE MANUAL TRANSMISSION ASSEMBLY
(a) Remove the 3 bolts, 2 nuts and manual transmission assembly.


NOTICE:
* Do not apply excessive force to the transmission assembly as this will break the input shaft.
* To prevent damage to the knock pins, do not pry between the manual transmission assembly and the engine assembly.
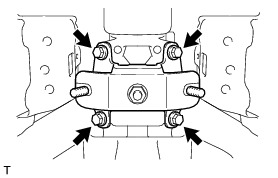
23. REMOVE REAR NO. 1 ENGINE MOUNTING INSULATOR
(a) Remove the 4 bolts and rear No. 1 engine mounting insulator.
24. REMOVE FLOOR SHIFT CONTROL SHIFT LEVER RETAINER SUB-ASSEMBLY
(a) Remove the floor shift control shift lever retainer sub-assembly.

25. REMOVE FLOOR SHIFT CONTROL SHIFT LEVER RETAINER
(a) Pull up the locks of the shift lever pins, and remove the 2 shift lever pins.
(b) Remove the floor shift control shift lever retainer.
26. REMOVE SHIFT LEVER RETAINER BUSHING
(a) Remove the 4 shift lever retainer bushings.

27. REMOVE FLOOR SHIFT CONTROL SHAFT
(a) Using a screwdriver, remove the clip, plate washer and floor shift control shaft.
(b) Remove the 2 collars from the control shaft.
28. REMOVE CONTROL SHAFT


(a) Using a hammer and a screwdriver, cut off the control shaft collar and remove it from the shift shaft.
(b) Using a pin punch (5 mm (0.197 in.)) and a hammer, remove the shaft pin and control shaft from the shift shaft.
(c) Remove the shift lever damper from the floor shift control shaft.