Fuel Pump: Service and Repair
Fuel Pump:

REMOVAL
CAUTION: Do not smoke or work near an open flame when working on the fuel pump.
1. REMOVE REAR SEAT CUSHION
2. REMOVE FLOOR SERVICE HOLE COVER
3. DISCONNECT FUEL PUMP & SENDER GAUGE CONNECTOR AND VAPOR PRESSURE SENSOR CONNECTOR
4. DISCONNECT FUEL TUBE AND EMISSION TUBE

a. Wash away the mud, dust and the likes on the fuel suction plate with water.
b. Pull off the tube joint clip from the No. 1 fuel suction plate,
c. Disconnect the fuel tube from the fuel pump assembly.
d. Disconnect the emission tube from the fuel pump assembly.

e. Attach the tape in order to protect the port portion from the dust.

f. Protect the disconnected fuel tube from damage and foreign material by covering it with a plastic bag.

5. REMOVE FUEL PUMP ASSEMBLY FROM FUEL TANK
a. Remove the 8 bolts and fuel tank vent tube set plate.
b. Pull out the fuel pump assembly.
NOTE:
- Do not damage the fuel pump filter.
- Be careful that the arm of the sender gauge should not bent.
c. Remove the gasket from the pump assembly.
DISASSEMBLY

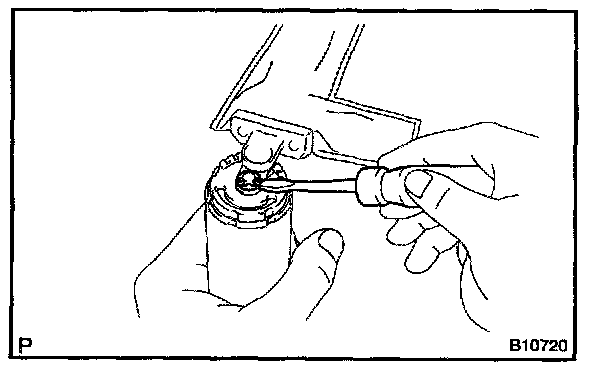
1. REMOVE NO. 2 FUEL SUCTION SUPPORT
a. Using a small screwdriver, remove the No. 2 fuel suction support.
b. Remove the rubber cushion.

2. REMOVE NO. 1 FUEL SUCTION SUPPORT
a. Disconnect the fuel sender gauge connector and earth plate.
b. While pressing the lock of the fuel pump filter, slide the fuel sender gauge and remove it.

c. Using a small screwdriver, remove the No. 1 fuel suction support.
NOTE: Do not damage the fuel suction support and fuel suction plate.
d. Disconnect the fuel pump harness from the No. 1 fuel suction support and fuel pump.
3. REMOVE VAPOR PRESSURE SENSOR
Pull off the joint clip and remove the vapor pressure sensor from No. 1 fuel suction support.

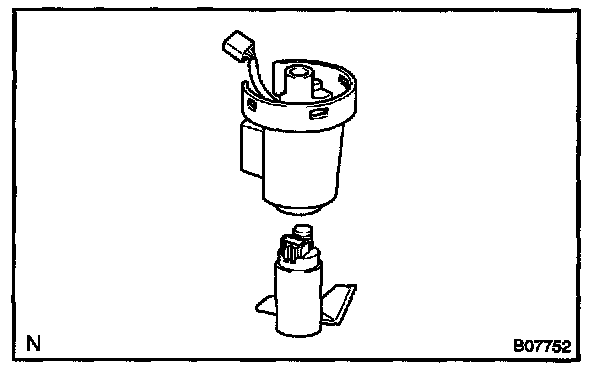
4. REMOVE FUEL PUMP
Remove the pump from the fuel filter.
5. REMOVE FUEL PRESSURE REGULATOR
Pull out the fuel pressure regulator and O-ring from the fuel filter.
6. REMOVE FUEL SUCTION FILTER
a. Using a small screwdriver, pry out the clip.
b. Pull out the suction filter.
REASSEMBLY

1. INSTALL FUEL SUCTION FILTER
Install the suction filter with a new clip.
2. INSTALL FUEL PUMP
Connect the fuel pump to the fuel filter.
3. INSTALL FUEL PRESSURE REGULATOR
a. Install the O-ring to the pressure regulator.
HINT: Apply a light coat of gasoline to a new O-ring, and install it to the pressure regulator.
b. Connect the pressure regulator to the fuel filter.
4. INSTALL NO. 1 FUEL SUCTION SUPPORT
a. Connect the fuel pump harness to the No. 1 fuel suction support and fuel pump.
b. Install the No. 1 fuel suction support to the fuel filter.
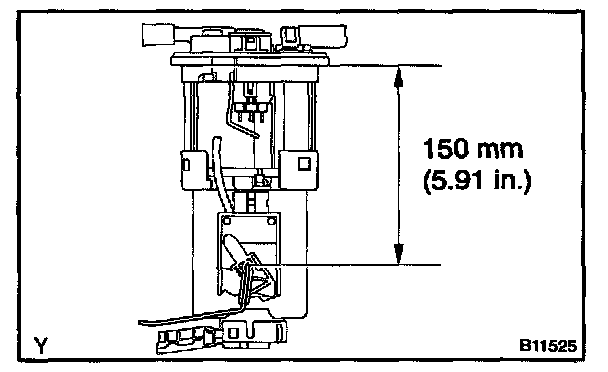
c. Install the fuel sender gauge to the fuel pump filter so that the distance between the No.1 fuel suction support and the float fulcrum of the fuel sender gauge is 150 mm (5.91 in.).
d. Connect the fuel sender gauge connector and earth plate.
5. INSTALL NO.2 FUEL SUCTION SUPPORT
a. Install the rubber cushion.
b. Install the No. 2 fuel suction support to the No. 1 fuel suction support.
6. INSTALL VAPOR PRESSURE SENSOR
Install the vapor pressure sensor and connect the joint clip to the No.1 fuel suction support.
INSTALLATION

1. INSTALL FUEL PUMP ASSEMBLY
a. Install the new gasket to the fuel pump assembly.
b. Install the fuel pump assembly to the fuel tank.
NOTE:
- Do not damage the fuel pump filter.
- Be careful that the arm of the sender gauge should not bent.
c. Install the 8 bolts and fuel tank vent tube set plate from the fuel tank.
Torque: 4.0 N.m (40 kgf.cm, 35 in.lbf)

2. CONNECT FUEL TUBE
a. Clean up around the fuel tube.
b. Connect the fuel tube and emission tube to the fuel pump assembly.
c. Connect the tube joint clip to the fuel suction plate.
3. CONNECT FUEL PUMP AND SENDER GAUGE CONNECTOR AND VAPOR PRESSURE SENSOR CONNECTOR
HINT: Start the engine, check for fuel leakage.
4. INSTALL FLOOR SERVICE HOLE COVER
a. Install the service hole cover.
b. Install the floor carpet.
5. INSTALL REAR SEAT CUSHION