Back Window Glass: Service and Repair
REMOVALHINT: For steps 2 to 10, refer to Headliner.
1. Access cab (Standard Body Type),
Access cab (Wide Body Type):
REMOVE REAR SEAT
2. Standard cab:
REMOVE FRONT DOOR SCUFF PLATES
3. Access cab (Standard Body Type),
Access cab (Wide Body Type):
REMOVE ACCESS DOOR SCUFF PLATES
4. REMOVE ASSIST GRIPS
5. Standard cab:
REMOVE FRONT PILLAR GARNISHES
6. Access cab (Standard Body Type),
Access cab (Wide Body Type):
REMOVE ROOF SIDE RAIL GARNISHES
7. REMOVE ROOM LIGHT
8. Standard cab:
REMOVE COAT HOOK
9. Standard cab:
REMOVE BACK PANEL UPPER GARNISH
10. REMOVE QUARTER TRIMS
11. REMOVE REAR PART OF ROOF HEADLINING
a. Standard cab:
Remove the 2 clips and the rear part of the roof headlining.
b. Access cab (Standard Body Type), Access cab (Wide Body Type):
Remove the 3 clips and the rear part of the roof headlining.
12. Power slide type:
REMOVE BACK WINDOW REGULATOR ASSEMBLY
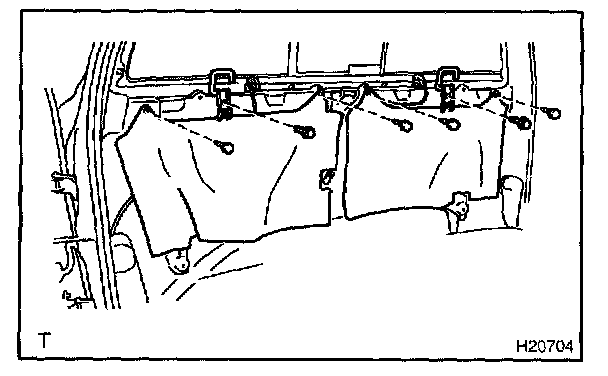
a. Remove the 2 bolts and tether anchor brackets.
b. Remove the 4 clips and 2 back panel silencer pads.
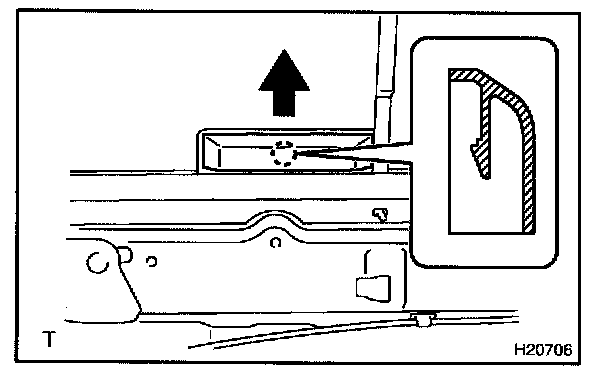
c. Using a screwdriver, remove the back door glass channel cover.
HINT: Tape the screwdriver tip before use.
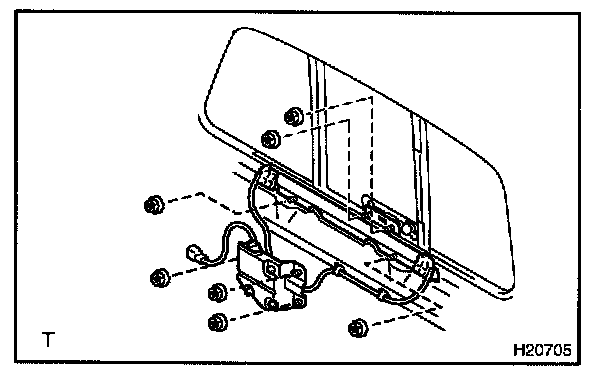
d. Remove the 7 nuts and back window regulator assembly.
13. REMOVE BACK WINDOW GLASS
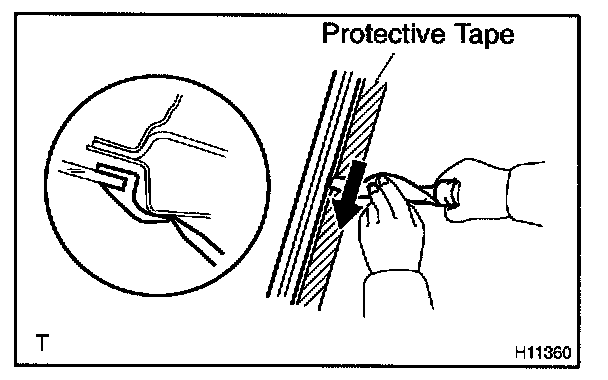
a. Remove the 4 nuts.
b. Using a screwdriver, remove the weatherstrip from the body.
NOTE: Be careful not to damage the body paint.
HINT: Tape the screwdriver tip before use.
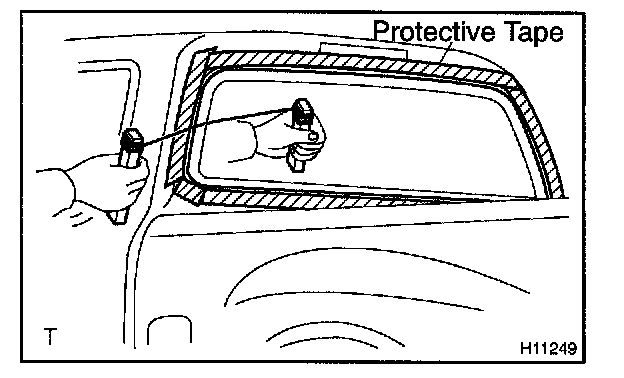
c. Pass piano wire through from the interior.
d. Tie both wire ends to wooden blocks or similar objects.
HINT: Apply protective tape to the outer surface to prevent the surface from being scratched.
NOTE: When separating the glass, take care not to damage the paint and exterior.
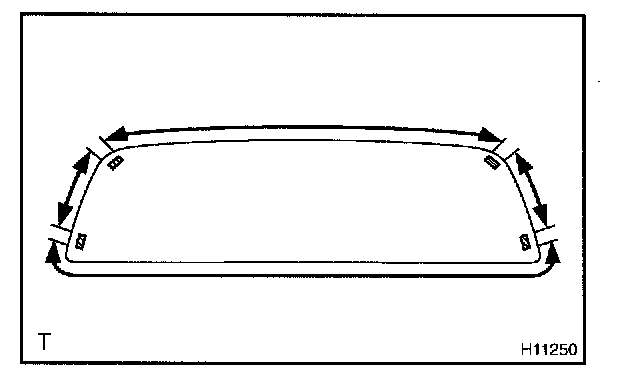
e. Cut off the adhesive by pulling the piano wire around it.
HINT: Cut off the adhesive on the areas as shown in the illustration but leave the adhesive where the stud bolts exist.
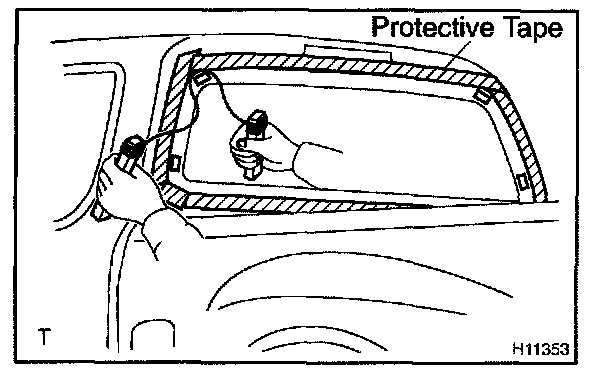
f. Pass piano wire through as shown in the illustration, and cut off the adhesive on the part adhered to the stud bolts.
g. Remove the glass.
NOTE: Leave as much of the adhesive on the body as possible when removing the glass.
INSTALLATION
HINT: For steps 8 to 17, refer to Headliner.
1. CLEAN AND SHAPE CONTACT SURFACE OF BODY
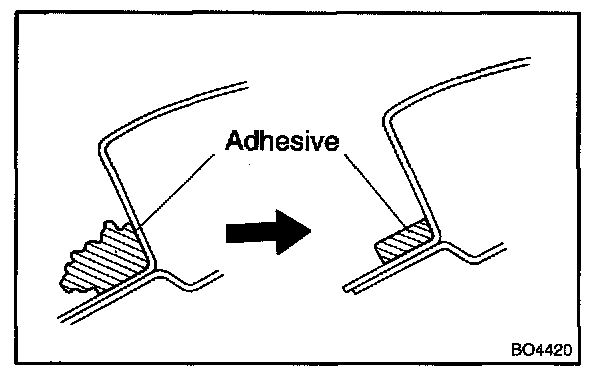
a. Using a knife, cut away any rough adhesive on the contact surface of the body to shape the surface.
HINT: Leave as much of the adhesive on the body as possible.
b. Clean the contact surface of the body with a piece of shop rag saturated with cleaner.
2. POSITION GLASS
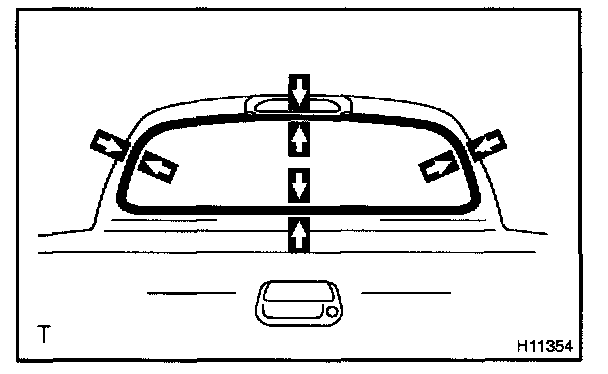
a. Place the glass in the correct position.
b. Check that the whole contact surface of the glass rim is perfectly even.
c. Place reference marks on the glass and body.
d. Remove the glass.
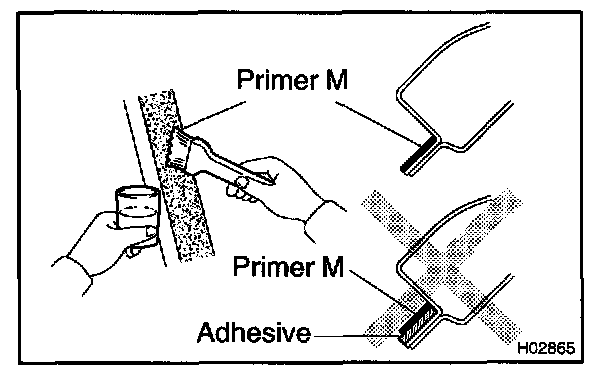
3. COAT CONTACT SURFACE OF BODY WITH PRIMER "M"
Using a brush, coat the exposed part of the body with Primer M.
NOTE:
- Dry the primer coating for 3 minutes or more.
- Do not coat the adhesive with Primer M.
- Do not keep any of the opened Primer M for later use.
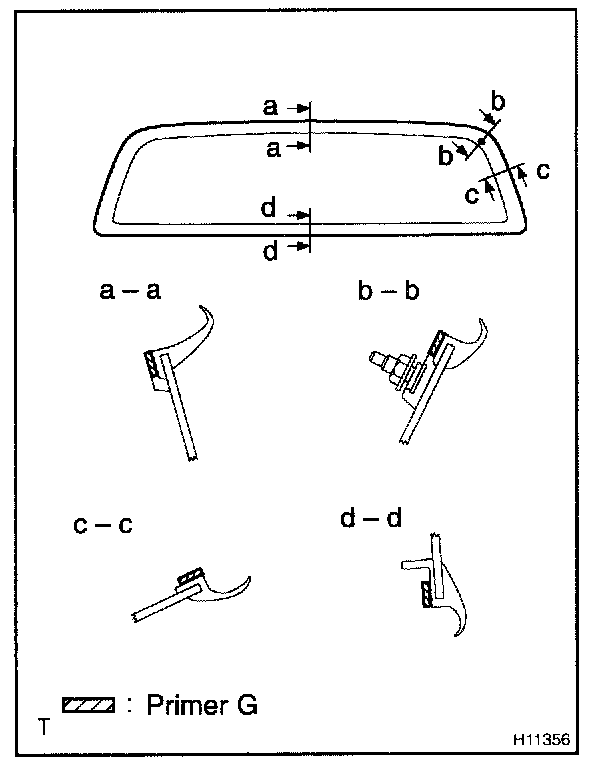
4. Fixed type:
COAT CONTACT SURFACE OF GLASS WITH PRIMER "G"
Using a brush or sponge, coat the edge of the glass and the contact surface with Primer G as shown in the illustration.
HINT: If the area other than the specified is coated by accident, wipe off the primer with a clean shop rag before it dries.
NOTE:
- Dry the primer coating for 3 minutes or more.
- Do not keep any of the opened Primer G for later use.
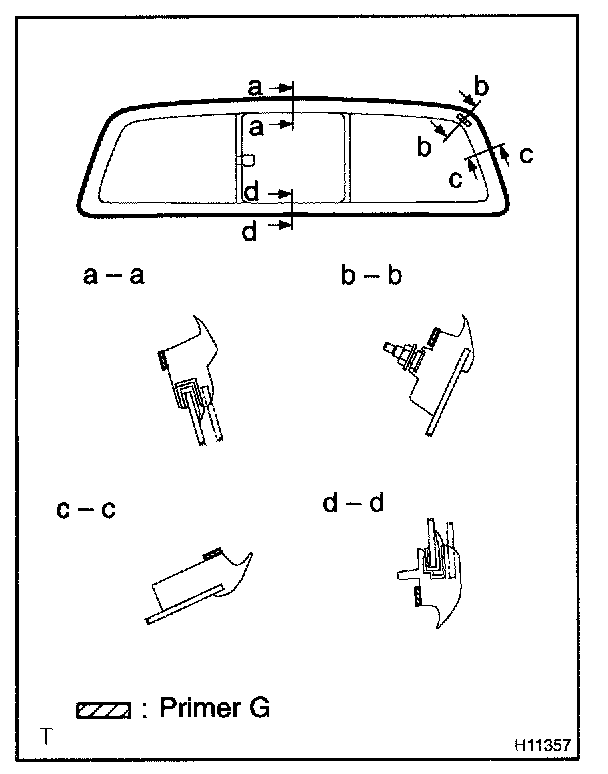
5. Slide type:
COAT CONTACT SURFACE OF GLASS WITH PRIMER "G"
Using a brush or sponge, coat the edge of the glass and the contact surface with Primer G as shown in the illustration.
HINT: If the area other than the specified is coated by accident, wipe off the primer with a clean shop rag before it dries.
NOTE:
- Dry the primer coating for 3 minutes or more.
- Do not keep any of the opened Primer G for later use.
6. Fixed type:
APPLY ADHESIVE
a. Cut off the tip of the cartridge nozzle. Part No. 08850-00801 or equivalent
HINT: After cutting off the tip, use all adhesive within the time described in the table.
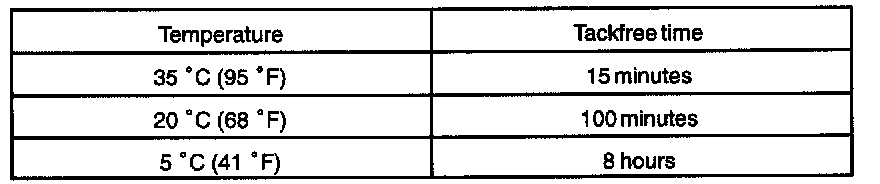
b. Load the cartridge into a sealer gun.
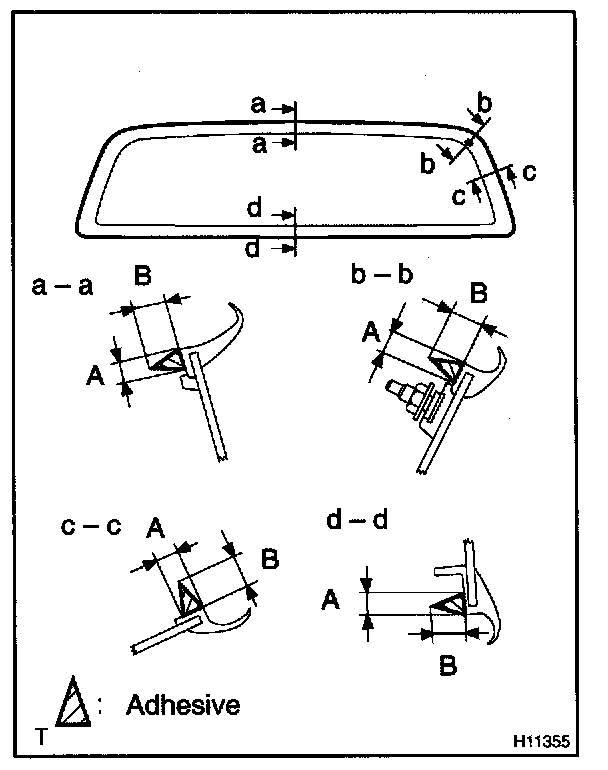
c. Coat the glass with adhesive, as shown in the illustration.
A: 8.0 mm (0.314 in.)
B: 12.0 mm (0.472 in.)
7. Slide type:
APPLY ADHESIVE
a. Cut off the tip of the cartridge nozzle.
Part No. 08850-00801 or equivalent
HINT: After cutting off the tip, use all adhesive within the time described in the table.
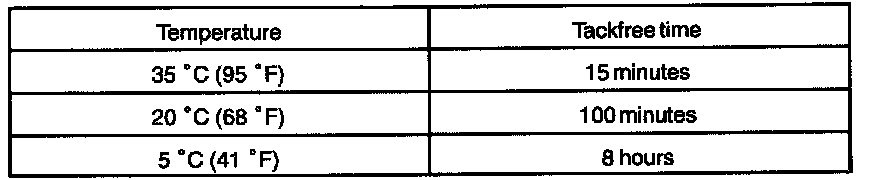
b. Load the cartridge into a sealer gun.
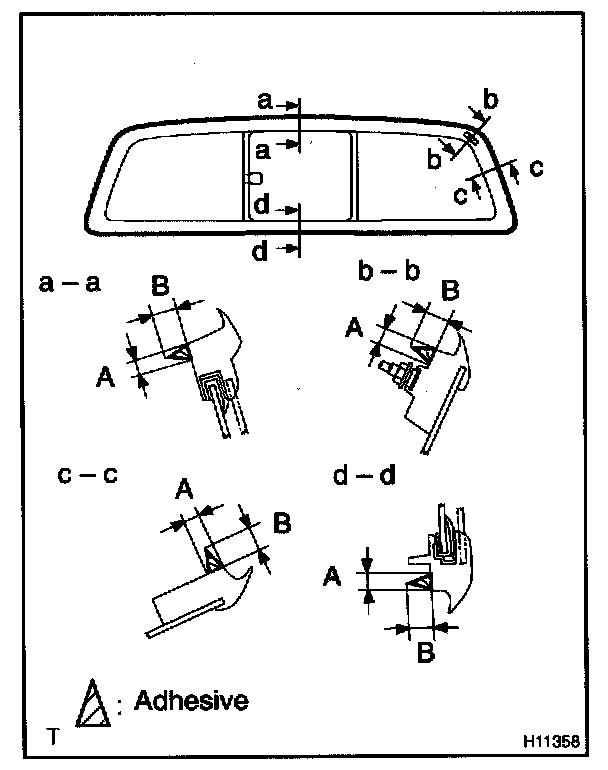
c. Coat the glass with adhesive, as shown in the illustration.
A: 8.0 mm (0.314 in.)
B: 12.0 mm (0.472 in.)
8. INSTALL BACK WINDOW GLASS
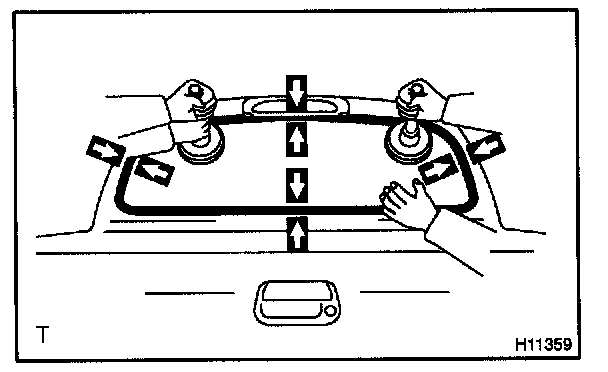
a. Position the glass so that the reference marks are aligned, and press it in gently along the rim.
b. Using a spatula, apply adhesive on the glass rim.
c. Use a scraper to remove any excess or protruding adhesive.
HINT: Confirm that the moulding is attached to the body panel as shown in the illustration.
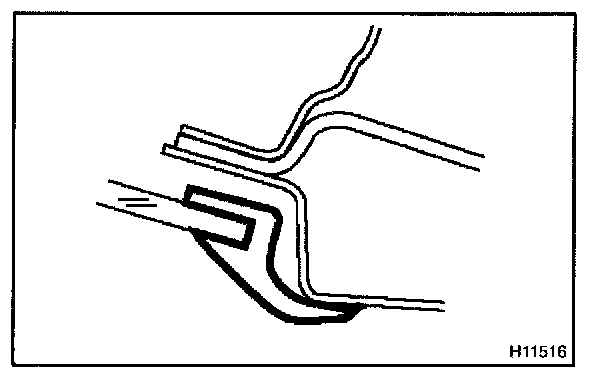
d. Hold the back window glass in place securely with a protective tape or equivalent until the adhesive hardens.
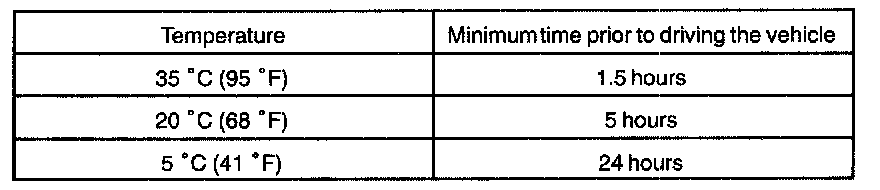
NOTE: Take care not to drive the vehicle during the time described in the table.
9. INSPECT FOR LEAK AND REPAIR
NOTE: Conduct a leak test after the adhesive has completely hardened.
Part No. 08833-00030 or equivalent
10. Power slide type:
INSTALL BACK WINDOW REGULATOR ASSEMBLY
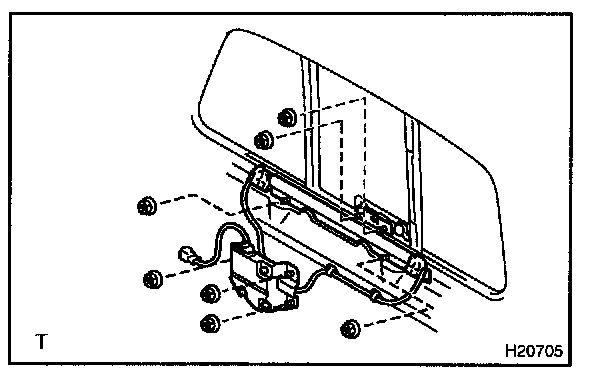
a. Install the back window regulator assembly with the 7 nuts.
Torque: 5.5 N.m (54 kgf.cm, 49 in.lbf)
b. Install the back door glass channel cover.
11. Power slide type:
INSTALL BACK PANEL SILENCER PADS
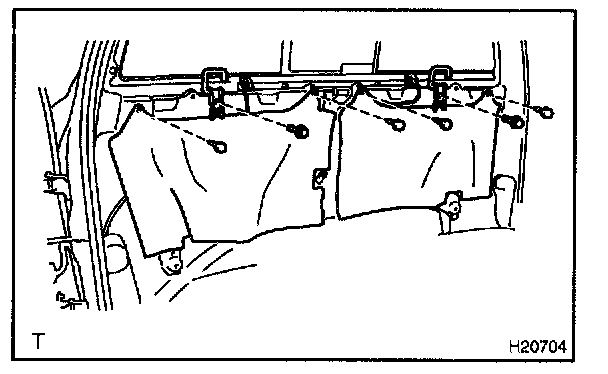
a. Install the 4 clips and 2 back panel silencer pads.
b. Install the tether anchor brackets with the 2 bolts.
Torque: 20 N.m (200 kgf.cm, 15 ft.lbf)
12. INSTALL REAR PART OF ROOF HEADLINING
a. Standard cab:
Install the rear part of the roof headlining with the 2 clips.
b. Access cab:
Install the rear part of the roof headlining with the 3 clips.
13. INSTALL QUARTER TRIMS
14. Standard cab:
INSTALL BACK PANEL UPPER GARNISH
15. Standard cab:
INSTALL COAT HOOK
16. INSTALL ROOM LIGHT
17. Access cab (Standard Body Type),
Access cab (Wide Body Type):
INSTALL ROOF SIDE RAIL GARNISHES
18. Standard cab:
INSTALL FRONT PILLAR GARNISHES
19. INSTALL ASSIST GRIPS
20. Access cab (Standard Body Type),
Access cab (Wide Body Type):
INSTALL ACCESS DOOR SCUFF PLATES
21. Standard cab:
INSTALL FRONT DOOR SCUFF PLATES
22. Access cab (Standard Body Type),
Access cab (Wide Body Type):
INSTALL REAR SEAT