Lower Control Arm Replacement
Lower Control Arm Replacement (4 Wheel Drive)
Tools Required
* J 43631 Ball Joint Remover
* J 45851 Ball Joint Separator Protector Adapters
Removal Procedure
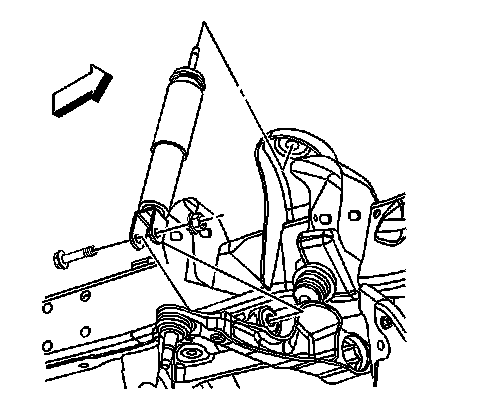
1. Raise and support the vehicle. Refer to Lifting and Jacking the Vehicle .
2. Remove the tire and wheel.
3. Remove the torsion bar.
4. Remove the stabilizer link.
5. Remove the wheel drive shaft.
6. Remove the shock absorber lower retaining nut and bolt.

7. Remove the lower ball joint retaining nut.

8. Disconnect the lower ball joint from the steering knuckle using J 43631 and J 45851 .
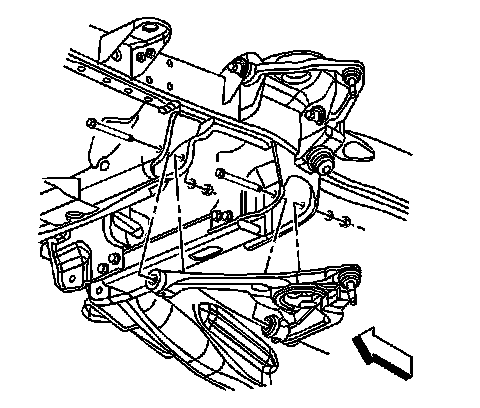
9. Remove the lower control arm nuts and the washers.
10. Remove the lower control arm bolts.
11. Remove the lower control arm.
Installation Procedure
1. Install the lower control arm.
2. Connect the lower ball joint to the steering knuckle.
3. Install the lower control arm mounting bolts.
Notice: Refer to Fastener Notice .
4. Install the lower control arm mounting nuts and the washers.
* W/O 14050/12300 GVW, tighten the nuts to 155 N.m (114 lb ft).
* With 14050/12300 GVW, tighten the nuts to 240 N.m (177 lb ft).
* With Diesel Engine, tighten the nuts to 240 N.m (177 lb ft).
5. Install the lower ball joint retaining nut.
Tighten the nut to 100 N.m (74 lb ft).
6. Install the shock absorber lower retaining nut and bolt.
Tighten the nut to 80 N.m (59 lb ft).
7. Install the wheel drive shaft.
8. Install the stabilizer link.
9. Install the torsion bar.
10. Install the tire and wheel.
11. Lower the vehicle.
12. Check the wheel alignment. Refer to Measuring Wheel Alignment .