 |
absggw00000556
ENGINE REMOVAL/INSTALLATION [WLT-1, WLT-2]
id011096800400
1. Remove the air intake pipe. (See INTAKE-AIR SYSTEM REMOVAL/INSTALLATION [WLT-1, WLT-2].)
2. Remove the battery. (See BATTERY REMOVAL/INSTALLATION [WLT-1, WLT-2, WL-3, WL-C, WE-C].)
3. Remove the radiator. (See RADIATOR REMOVAL/INSTALLATION [WLT-1, WLT-2, WL-3].)
4. Remove the front pipe. (See EXHAUST SYSTEM REMOVAL/INSTALLATION [WLT-1, WLT-2].)
5. Remove the transmission. (See TRANSMISSION REMOVAL/INSTALLATION [R15M-D].)
6. Remove the P/S oil pump with the oil hoses and pipes still connected. (See POWER STEERING OIL PUMP REMOVAL/INSTALLATION [WLT-1, WLT-2, WL-3, WL-C, WE-C].)
7. Remove the A/C compressor with the pipes still connected. (See A/C COMPRESSOR REMOVAL/INSTALLATION.)
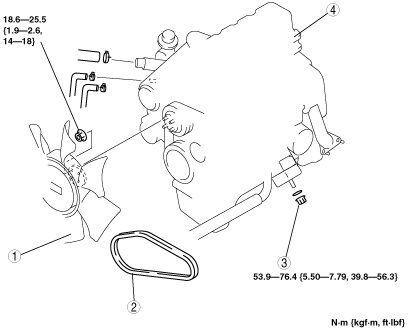
8. Remove the order indicated in the table.
9. Install in the reverse order of removal.
10. Adjust the drive belt deflection. (See DRIVE BELT ADJUSTMENT [WLT-1, WLT-2].)
11. Bleed air in the fuel line. (See AFTER REPAIR PROCEDURE [WLT-1, WLT-2].)
12. Start the engine and
13. Perform a road test.
absggw00000556
|
|
1
|
Cooling fan
|
|
2
|
Drive belt
|
|
3
|
Engine mount nut
|
|
4
|
Engine
|
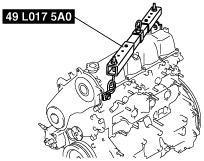
Engine Removal/Installation Note
1. Install the SST to the cylinder head as shown in the figure.
arnffw00001240
|