PTC (POSITIVE TEMPERATURE COEFFICIENT) HEATER REMOVAL/INSTALLATION [FULL-AUTO AIR CONDITIONER]
id0740a1806900
1. Disconnect the negative battery cable. (See NEGATIVE BATTERY CABLE DISCONNECTION/CONNECTION [SKYACTIV-D 2.2].)
2. Remove the following parts:
- (1) Shift lever knob (MTX) (See MANUAL TRANSAXLE SHIFT MECHANISM REMOVAL/INSTALLATION [C66M-R, C66MX-R].) (See MANUAL TRANSAXLE SHIFT MECHANISM REMOVAL/INSTALLATION [D66M-R, D66MX-R].)
-
- (2) Glove compartment (See GLOVE COMPARTMENT REMOVAL/INSTALLATION.)
-
- (3) Front console box (See FRONT CONSOLE BOX REMOVAL/INSTALLATION.)
-
- (4) Shift panel (See SHIFT PANEL REMOVAL/INSTALLATION.)
-
- (5) Upper panel (See UPPER PANEL REMOVAL/INSTALLATION.)
-
- (6) Rear console (See REAR CONSOLE REMOVAL/INSTALLATION.)
-
- (7) Side wall (See SIDE WALL REMOVAL/INSTALLATION.)
-
- (8) Decoration panel (See DECORATION PANEL REMOVAL/INSTALLATION.)
-
- (9) Front console (See FRONT CONSOLE BOX REMOVAL/INSTALLATION.)
-
- (10) Front scuff plate (passenger-side) (See FRONT SCUFF PLATE REMOVAL/INSTALLATION.)
-
- (11) Front side trim (passenger-side) (See FRONT SIDE TRIM REMOVAL/INSTALLATION.)
-
- (12) Dashboard under cover (See DASHBOARD UNDER COVER REMOVAL/INSTALLATION.)
-
- (13) Front heat duct (passenger-side) (See FRONT HEAT DUCT REMOVAL/INSTALLATION.)
-
- (14) Lower panel (passenger-side) (See LOWER PANEL REMOVAL/INSTALLATION.)
-
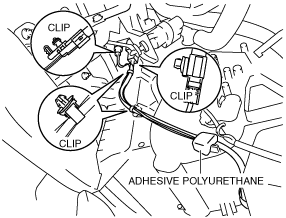
3. Detach the clips.
4. Remove the adhesive polyurethane.
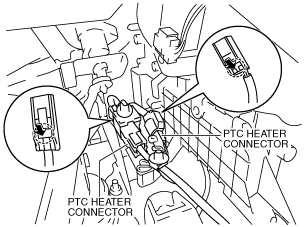
5. Disconnect the PTC heater connectors.
6. Remove the PTC heater wiring harness from the hook as shown in the figure.
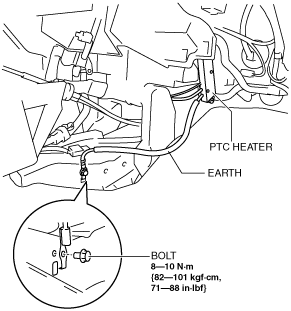
7. Remove the bolt and disconnect the earth.
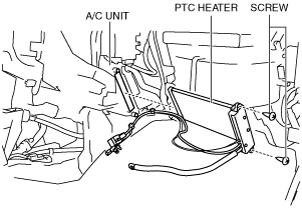
8. Remove the screws and remove the PTC heater.
9. Install in the reverse order of the removal.