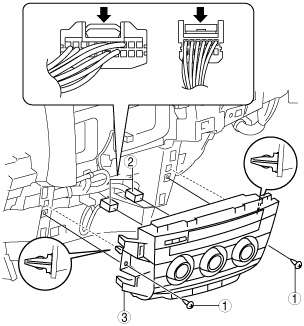
CLIMATE CONTROL UNIT REMOVAL/INSTALLATION [FULL-AUTO AIR CONDITIONER]


id0740a1807400

Note
•  The climate control unit prior to replacement stores the vehicle specification information.
•  The new climate control unit does not store any vehicle specification information.
•  When the ignition is switched ON after the climate control unit is replaced, the climate control unit reads the vehicle specification information sent via CAN transmission from the instrument cluster, and stores the vehicle specification information.

1.  Disconnect the negative battery cable. (See NEGATIVE BATTERY CABLE DISCONNECTION/CONNECTION [SKYACTIV-G 2.0, SKYACTIV-G 2.5].)(See NEGATIVE BATTERY CABLE DISCONNECTION/CONNECTION [SKYACTIV-G 2.0, SKYACTIV-G 2.5 (WITHOUT i-stop)].)(See NEGATIVE BATTERY CABLE DISCONNECTION/CONNECTION [SKYACTIV-D 2.2].)

2.  Remove the following parts:

(1)  Shift lever knob (MTX) (See MANUAL TRANSAXLE SHIFT MECHANISM REMOVAL/INSTALLATION [C66M-R, C66MX-R].) (See MANUAL TRANSAXLE SHIFT MECHANISM REMOVAL/INSTALLATION [D66M-R, D66MX-R].)
(2)  Front console box (See FRONT CONSOLE BOX REMOVAL/INSTALLATION.)
(3)  Shift panel (See SHIFT PANEL REMOVAL/INSTALLATION.)
(4)  Upper panel (See UPPER PANEL REMOVAL/INSTALLATION.)
(5)  Rear console (See REAR CONSOLE REMOVAL/INSTALLATION.)
(6)  Side wall (See SIDE WALL REMOVAL/INSTALLATION.)
(7)  Decoration panel (See DECORATION PANEL REMOVAL/INSTALLATION.)
(8)  Front console (See FRONT CONSOLE REMOVAL/INSTALLATION.)

3.  Remove in the order indicated in the table.

ac5wzw00001877

1
Screw
2
Connector
3
Climate control unit

4.  Install in the reverse order of removal.

5.  Switch the ignition ON and perform the climate control unit automatic configuration.

6.  Clear the DTCs. (See CLEARING DTC [FULL-AUTO AIR CONDITIONER].)