 |
ac5wzw00001719
FRONT DRAIN HOSE REMOVAL/INSTALLATION
id091500443800
1. Disconnect the negative battery cable. (See NEGATIVE BATTERY CABLE DISCONNECTION/CONNECTION [SKYACTIV-G 2.0, SKYACTIV-G 2.5].) (See NEGATIVE BATTERY CABLE DISCONNECTION/CONNECTION [SKYACTIV-G 2.0, SKYACTIV-G 2.5 (WITHOUT i-stop)].) (See NEGATIVE BATTERY CABLE DISCONNECTION/CONNECTION [SKYACTIV-D 2.2].)
2. Remove the following parts:
3. Disconnect the front drain hose from the sunroof frame.
ac5wzw00001719
|
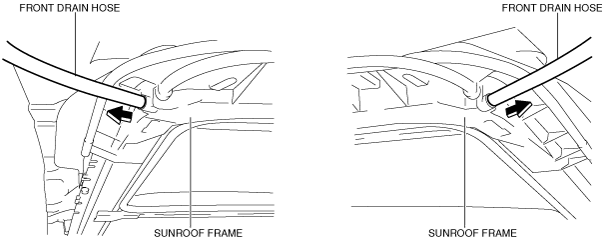
4. Pull the front drain hose in the direction of the arrow in the order of (1), (2) and remove it while detaching hooks A.
ac5wzw00001720
|
5. Pull the front drain hose in the direction of the arrow in the order of (3), (4) and remove it while detaching hooks B.
6. Remove the car-navigation unit. (driver-side) (See CAR-NAVIGATION UNIT REMOVAL/INSTALLATION.)
7. Remove the glove compartment. (passenger-side) (See GLOVE COMPARTMENT REMOVAL/INSTALLATION.)
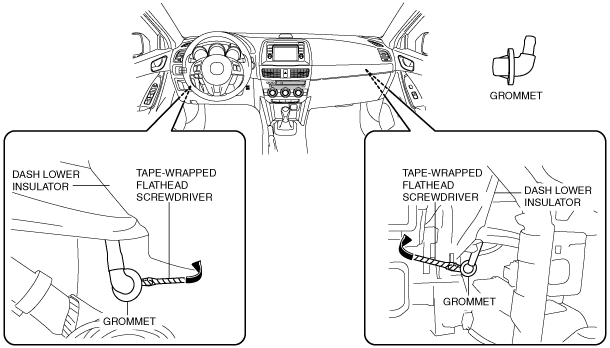
8. While visually verifying from the car-navigation unit opening (driver-side) and glove component opening (passenger-side), partially peel back the dashboard lower insulator, insert a tape-wrapped flathead screwdriver into the position shown in the figure, then remove the grommet in the direction of the arrow.
ac5wzw00001500
|
9. Pull the front drain hose out from the A-pillar side.
ac5wzw00001721
|
10. Install in the reverse order of removal.