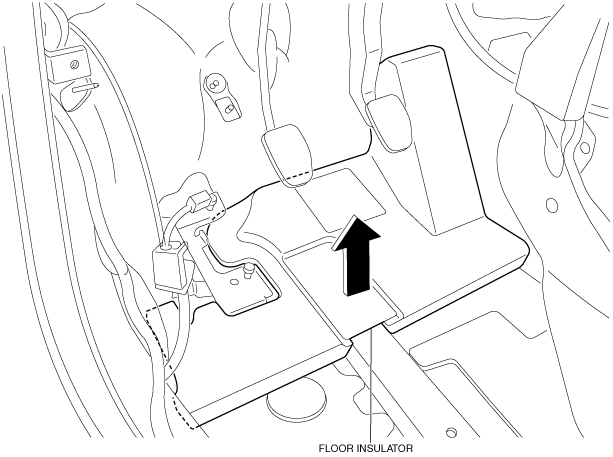
FLOOR INSULATOR REMOVAL/INSTALLATION
id091700889000
Driver-side
1. Disconnect the negative battery cable. (See NEGATIVE BATTERY CABLE DISCONNECTION/CONNECTION [SKYACTIV-G 2.0, SKYACTIV-G 2.5].) (See NEGATIVE BATTERY CABLE DISCONNECTION/CONNECTION [SKYACTIV-G 2.0, SKYACTIV-G 2.5 (WITHOUT i-stop)].) (See NEGATIVE BATTERY CABLE DISCONNECTION/CONNECTION [SKYACTIV-D 2.2].)
2. Remove the following parts:
- (1) Driver-side front scuff plate (See FRONT SCUFF PLATE REMOVAL/INSTALLATION.)
-
- (2) Driver-side front side trim (See FRONT SIDE TRIM REMOVAL/INSTALLATION.)
-
- (3) Decoration panel (See DECORATION PANEL REMOVAL/INSTALLATION.)
-
- (4) Shift lever knob (MTX) (See MANUAL TRANSAXLE SHIFT MECHANISM REMOVAL/INSTALLATION [C66M-R, C66MX-R].) (See MANUAL TRANSAXLE SHIFT MECHANISM REMOVAL/INSTALLATION [D66M-R, D66MX-R].)
-
- (5) Front console box (See FRONT CONSOLE BOX REMOVAL/INSTALLATION.)
-
- (6) Shift panel (See SHIFT PANEL REMOVAL/INSTALLATION.)
-
- (7) Upper panel (See UPPER PANEL REMOVAL/INSTALLATION.)
-
- (8) Rear console (See REAR CONSOLE REMOVAL/INSTALLATION.)
-
- (9) Side wall (See SIDE WALL REMOVAL/INSTALLATION.)
-
- (10) Front console (See FRONT CONSOLE REMOVAL/INSTALLATION.)
-
- (11) Accelerator pedal (See ACCELERATOR PEDAL REMOVAL/INSTALLATION [SKYACTIV-G 2.0, SKYACTIV-G 2.5].)
-
3. Partially peel back the floor covering.
4. Pull the floor insulator in the direction of the arrow and remove it.
5. Install in the reverse order of removal.
Passenger-side
1. Disconnect the negative battery cable. (See NEGATIVE BATTERY CABLE DISCONNECTION/CONNECTION [SKYACTIV-G 2.0, SKYACTIV-G 2.5].) (See NEGATIVE BATTERY CABLE DISCONNECTION/CONNECTION [SKYACTIV-G 2.0, SKYACTIV-G 2.5 (WITHOUT i-stop)].) (See NEGATIVE BATTERY CABLE DISCONNECTION/CONNECTION [SKYACTIV-D 2.2].)
2. Remove the following parts:
- (1) Passenger-side front scuff plate (See FRONT SCUFF PLATE REMOVAL/INSTALLATION.)
-
- (2) Passenger-side front side trim (See FRONT SIDE TRIM REMOVAL/INSTALLATION.)
-
- (3) Grove compartment (See GLOVE COMPARTMENT REMOVAL/INSTALLATION.)
-
- (4) Decoration panel (See DECORATION PANEL REMOVAL/INSTALLATION.)
-
- (5) Shift lever knob (MTX) (See MANUAL TRANSAXLE SHIFT MECHANISM REMOVAL/INSTALLATION [C66M-R, C66MX-R].) (See MANUAL TRANSAXLE SHIFT MECHANISM REMOVAL/INSTALLATION [D66M-R, D66MX-R].)
-
- (6) Front console box (See FRONT CONSOLE BOX REMOVAL/INSTALLATION.)
-
- (7) Shift panel (See SHIFT PANEL REMOVAL/INSTALLATION.)
-
- (8) Upper panel (See UPPER PANEL REMOVAL/INSTALLATION.)
-
- (9) Rear console (See REAR CONSOLE REMOVAL/INSTALLATION.)
-
- (10) Side wall (See SIDE WALL REMOVAL/INSTALLATION.)
-
- (11) Front console (See FRONT CONSOLE REMOVAL/INSTALLATION.)
-
3. Partially peel back the floor covering.
4. Remove the fastener.
5. Pull the floor insulator in the direction of the arrow and remove it.
6. Install in the reverse order of removal.
