 |
ac5wzw00005764
FUEL TANK INSPECTION [SKYACTIV-D 2.2]
id0114z7803200
2WD
1. Park the vehicle on a level surface.
2. Perform the “Fuel Line Safety Procedure” referring to the “BEFORE SERVICE PRECAUTION”. (See BEFORE SERVICE PRECAUTION [SKYACTIV-D 2.2].)
3. Drain the fuel. (See FUEL DRAINING PROCEDURE [SKYACTIV-D 2.2].)
4. Remove the rear seat cushion. (See REAR SEAT CUSHION REMOVAL/INSTALLATION.)
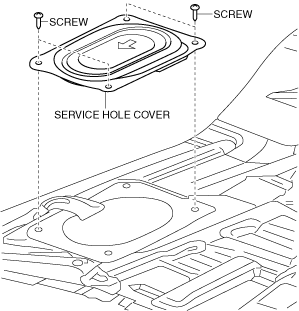
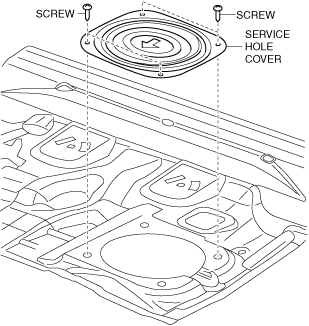
5. Remove the service hole cover.
ac5wzw00005764
|
6. Disconnect the following parts:
7. Remove the floor under cover. (See FLOOR UNDER COVER REMOVAL/INSTALLATION.)
8. Remove the middle pipe. (See EXHAUST SYSTEM REMOVAL/INSTALLATION [SKYACTIV-D 2.2].)
9. Remove the fuel tank and the fuel gauge sender unit as a single unit. (See FUEL TANK REMOVAL/INSTALLATION [SKYACTIV-D 2.2].)
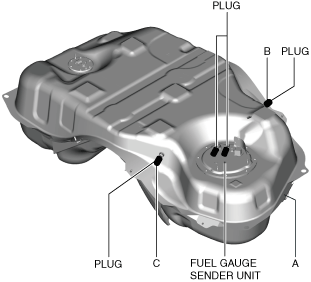
10. Perform the following procedure to verify fuel tank airtightness.
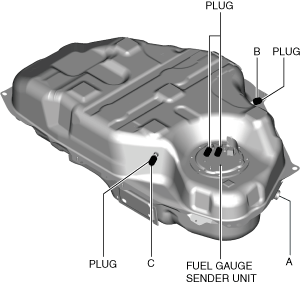
ac5wzw00008640
|
11. Remove the port C plug
ac5wzw00008641
|
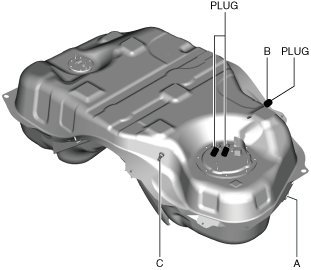
12. Place the fuel tank in a level position.
13. Close port A and apply 5.9 kPa {44 mmHg, 1.7 inHg} of pressure to port C, and leave it in this condition momentarily.
14. Open port A and verify that the pressure decreases from 5.9 kPa {44 mmHg, 1.7 inHg}.
15. Close port A and apply -2.0 kPa {-15 mmHg, -0.59 inHg} vacuum to port C, and leave it in this condition momentarily.
16. Open port A and verify that the -2.0 kPa {-15 mmHg, -0.59 inHg} negative pressure condition restores to near positive pressure.
17. Turn the fuel tank upside down.
18. Apply pressure of 5.9 kPa {44 mmHg, 1.7 inHg} to port C and wait for a while.
ac5wzw00008642
|
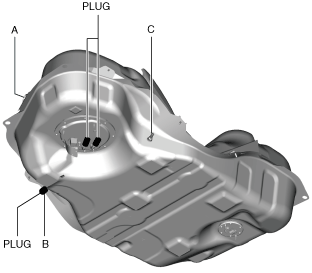
19. Verify that there is no change in the pressure and no air leakage from the fuel tank.
4WD
1. Park the vehicle on a level surface.
2. Perform the “Fuel Line Safety Procedure” referring to the “BEFORE SERVICE PRECAUTION”. (See BEFORE SERVICE PRECAUTION [SKYACTIV-D 2.2].)
3. Drain the fuel. (See FUEL DRAINING PROCEDURE [SKYACTIV-D 2.2].)
4. Remove the rear seat cushion. (See REAR SEAT CUSHION REMOVAL/INSTALLATION.)
5. Remove the service hole cover.
Main side
ac5wzw00005764
|
Sub side
ac5wzw00005770
|
6. Disconnect the following parts:
7. Remove the floor under cover. (See FLOOR UNDER COVER REMOVAL/INSTALLATION.)
8. Remove the middle pipe. (See EXHAUST SYSTEM REMOVAL/INSTALLATION [SKYACTIV-D 2.2].)
9. Remove the propeller shaft. (See PROPELLER SHAFT REMOVAL/INSTALLATION.)
10. Remove the fuel tank, fuel gauge sender unit (main), and fuel gauge sender unit (sub) as a single unit. (See FUEL TANK REMOVAL/INSTALLATION [SKYACTIV-D 2.2].)
11. Perform the following procedure to verify fuel tank airtightness.
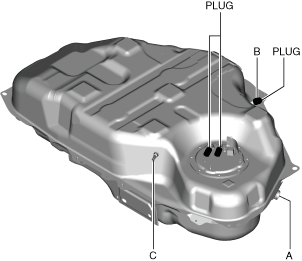
ac5wzw00008643
|
12. Remove the port C plug
ac5wzw00008644
|
13. Place the fuel tank in a level position.
14. Close port A and apply 5.9 kPa {44 mmHg, 1.7 inHg} of pressure to port C, and leave it in this condition momentarily.
15. Open port A and verify that the pressure decreases from 5.9 kPa {44 mmHg, 1.7 inHg}.
16. Close port A and apply -2.0 kPa {-15 mmHg, -0.59 inHg} vacuum to port C, and leave it in this condition momentarily.
17. Open port A and verify that the -2.0 kPa {-15 mmHg, -0.59 inHg} negative pressure condition restores to near positive pressure.
18. Turn the fuel tank upside down.
19. Apply pressure of 5.9 kPa {44 mmHg, 1.7 inHg} to port C and wait for a while.
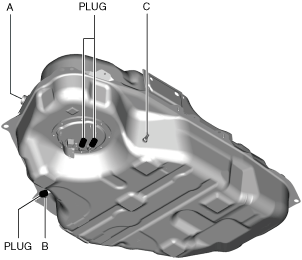
ac5wzw00008973
|
20. Verify that there is no change in the pressure and no air leakage from the fuel tank.