FUEL-FILLER LID OPENER CABLE REMOVAL/INSTALLATION
id091400510800
L.H.D.
1. Disconnect the negative battery terminal. (See NEGATIVE BATTERY TERMINAL DISCONNECTION/CONNECTION.)
2. Remove the following parts:
- (1) Front seat (LH) (See FRONT SEAT REMOVAL/INSTALLATION.)
-
- (2) Front scuff plate (LH) (See FRONT SCUFF PLATE REMOVAL/INSTALLATION.)
-
- (3) Front side trim (LH) (See FRONT SIDE TRIM REMOVAL/INSTALLATION.)
-
- (4) Rear seat cushion (See REAR SEAT CUSHION REMOVAL/INSTALLATION.)
-
- (5) Rear scuff plate (LH) (See REAR SCUFF PLATE REMOVAL/INSTALLATION.)
-
- (6) B-pillar lower trim (LH) (See B-PILLAR LOWER TRIM REMOVAL/INSTALLATION.)
-
- (7) Lap pre-tensioner seat belt cover (LH) (See FRONT SEAT BELT REMOVAL/INSTALLATION.)
-
- (8) Lap pre-tensioner seat belt (LH) (See FRONT SEAT BELT REMOVAL/INSTALLATION.)
-
- (9) Trunk board (See TRUNK BOARD REMOVAL/INSTALLATION.)
-
- (10) Bass-box (with Bose®) (See BASS-BOX REMOVAL/INSTALLATION.)
-
- (11) Sub-trunk (See SUB-TRUNK REMOVAL/INSTALLATION.)
-
- (12) Trunk end trim (See TRUNK END TRIM REMOVAL/INSTALLATION.)
-
- (13) Trunk side trim (LH) (See TRUNK SIDE TRIM REMOVAL/INSTALLATION.)
-
- (14) Fuel-filler lid opener (See FUEL-FILLER LID OPENER AND LEVER REMOVAL/INSTALLATION.)
-
- (15) Fuel-filler lid opener lever (See FUEL-FILLER LID OPENER AND LEVER REMOVAL/INSTALLATION.)
-
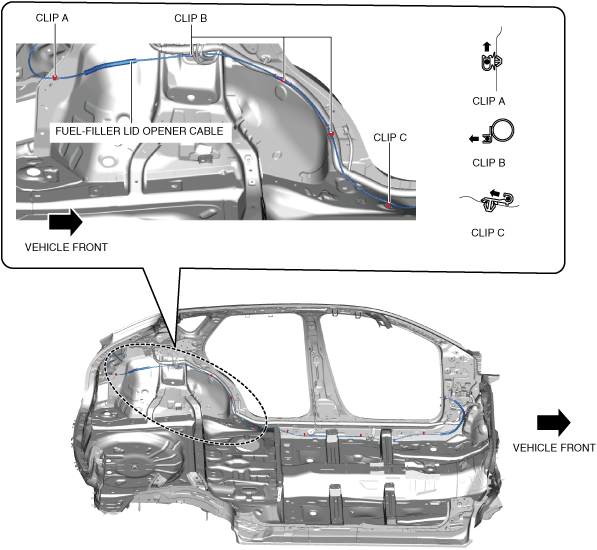
3. Remove the fuel-filler lid opener cable from clips A,B, and C.
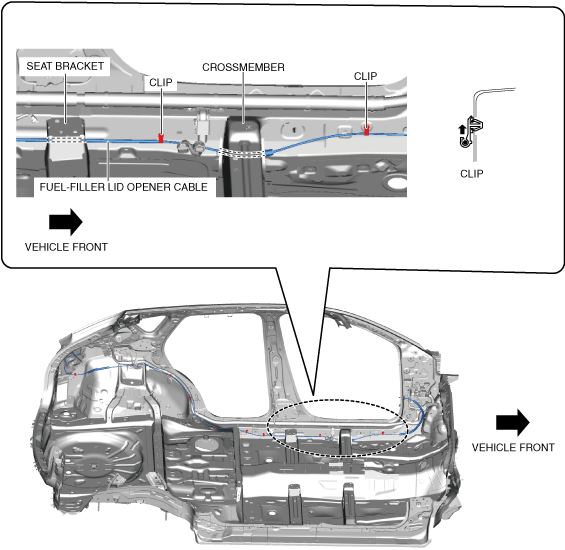
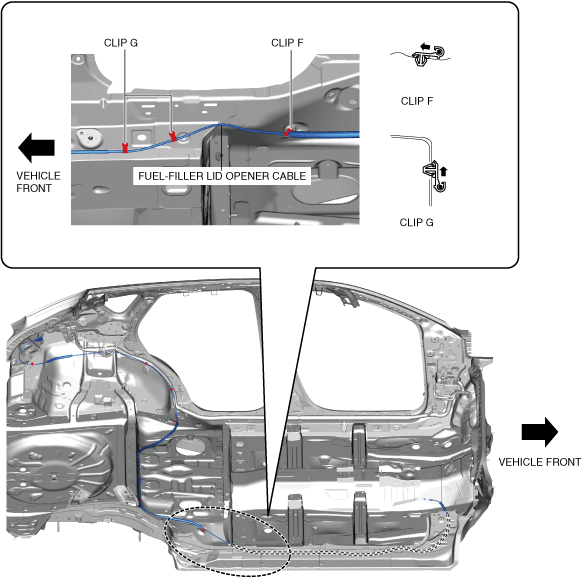
4. Peel back the floor mat and remove the fuel-filler lid opener cable from the clips shown in the figure.
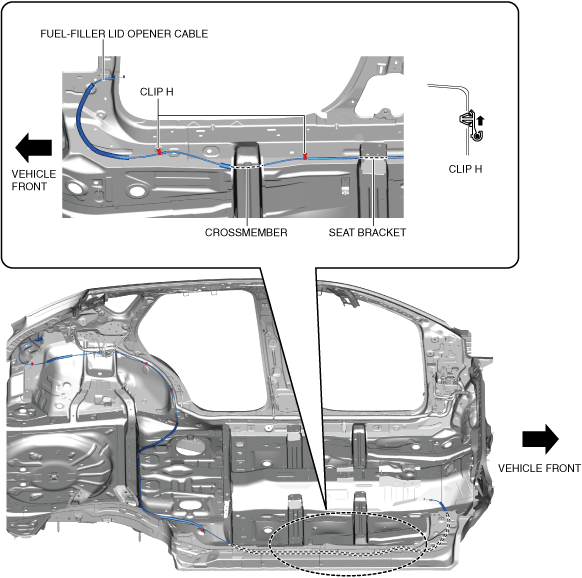
5. Peel back the floor mat and remove the fuel-filler lid opener cable from the clips shown in the figure.
6. Pull the fuel-filler lid opener cable from the crossmember and the seat bracket.
7. Install in the reverse order of removal.
R.H.D.
1. Disconnect the negative battery terminal. (See NEGATIVE BATTERY TERMINAL DISCONNECTION/CONNECTION.)
2. Remove the following parts:
- (1) Front seat (RH) (See FRONT SEAT REMOVAL/INSTALLATION.)
-
- (2) Front scuff plate (RH) (See FRONT SCUFF PLATE REMOVAL/INSTALLATION.)
-
- (3) Front side trim (RH) (See FRONT SIDE TRIM REMOVAL/INSTALLATION.)
-
- (4) Rear seat cushion (See REAR SEAT CUSHION REMOVAL/INSTALLATION.)
-
- (5) Rear scuff plate (See REAR SCUFF PLATE REMOVAL/INSTALLATION.)
-
- (6) B-pillar lower trim (RH) (See B-PILLAR LOWER TRIM REMOVAL/INSTALLATION.)
-
- (7) Lap pre-tensioner seat belt cover (RH) (See FRONT SEAT BELT REMOVAL/INSTALLATION.)
-
- (8) Lap pre-tensioner seat belt (RH) (See FRONT SEAT BELT REMOVAL/INSTALLATION.)
-
- (9) Trunk board (See TRUNK BOARD REMOVAL/INSTALLATION.)
-
- (10) Bass-box (with Bose®) (See BASS-BOX REMOVAL/INSTALLATION.)
-
- (11) Sub-trunk (See SUB-TRUNK REMOVAL/INSTALLATION.)
-
- (12) Trunk end trim (See TRUNK END TRIM REMOVAL/INSTALLATION.)
-
- (13) Trunk side trim (LH) (See TRUNK SIDE TRIM REMOVAL/INSTALLATION.)
-
- (14) Fuel-filler lid opener (See FUEL-FILLER LID OPENER AND LEVER REMOVAL/INSTALLATION.)
-
- (15) Fuel-filler lid opener lever (See FUEL-FILLER LID OPENER AND LEVER REMOVAL/INSTALLATION.)
-
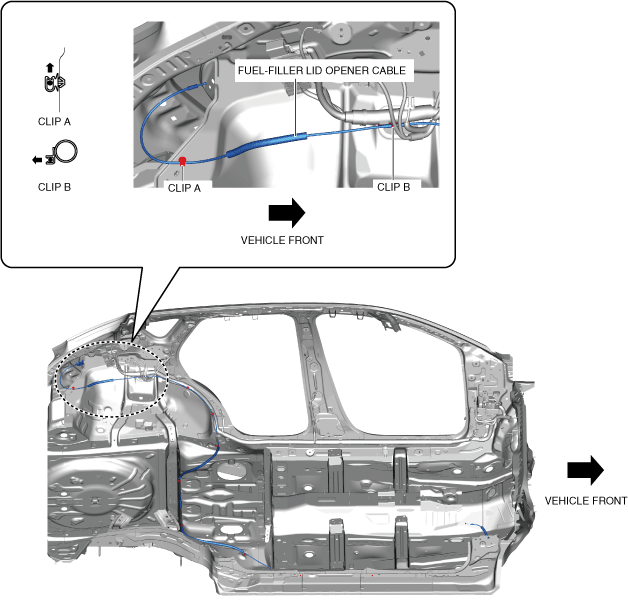
3. Remove the fuel-filler lid opener cable from clips A and B.
4. Remove the fuel-filler lid opener cable from clips C and D.
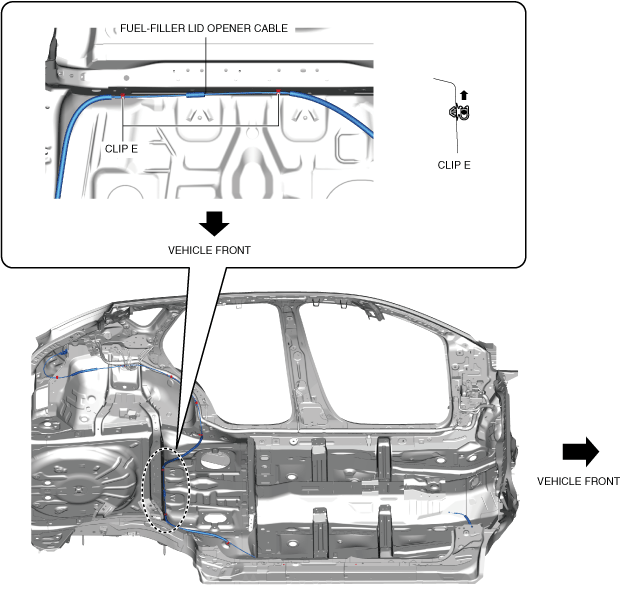
5. Remove the fuel-filler lid opener cable from clips E.
6. Peel back the floor mat and remove the fuel-filler lid opener cable from the clips F and G shown in the figure.
7. Peel back the floor mat and remove the fuel-filler lid opener cable from the clips H shown in the figure.
8. Pull the fuel-filler lid opener cable from the crossmember and the seat bracket.
9. Install in the reverse order of removal.