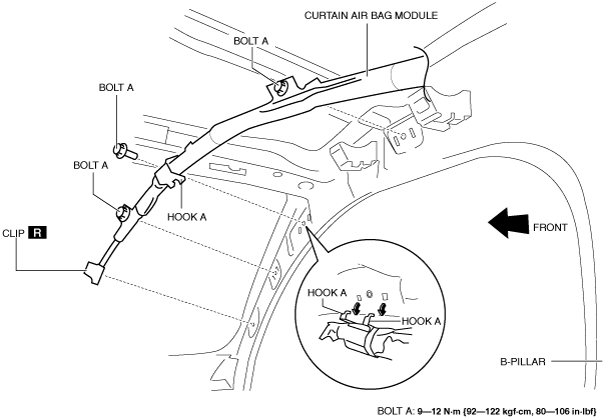
CURTAIN AIR BAG MODULE REMOVAL/INSTALLATION


id081000800900

Warning
•  Handling the air bag module improperly can accidentally deploy the air bag module, which may seriously injure you. Read the air bag system service warnings and cautions before handling the air bag module. (See AIR BAG SYSTEM SERVICE WARNINGS.) (See AIR BAG SYSTEM SERVICE CAUTIONS.)

1.  Switch the ignition to off.

2.  Disconnect the negative battery cable and wait for 1 min or more. (See NEGATIVE BATTERY CABLE DISCONNECTION/CONNECTION [SKYACTIV-G 2.0, SKYACTIV-G 2.5].)(See NEGATIVE BATTERY CABLE DISCONNECTION/CONNECTION [SKYACTIV-G 2.0, SKYACTIV-G 2.5 (WITHOUT i-stop)].)(See NEGATIVE BATTERY CABLE DISCONNECTION/CONNECTION [SKYACTIV-D 2.2].)

3.  Partially peel back the seaming welts.

4.  Remove the following parts:

(1)  Sunroof seaming welt (With sunroof system) (See SUNROOF UNIT REMOVAL/INSTALLATION.)
(2)  A-pillar trim (See A-PILLAR TRIM REMOVAL/INSTALLATION.)
(3)  Front map light (See MAP LIGHT REMOVAL/INSTALLATION.)
(4)  Sunvisor (See SUNVISOR REMOVAL/INSTALLATION.)
(5)  Front scuff plate (See FRONT SCUFF PLATE REMOVAL/INSTALLATION.)
(6)  Front side trim (RH) (with center display) (See FRONT SIDE TRIM REMOVAL/INSTALLATION.)
(7)  Rear scuff plate (See REAR SCUFF PLATE REMOVAL/INSTALLATION.)
(8)  B-pillar lower trim (See B-PILLAR LOWER TRIM REMOVAL/INSTALLATION.)
(9)  Adjust anchor cover (See FRONT SEAT BELT REMOVAL/INSTALLATION.)
(10)  Upper anchor installation bolt on the seat belt (See FRONT SEAT BELT REMOVAL/INSTALLATION.)
(11)  B-pillar upper trim (See B-PILLAR UPPER TRIM REMOVAL/INSTALLATION.)
(12)  Assist handle (See ASSIST HANDLE REMOVAL/INSTALLATION.)
(13)  Trunk covering (See TRUNK COVERING REMOVAL/INSTALLATION.)
(14)  Trunk board (See TRUNK BOARD REMOVAL/INSTALLATION.)
(15)  Trunk end trim (See TRUNK END TRIM REMOVAL/INSTALLATION.)
(16)  Trunk side trim (See TRUNK SIDE TRIM REMOVAL/INSTALLATION.)
(17)  D-pillar trim (See D-PILLAR TRIM REMOVAL/INSTALLATION.)
(18)  C-pillar trim (See C-PILLAR TRIM REMOVAL/INSTALLATION.)

5.  Remove the headliner. (See HEADLINER REMOVAL/INSTALLATION.)

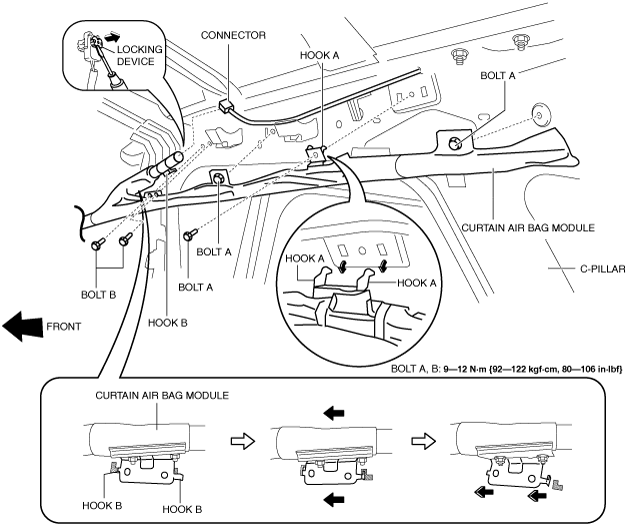
6.  Using a flathead screwdriver, lift the locking device carefully, however do not remove it.

ac5wzw00002006
ac5wzw00002007

7.  Disconnect the connector.

8.  Remove the clip. (See Clip Removal Note.)

9.  Remove bolts A.

10.  Remove bolts B.

11.  Pull hook A in the direction shown in the figure and remove it from the body.

12.  Pull hook B in the direction shown in the figure and remove it from the body.

13.  Remove the curtain air bag module.

14.  Install in the reverse order of removal.

15.  When the Switch the ignition ON (engine off or on).

16.  Verify that the air bag system warning light illuminates for approx. 6 s and goes out.
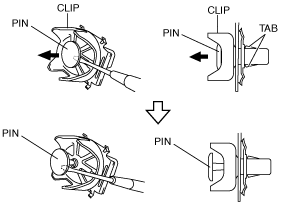
•  If the air bag system warning light does not operate normally, refer to the on-board diagnostic system (air bag system) and perform inspection of the system. (See FLOWCHART [SAS CONTROL MODULE].)


Clip Removal Note

1.  Pull out the pin with flathead screwdriver as shown in the figure.

ac5wzw00003185

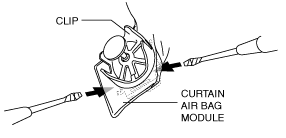
2.  Insert a flathead screwdriver into shown in the figure.

ac5wzw00002008

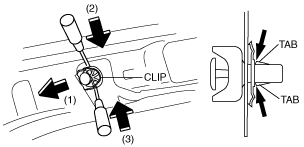
3.  While pulling the curtain air bag in the direction of the arrow shown in the figure (1), detach tabs by prying with a flathead screwdriver in the direction of the arrow (2) (3).

ac5wzw00007374

4.  Remove the clip from the body.