Note
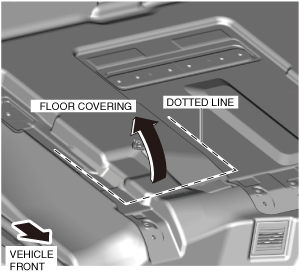
• Cut the floor covering to use the service hole.
ac8wzw00003792
|
FUEL TANK INSPECTION [SKYACTIV-G 2.5]
id0114za803200
2WD
1. Level the vehicle.
2. Complete the “BEFORE SERVICE PRECAUTION”. (See BEFORE SERVICE PRECAUTION [SKYACTIV-G 2.5].)
3. Drain the fuel. (See FUEL DRAINING PROCEDURE [SKYACTIV-G 2.5].)
4. Remove the second-row seat. (See SECOND-ROW SEAT REMOVAL/INSTALLATION.)
5. Cut the floor covering along the dotted lines shown in the figure and partially peel it back.
ac8wzw00003792
|
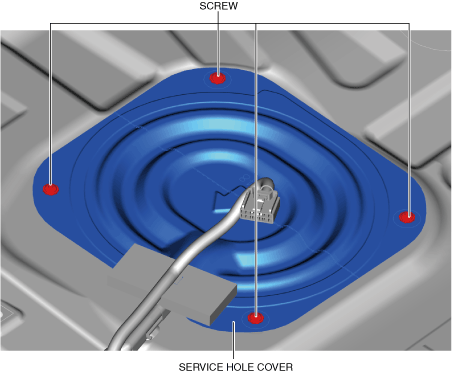
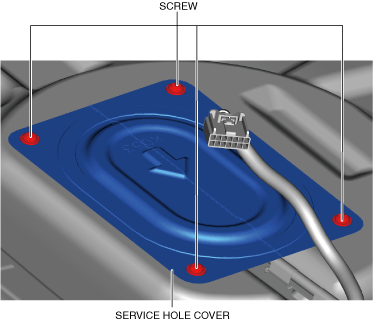
6. Remove the service hole cover.
ac8wzw00003793
|
7. Disconnect the following parts:
8. Remove the floor under cover. (See FLOOR UNDER COVER REMOVAL/INSTALLATION.)
9. Disconnect the HO2S connector.
10. Remove the TWC and HO2S as a single unit. (See EXHAUST SYSTEM REMOVAL/INSTALLATION [SKYACTIV-G 2.5])
11. Remove the fuel tank and fuel pump unit as a single unit. (See FUEL TANK REMOVAL/INSTALLATION [SKYACTIV-G 2.5])
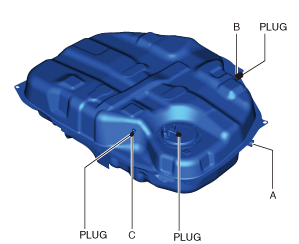
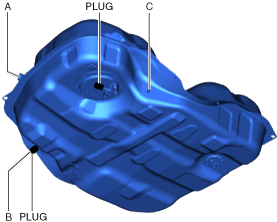
12. Perform the following procedure to verify fuel tank airtightness.
ac8wzw00003794
|
13. Remove the port C plug.
ac8wzw00003795
|
14. Place the fuel tank in a level position.
15. Close port A and apply 5.9 kPa {44 mmHg, 1.7 inHg} of pressure to port C, and leave it in this condition momentarily.
16. Open port A and verify that the pressure decreases from 5.9 kPa {44 mmHg, 1.7 inHg}.
17. Close port A and apply -2.0 kPa {-15 mmHg, -0.59 inHg} vacuum to port C, and leave it in this condition momentarily.
18. Open port A and verify that the -2.0 kPa {-15 mmHg, -0.59 inHg} negative pressure condition restores to near positive pressure.
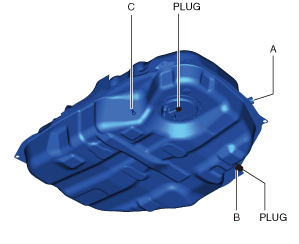
19. Turn the fuel tank upside down.
20. Apply pressure of 5.9 kPa {44 mmHg, 1.7 inHg} to port A and wait for a while.
ac8wzw00003796
|
21. Verify that there is no change in the pressure and no air leakage from the port C.
4WD
1. Level the vehicle.
2. Complete the “BEFORE SERVICE PRECAUTION”. (See BEFORE SERVICE PRECAUTION [SKYACTIV-G 2.5].)
3. Drain the fuel. (See FUEL DRAINING PROCEDURE [SKYACTIV-G 2.5].)
4. Remove the second-row seat. (See SECOND-ROW SEAT REMOVAL/INSTALLATION.)
5. Cut the floor covering along the dotted lines shown in the figure and partially peel it back.
main side
ac8wzw00003792
|
sub side
ac8wzw00003797
|
6. Remove the service hole cover.
Main side
ac8wzw00003793
|
Sub side
ac8wzw00003798
|
7. Disconnect the following parts:
8. Remove the floor under cover. (See FLOOR UNDER COVER REMOVAL/INSTALLATION.)
9. Disconnect the HO2S connector.
10. Remove the TWC and HO2S as a single unit. (See EXHAUST SYSTEM REMOVAL/INSTALLATION [SKYACTIV-G 2.5])
11. Remove the propeller shaft. (See PROPELLER SHAFT REMOVAL/INSTALLATION.)
12. Remove the fuel tank, fuel pump unit and fuel gauge sender unit (sub) as a single unit. (See FUEL TANK REMOVAL/INSTALLATION [SKYACTIV-G 2.5])
13. Perform the following procedure to verify the fuel tank airtightness.
ac8wzw00003799
|
14. Remove the port C plug.
ac8wzw00003800
|
15. Place the fuel tank in a level position.
16. Close port A and apply 5.9 kPa {44 mmHg, 1.7 inHg} of pressure to port C, and leave it in this condition momentarily.
17. Open port A and verify that the pressure decreases from 5.9 kPa {44 mmHg, 1.7 inHg}.
18. Close port A and apply -2.0 kPa {-15 mmHg, -0.59 inHg} vacuum to port C, and leave it in this condition momentarily.
19. Open port A and verify that the -2.0 kPa {-15 mmHg, -0.59 inHg} negative pressure condition restores to near positive pressure.
20. Turn the fuel tank upside down.
21. Apply pressure of 5.9 kPa {44 mmHg, 1.7 inHg} to port A and wait for a while.
ac8wzw00003801
|
22. Verify that there is no change in the pressure and no air leakage from the port C.