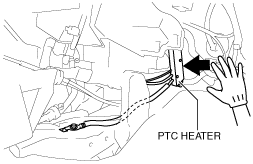
PTC (POSITIVE TEMPERATURE COEFFICIENT) HEATER INSPECTION


id071100002900

am2zzw00012923

Step 1

1.  Remove the side wall. (See SIDE WALL REMOVAL/INSTALLATION.)

2.  Connect the M-MDS to the DLC-2.

3.  After the vehicle is identified, select the following items from the initialization screen of the M-MDS.

(1)  Select “DataLogger”.
(2)  Select “Modules”.
(3)  Select “BCM”.

4.  Operate the PTC heater using the PID “PTC_HEAT_ST”.

5.  Touch the side surface of the PTC heater by hand to verify that it warms up.

am3zzw00015076

Caution
•  Touching the metal part of the PTC heater directly by hand can cause a serious burn. Wear gloves to prevent burns.

•  If the side surface of the PTC heater does not warm, go to the next step.

Step 2

1.  Measure the voltage of the PTC heater terminals 1A and 2A.

•  If there is any malfunction, inspect the parts under “Inspection item (s)”.
―  If the parts under “Inspection item (s)” are found to be normal, go to the next step.

Without i-ELOOP

Terminal

Signal name

Connected to

Measurement condition

Voltage (V)

Inspection item (s)

1A
IG1
•  IG1 relay
•  C/U IG1 15A fuse
Switch the ignition ON (engine off)
B+
•  Related wiring harness
•  IG1 relay
•  C/U IG1 15A fuse
Switch the ignition off
1.0 or less
2A
B+
•  Battery
•  PTC 100A fuse
Under any condition
B+
•  Related wiring harness
•  Battery
•  PTC 100A fuse

With i-ELOOP

Terminal

Signal name

Connected to

Measurement condition

Voltage (V)

Inspection item (s)

1A
IG1
•  IG1 relay
•  C/U IG1 15A fuse
Switch the ignition ON (engine off)
B+
•  Related wiring harness
•  IG1 relay
•  C/U IG1 15A fuse
Switch the ignition off
1.0 or less
2A
B+
•  Capacitor
•  Generator
•  DC-DC converter
•  Battery
Switch the ignition ON (engine on)
B+—24.3
•  Related wiring harness
•  Capacitor
•  Fuse (inside the capacitor)
•  Generator
•  DC-DC converter
•  Battery


Step 3

1.  Operate the PTC heater using the PID “PTC_HEAT_ST”.

2.  Measure the voltage at PTC heater terminal 1B while the PTC heater is operating.

•  If the voltage is 1.0 V or less or does not change from the battery voltage, inspect the body control module (BCM) or the related wiring harness.
―  If the body control module (BCM) or the related wiring harness is normal, go to the next step.


Step 4

1.  Switch the ignition off.

2.  Disconnect the negative battery cable. (See NEGATIVE BATTERY CABLE DISCONNECTION/CONNECTION.)

3.  Remove the following parts:

(1)  Center console tray (See CENTER CONSOLE TRAY REMOVAL/INSTALLATION.)
(2)  Shift lever knob (MTX) (See MANUAL TRANSAXLE SHIFT MECHANISM REMOVAL/INSTALLATION [F65M-R].)(See MANUAL TRANSAXLE SHIFT MECHANISM REMOVAL/INSTALLATION [F66M-R].)
(3)  Selector lever knob (ATX) (See AUTOMATIC TRANSAXLE SHIFT MECHANISM REMOVAL/INSTALLATION.)
(4)  Shift bezel (See SHIFT BEZEL REMOVAL/INSTALLATION.)
(5)  Upper panel (See UPPER PANEL REMOVAL/INSTALLATION.)
(6)  Shift panel (See SHIFT PANEL REMOVAL/INSTALLATION.)
(7)  Console side panel (See CONSOLE SIDE PANEL REMOVAL/INSTALLATION.)
(8)  Front console box (See FRONT CONSOLE BOX REMOVAL/INSTALLATION.)
(9)  Glove compartment (See GLOVE COMPARTMENT REMOVAL/INSTALLATION.)
(10)  Dashboard under cover (See DASHBOARD UNDER COVER REMOVAL/INSTALLATION.)
(11)  Side wall (See SIDE WALL REMOVAL/INSTALLATION.)
(12)  Front heat duct (See FRONT HEAT DUCT REMOVAL/INSTALLATION.)
(13)  CD player (with CD player) (See CD PLAYER REMOVAL.)(See CD PLAYER INSTALLATION.)
(14)  DVD/CD player (with DVD/CD player) (See DVD/CD PLAYER REMOVAL.)(See DVD/CD PLAYER INSTALLATION.)
(15)  Front console (See FRONT CONSOLE REMOVAL/INSTALLATION.)
(16)  Passenger-side front scuff plate (See FRONT SCUFF PLATE REMOVAL/INSTALLATION.)
(17)  Passenger-side front side trim (See FRONT SIDE TRIM REMOVAL/INSTALLATION.)
(18)  Center panel (See CENTER PANEL REMOVAL/INSTALLATION.)
(19)  Passenger-side lower panel (See PASSENGER-SIDE LOWER PANEL REMOVAL/INSTALLATION.)

4.  Connect the negative battery cable.

5.  Switch the ignition ON (engine off or on).

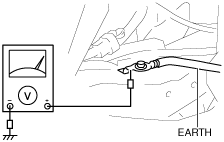
6.  Operate the PTC heater using the PID “PTC_HEAT_ST”.

7.  Measure the voltage at the ground of the PTC heater as shown in the figure.

am6zzw00010705
•  If the voltage is other than 0 V, verify that there is no poor contact between the ground and the body.
―  If there is no poor contact between the ground and the body, replace the PTC heater. (See PTC (POSITIVE TEMPERATURE COEFFICIENT) HEATER REMOVAL/INSTALLATION.)