HEAT DUCT COMPONENT REMOVAL/INSTALLATION
id071100816700
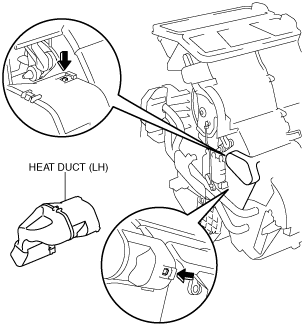
L.H.D.: Heat Duct (LH)
1. Disconnect the negative battery cable.
2. Remove the following parts:
- (1) Shift lever knob (MTX) (See MANUAL TRANSAXLE SHIFT MECHANISM REMOVAL/INSTALLATION [F35M-R].) (See MANUAL TRANSAXLE SHIFT MECHANISM REMOVAL/INSTALLATION [B65M-R].)
- (2) Side wall (See SIDE WALL REMOVAL/INSTALLATION.)
- (3) Front console component (See FRONT CONSOLE COMPONENT REMOVAL/INSTALLATION.)
- (4) Front scuff plate (LH) (See FRONT SCUFF PLATE REMOVAL/INSTALLATION.)
- (5) Front side trim (LH) (See FRONT SIDE TRIM REMOVAL/INSTALLATION.)
- (6) Bonnet release lever (See BONNET LATCH AND RELEASE LEVER REMOVAL/INSTALLATION.)
- (7) Driver's side lower panel (See LOWER PANEL REMOVAL/INSTALLATION.)
3. Using a flathead screwdriver, unhook the heat duct (LH) hooks and remove the heat duct (LH).
4. Install in the reverse order of removal.
L.H.D.: Heat Duct (RH) No.1
1. Disconnect the negative battery cable.
2. Remove the following parts:
- (1) Glove compartment (See GLOVE COMPARTMENT REMOVAL/INSTALLATION.)
- (2) Glove compartment cover (See GLOVE COMPARTMENT COVER REMOVAL/INSTALLATION.)
- (3) Dashboard under cover (See DASHBOARD UNDER COVER REMOVAL/INSTALLATION.)
3. Remove in the order indicated in the table.
|
1
|
Fastener
|
|
2
|
Heat duct (RH) No.1
|
4. Install in the reverse order of removal.
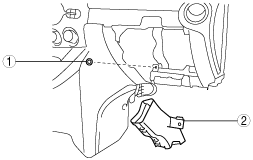
L.H.D.: Heat Duct (RH) No.2
1. Disconnect the negative battery cable.
2. Remove the following parts:
- (1) Glove compartment (See GLOVE COMPARTMENT REMOVAL/INSTALLATION.)
- (2) Glove compartment cover (See GLOVE COMPARTMENT COVER REMOVAL/INSTALLATION.)
- (3) Dashboard under cover (See DASHBOARD UNDER COVER REMOVAL/INSTALLATION.)
- (4) Heat duct (RH) No.1
- (5) Shift lever knob (MTX) (See MANUAL TRANSAXLE SHIFT MECHANISM REMOVAL/INSTALLATION [F35M-R].) (See MANUAL TRANSAXLE SHIFT MECHANISM REMOVAL/INSTALLATION [B65M-R].)
- (6) Side wall (See SIDE WALL REMOVAL/INSTALLATION.)
- (7) Front console component (See FRONT CONSOLE COMPONENT REMOVAL/INSTALLATION.)
- (8) Center panel unit (with audio) (See CENTER PANEL UNIT REMOVAL/INSTALLATION.)
- (9) Center panel (without audio) (See CENTER PANEL REMOVAL/INSTALLATION.)
3. Using a flathead screwdriver, unhook the heat duct (RH) hooks and remove the heat duct (RH) No.2.
4. Install in the reverse order of removal.
R.H.D.: Heat Duct (RH)
1. Disconnect the negative battery cable.
2. Remove the following parts:
- (1) Shift lever knob (MTX) (See MANUAL TRANSAXLE SHIFT MECHANISM REMOVAL/INSTALLATION [F35M-R].) (See MANUAL TRANSAXLE SHIFT MECHANISM REMOVAL/INSTALLATION [B65M-R].)
- (2) Side wall (See SIDE WALL REMOVAL/INSTALLATION.)
- (3) Front console component (See FRONT CONSOLE COMPONENT REMOVAL/INSTALLATION.)
- (4) Front scuff plate (RH) (See FRONT SCUFF PLATE REMOVAL/INSTALLATION.)
- (5) Front side trim (RH) (See FRONT SIDE TRIM REMOVAL/INSTALLATION.)
- (6) Bonnet release lever (See BONNET LATCH AND RELEASE LEVER REMOVAL/INSTALLATION.)
- (7) Driver's side lower panel (See LOWER PANEL REMOVAL/INSTALLATION.)
- (8) Steering wheel lower side L-shaped bracket (MTX) (See STEERING WHEEL AND COLUMN REMOVAL/INSTALLATION [R.H.D.].)
3. Using a flathead screwdriver, unhook the heat duct (RH) hooks and remove the heat duct (RH).
4. Install in the reverse order of removal.
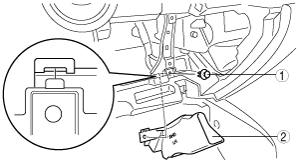
R.H.D.: Heat Duct (LH)
1. Disconnect the negative battery cable.
2. Remove the following parts:
- (1) Glove compartment (See GLOVE COMPARTMENT REMOVAL/INSTALLATION.)
- (2) Glove compartment cover (See GLOVE COMPARTMENT COVER REMOVAL/INSTALLATION.)
- (3) Dashboard under cover (See DASHBOARD UNDER COVER REMOVAL/INSTALLATION.)
3. Remove in the order indicated in the table.
|
1
|
Fastener
|
|
2
|
Heat duct (LH)
|
4. Install in the reverse order of removal.