|
am2zzw00005351
POWER BRAKE UNIT REMOVAL/INSTALLATION (L.H.D.)
id041100803700
1. Remove the battery and battery tray. (See BATTERY REMOVAL/INSTALLATION [MZR 1.3, MZR 1.5].) (See BATTERY REMOVAL/INSTALLATION [MZ-CD 1.6].)
2. Remove the windshield wiper arm and blade. (See WINDSHIELD WIPER ARM AND BLADE REMOVAL/INSTALLATION.)
3. Remove the front fender molding. (See FRONT FENDER PANEL REMOVAL/INSTALLATION.)
4. Remove the cowl grille. (See COWL GRILLE REMOVAL/INSTALLATION.)
5. Remove the windshield wiper motor. (See WINDSHIELD WIPER MOTOR REMOVAL/INSTALLATION.)
6. Remove the cowl panel. (See COWL PANEL REMOVAL/INSTALLATION.)
7. Remove the master cylinder. (See MASTER CYLINDER REMOVAL/INSTALLATION [L.H.D.].)
8. Remove in the order indicated in the table.
9. Remove the brake switch. (See BRAKE PEDAL REMOVAL/INSTALLATION [MZR 1.3, MZR 1.5].)
10. Install in the reverse order of removal.
11. After installation, inspect the brake pedal. (See BRAKE PEDAL INSPECTION.)
12. Perform the shift-lock and key interlock inspections with the ATX vehicles. (See AUTOMATIC TRANSAXLE SHIFT MECHANISM INSPECTION.)
am2zzw00005351
|
|
1
|
Vacuum hose
|
|
2
|
Snap pin
|
|
3
|
Clevis pin
|
|
4
|
Nut
|
|
5
|
Power brake unit
|
|
6
|
Gasket
|
|
7
|
Fork
(See Fork Installation Note.)
|
|
8
|
Locknut
|
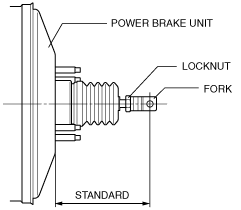
Fork Installation Note
1. Install the fork as shown in the figure.
am2zzw00001076
|