|
am2zzw00006275
LOWER PANEL REMOVAL/INSTALLATION
id091700453900
L.H.D.
Driver’s side
1. Disconnect the negative battery cable.
2. Remove the following parts:
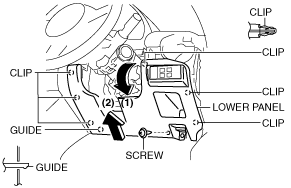
3. Remove the screw, pull the lower panel in the direction of the arrow in the order of (1) , (2), (3), (4) and remove the lower panel while detaching the clips and pins.
am2zzw00006275
|
4. Disconnect the switch connector.
5. Install in the reverse order of removal.
Passenger’s side
1. Remove the front scuff plate. (See FRONT SCUFF PLATE REMOVAL/INSTALLATION)
2. Remove the front side trim. (See FRONT SIDE TRIM REMOVAL/INSTALLATION)
3. Remove the glove compartment (See GLOVE COMPARTMENT REMOVAL/INSTALLATION.)
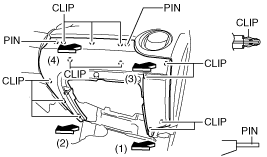
4. Pull the lower panel in the direction of the arrow in the order of (1), (2), (3), (4) then remove it while detaching the clips and pins.
am2uuw00000988
|
5. Install in the reverse order of removal.
R.H.D.
Driver’s side
1. Disconnect the negative battery cable.
2. Remove the following parts:
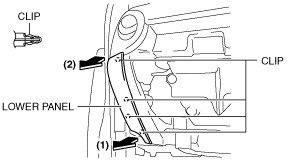
3. Remove the screw, pull the lower panel in the direction of the arrow in the order of (1) and (2), and remove the lower panel while detaching the clips.
adejjw00003103
|
4. Disconnect the switch connector.
5. Install in the reverse order of removal.
Passenger’s side
1. Remove the front scuff plate. (See FRONT SCUFF PLATE REMOVAL/INSTALLATION)
2. Remove the front side trim. (See FRONT SIDE TRIM REMOVAL/INSTALLATION)
3. Pull the lower panel in the direction of the arrow in the order of (1) and (2), then remove it while detaching the clips.
am2zzw00001807
|
4. Install in the reverse order of removal.