HEADLIGHT LEVELING SWITCH INSPECTION
id091800464300
L.H.D.
1. Disconnect the negative battery cable.
2. Remove the switch panel. (See HEADLIGHT LEVELING SWITCH REMOVAL/INSTALLATION.)
3. Remove the Headlight leveling switch. (See HEADLIGHT LEVELING SWITCH REMOVAL/INSTALLATION.)
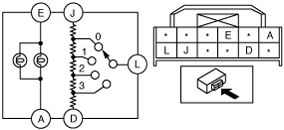
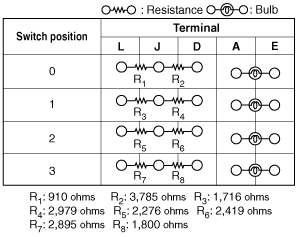
4. Verify that the resistance and continuity between the headlight leveling switch terminals is as indicated in the table.
-
• If not as indicated in the table, or if the resistance is not within the specification, replace the headlight leveling switch.
5. Install in the reverse order of removal.
R.H.D.
1. Disconnect the negative battery cable.
2. Remove the following parts:
- (1) Front scuff plate (driver-side) (See FRONT SCUFF PLATE REMOVAL/INSTALLATION.)
- (2) Front side trim (driver-side) (See FRONT SIDE TRIM REMOVAL/INSTALLATION.)
- (3) Shift lever knob (MTX) (See MANUAL TRANSAXLE SHIFT MECHANISM REMOVAL/INSTALLATION [F35M-R].) (See MANUAL TRANSAXLE SHIFT MECHANISM REMOVAL/INSTALLATION [B65M-R].)
- (4) Side wall (See SIDE WALL REMOVAL/INSTALLATION.)
- (5) Front console component (See FRONT CONSOLE COMPONENT REMOVAL/INSTALLATION.)
- (6) Bonnet release lever (See BONNET LATCH AND RELEASE LEVER REMOVAL/INSTALLATION.)
- (7) Lower panel (driver-side) (See LOWER PANEL REMOVAL/INSTALLATION.)
- (8) Headlight leveling switch (See HEADLIGHT LEVELING SWITCH REMOVAL/INSTALLATION.)
3. Verify that the resistance and continuity between the headlight leveling switch terminals is as indicated in the table.
-
• If not as indicated in the table, or if the resistance is not within the specification, replace the headlight leveling switch.