 |
am3zzw00035773
CYLINDER HEAD GASKET REPLACEMENT [SKYACTIV-X 2.0]
id0110hf800700
Replacement part
|
Cylinder head gasket
Quantity: 1
Location of use: Cylinder head
|
Oil and chemical type
|
Engine oil
Type: Recommended oil
|
Sealant
Type: TB1217D
|
1. Disconnect the negative battery terminal. (See NEGATIVE BATTERY TERMINAL DISCONNECTION/CONNECTION [(E)].)
2. Remove the engine cover. (See ENGINE COVER REMOVAL/INSTALLATION [SKYACTIV-X 2.0].)
3. Remove the ignition coils. (See IGNITION COIL REMOVAL/INSTALLATION [SKYACTIV-X 2.0].)
4. Remove front under cover No.2. (See FRONT UNDER COVER No.2 REMOVAL/INSTALLATION.)
5. Remove the front splash shield (RH). (See SPLASH SHIELD REMOVAL/INSTALLATION.)
6. Remove the water pump drive belt. (See DRIVE BELT REMOVAL/INSTALLATION [SKYACTIV-X 2.0].)
7. Remove the drive belt auto tensioner. (See DRIVE BELT AUTO TENSIONER REMOVAL/INSTALLATION [SKYACTIV-X 2.0].)
8. Drain the engine oil. (See ENGINE OIL REPLACEMENT [SKYACTIV-X 2.0].)
9. Drain the engine coolant and water-cooled charge air cooler coolant. (See ENGINE COOLANT REPLACEMENT [SKYACTIV-X 2.0].)(See WATER-COOLED CHARGE AIR COOLER COOLANT REPLACEMENT [SKYACTIV-X 2.0].)
10. Remove the intake manifold. (See INTAKE MANIFOLD REMOVAL/INSTALLATION [SKYACTIV-X 2.0].)
11. Remove the exhaust manifold. (See EXHAUST MANIFOLD REMOVAL/INSTALLATION [SKYACTIV-X 2.0].)
12. Remove the injection pipe. (See INJECTION PIPE REMOVAL/INSTALLATION [SKYACTIV-X 2.0].)
13. Remove the coolant switching valve. (See COOLANT SWITCHING VALVE (CSV) REMOVAL/INSTALLATION [SKYACTIV-X 2.0].)
14. Remove the cylinder head cover. (See CYLINDER HEAD COVER REMOVAL/INSTALLATION [SKYACTIV-X 2.0].)
15. Remove the engine rear cover (upper). (See ENGINE REAR COVER REMOVAL/INSTALLATION [SKYACTIV-X 2.0].)
16. Remove the timing chain No.1.(See TIMING CHAIN REMOVAL/INSTALLATION [SKYACTIV-X 2.0].)
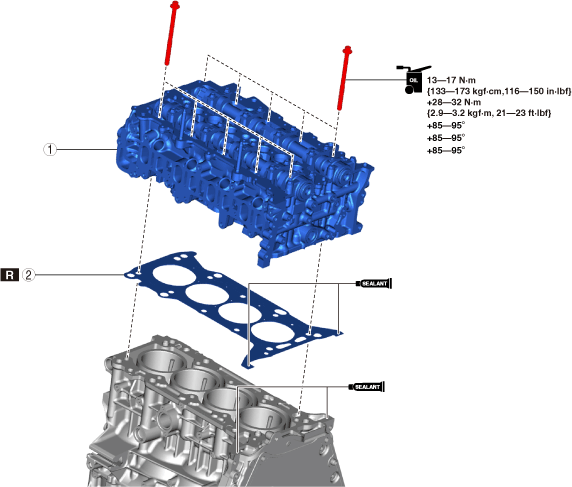
17. Remove using the procedure shown in the figure.
18. Install in the reverse order of removal.
19. Add engine oil to the specified level. (See ENGINE OIL REPLACEMENT [SKYACTIV-X 2.0].)
20. Add engine coolant and water-cooled charge air cooler coolant. (See ENGINE COOLANT REPLACEMENT [SKYACTIV-X 2.0].)(See WATER-COOLED CHARGE AIR COOLER COOLANT REPLACEMENT [SKYACTIV-X 2.0].)
21. Start the engine and inspect and adjust the following:
am3zzw00035773
|
|
1
|
Cylinder head
|
|
2
|
Cylinder head gasket
|
Cylinder Head Gasket Installation Note
1. Completely remove any oil, dirt, and sealant adhering to the cylinder block.
2. Apply silicone sealant (TB1217D) to the areas shown in the figure.
am30jw00000474
|
3. Install the cylinder head gasket.
Cylinder Head Installation Note
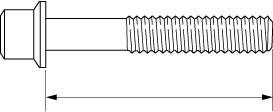
1. Measure the length of the cylinder head bolt.
am3zzw00036883
|
2. When a cylinder head bolt is reused, apply engine oil to any part of the following:
3. Completely remove any oil, dirt, and silicone sealant adhering to the cylinder block.
4. Apply silicone sealant (TB1217D) to the areas shown in the figure.
am30jw00000475
|
5. Set the cylinder head on the cylinder block.
6. Tighten the cylinder head bolts in 5 steps in the order shown in the figure.
am30jw00000476
|