CLUTCH RELEASE COLLAR INSPECTION [A26M-R (L3 Turbo)]


id0510008010c2

Caution
•  Secure the steering wheel using tape or a cable to prevent the steering shaft from rotating after disconnecting the steering shaft. If the steering wheel rotates after the steering shaft and the steering gear and linkage are disconnected, the internal parts of the clock spring could be damaged.
•  Cleaning the clutch release collar with cleaning fluids or a steam cleaner can
wash the grease out of the sealed bearing.

1.  Remove the battery cover. (See BATTERY REMOVAL/INSTALLATION [L3 Turbo].)

2.  Disconnect the negative battery cable. (See BATTERY REMOVAL/INSTALLATION [L3 Turbo].)

3.  Drain the engine coolant. (See ENGINE COOLANT REPLACEMENT [L3 Turbo].)

4.  Remove the PCM cover No.1. (See PCM REMOVAL/INSTALLATION [L3 Turbo].)

5.  Disconnect the PCM connector. (See PCM REMOVAL/INSTALLATION [L3 Turbo].)

6.  Remove the following parts:

(1)  Battery tray and PCM component (See BATTERY REMOVAL/INSTALLATION [L3 Turbo].)
(2)  Air cleaner component (See INTAKE-AIR SYSTEM REMOVAL/INSTALLATION [L3 Turbo].)
(3)  Charge air cooler cover (See INTAKE-AIR SYSTEM REMOVAL/INSTALLATION [L3 Turbo].)
(4)  Charge air cooler (See INTAKE-AIR SYSTEM REMOVAL/INSTALLATION [L3 Turbo].)
(5)  Front tires (See GENERAL PROCEDURES (SUSPENSION).)
(6)  Splash shield (See SPLASH SHIELD REMOVAL/INSTALLATION.)
(7)  Aerodynamic under cover No.2 (See AERODYNAMIC UNDER COVER NO.2 REMOVAL/INSTALLATION.)

7.  Remove the starter. (See STARTER REMOVAL/INSTALLATION [L3 Turbo].)

8.  Remove the front auto leveling sensor. (See AUTO LEVELING SENSOR REMOVAL/INSTALLATION.)

9.  Drain the transaxle oil into a suitable container. (See TRANSAXLE OIL REPLACEMENT [A26M-R].)

10.  Remove the manual transaxle. (See MANUAL TRANSAXLE REMOVAL/INSTALLATION [A26M-R (L3 Turbo)].)

11.  Remove the clutch release coller. (See CLUTCH UNIT REMOVAL/INSTALLATION [A26M-R (L3 Turbo)].)

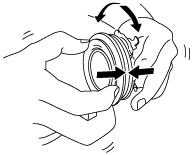
12.  Turn the collar while applying force in the axial direction.

adejjw00001005

•  If the collar sticks or has excessive resistance, replace the clutch release collar. (See CLUTCH UNIT REMOVAL/INSTALLATION [A26M-R (L3 Turbo)].)

13.  Install the clutch release collar.

14.  Install in the reverse order of removal.

15.  Perform the auto leveling system initialization. (See AUTO LEVELING SYSTEM INITIALIZATION.)

16.  Add the specified amount of specified transaxle oil. (See TRANSAXLE OIL REPLACEMENT [A26M-R].)

17.  Warm up the engine and transaxle, inspect for oil leakage, and inspect the transaxle operation.

Warning
•  Improperly jacking a transaxle is dangerous. It can slip off the jack and may cause serious injury.
Note
•  If the transaxle is overhauled and installed to the vehicle, perform the 'INSPECTION AFTER TRANSAXLE OVERHAUL' and verify that there is no abnormality. (See INSPECTION AFTER TRANSAXLE INSTALLATION [A26M-R].)