KEYLESS ANTENNA REMOVAL/INSTALLATION
id091400514900
Vehicle Interior, Glove compartment
Applied VIN (assumed):
• JMZ BLA2A60# 100001—132284
• JMZ BLA2G60# 100001—132284
• JMZ BL12Z20# 100001—132284
• JMZ BL12Y20# 100001—132284
• JMZ BL14Z20# 100001—132284
• JMZ BLA4360# 100001—132284
• JMZ BLA4F70# 100001—132284
• JMZ BLA4G60# 100001—132284
• JMZ BLA4C60# 100001—132284
• JMZ BLA4A60# 100001—132284
• JMZ BL14Y20# 100001—132284
• JM7 BL04F**# 100001—133678
• JMZ BLA2C60# 100001—132284
• JMZ BLA2F70# 100001—132284
• JMZ BL12Z50# 100001—132284
• JMZ BL12F70# 100001—132284
• JMZ BL12F60# 100001—132284
• JMZ BL14Z50# 100001—132284
• JMZ BL14F70# 100001—132284
• JMZ BL14F60# 100001—132284
• JM7 BL12Z**# 100001—133678
• JM7 BL22Z**# 100001—133678
• JM7 BL14Z**# 100001—133678
• JM7 BL24Z**# 100001—133678
• JM6 BL1051*0 100001—133678
• JM6 BL10Z1*0 100001—133678
• JM6 BL10F1*0 100001—133678
• JM6 BL1031*0 100001—133678
1. Disconnect the negative battery cable.
2. Remove the following parts:
- (1) Passenger-side front scuff plate (See FRONT SCUFF PLATE REMOVAL/INSTALLATION.)
- (2) Passenger-side front side trim (See FRONT SIDE TRIM REMOVAL/INSTALLATION.)
- (3) Grove compartment (See GLOVE COMPARTMENT REMOVAL/INSTALLATION.)
- (4) Passenger-side lower panel (See LOWER PANEL REMOVAL/INSTALLATION.)
3. Remove the fastener.
4. Disconnect the connector.
5. Remove the keyless antenna.
6. Install in the reverse order of removal.
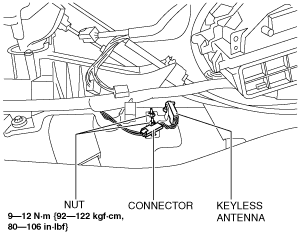
Vehicle Interior, Front
1. Disconnect the negative battery cable.
2. Remove the following parts:
- (1) Upper panel (See UPPER PANEL REMOVAL/INSTALLATION.)
- (2) Shift knob (MTX) (See MANUAL TRANSAXLE SHIFT MECHANISM REMOVAL/INSTALLATION.)
- (3) Selector lever knob (ATX/CVT) (See AUTOMATIC TRANSAXLE SHIFT MECHANISM REMOVAL/INSTALLATION.) (See CVT (CONTINUOUSLY VARIABLE TRANSAXLE) SHIFT MECHANISM REMOVAL/INSTALLATION.)
- (4) Shift panel (See SHIFT PANEL REMOVAL/INSTALLATION.)
- (5) Side wall (See SIDE WALL REMOVAL/INSTALLATION.)
- (6) Center panel (See CENTER PANEL REMOVAL/INSTALLATION.)
- (7) Audio unit (See AUDIO UNIT REMOVAL/INSTALLATION.)
- (8) Rear heat duct (1). (See REAR HEAT DUCT REMOVAL/INSTALLATION.)
3. Disconnect the connector.
4. Remove the nuts.
5. Remove the keyless antenna.
6. Install in the reverse order of removal.
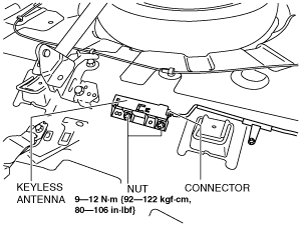
Vehicle Interior, Rear
1. Disconnect the negative battery cable.
2. Remove the rear seat cushion. (See REAR SEAT CUSHION REMOVAL/INSTALLATION.)
3. Disconnect the connector.
4. Remove the nuts.
5. Remove the keyless antenna.
6. Install in the reverse order of removal.
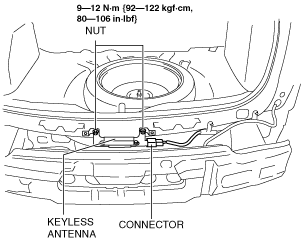
Vehicle Exterior, Rear
1. Disconnect the negative battery cable.
2. Remove the rear combination light. (See REAR COMBINATION LIGHT REMOVAL/INSTALLATION)
3. Remove the rear bumper. (See REAR BUMPER REMOVAL/INSTALLATION.)
4. Remove the nuts.
5. Disconnect the connector.
6. Remove the keyless antenna.
7. Install in the reverse order of removal.
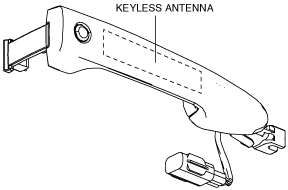
Vehicle Exterior, Driver's Door/Passenger's Door
-
Note
-